
An amortization schedule is a detailed breakdown of each loan payment over time, showing how much of each payment goes towards the interest and how much pays down the principal. If you want to plan for a mortgage, car loan, or any other type of debt, creating your own amortization schedule can help you clearly understand your repayment journey. This guide will help you create an easy-to-follow amortization schedule in Excel.
Templates

Make the Amortization Schedule in Excel
Gather Key Information About Your Loan –
Before getting started with the Excel, it’s important to have all the necessary details about your loan. This information will form the basis for all your calculations, so make sure everything is accurate. Knowing your loan details will help you understand how much you need to pay, how long it will take, and how much interest you will pay over time.
- Loan Amount (Principal)
- Interest Rate (Annual percentage rate or APR)
- Loan Term (Length of the loan, in years)
- Payment Frequency (e.g., 12 for monthly)

Set Up Your Excel Spreadsheet –
Setting up the Excel spreadsheet correctly is essential for organizing and automating your calculations. This will help you track your loan payments and monitor how your loan balance changes over time.
- Start by opening a blank Excel spreadsheet.
- In row 13, label the columns as follows:
B13: “Payment Number”
C13: “Payment Date”
D13: “Payment Amount”
E13: “Interest Paid”
F13: “Principal Paid”
G13: “Remaining Balance”
By labeling your columns on the 13th row, you can adjust the important information gathered in step one in the rows above. This will help you easily organize the data for calculations and reference.

Enter Your Loan Information –
Start by labeling the rows for the key loan details gathered in step one to keep everything organized. By inputting your loan details, you can then use Excel’s capabilities to automate and calculate your payments. These inputs are the foundation of your amortization schedule.
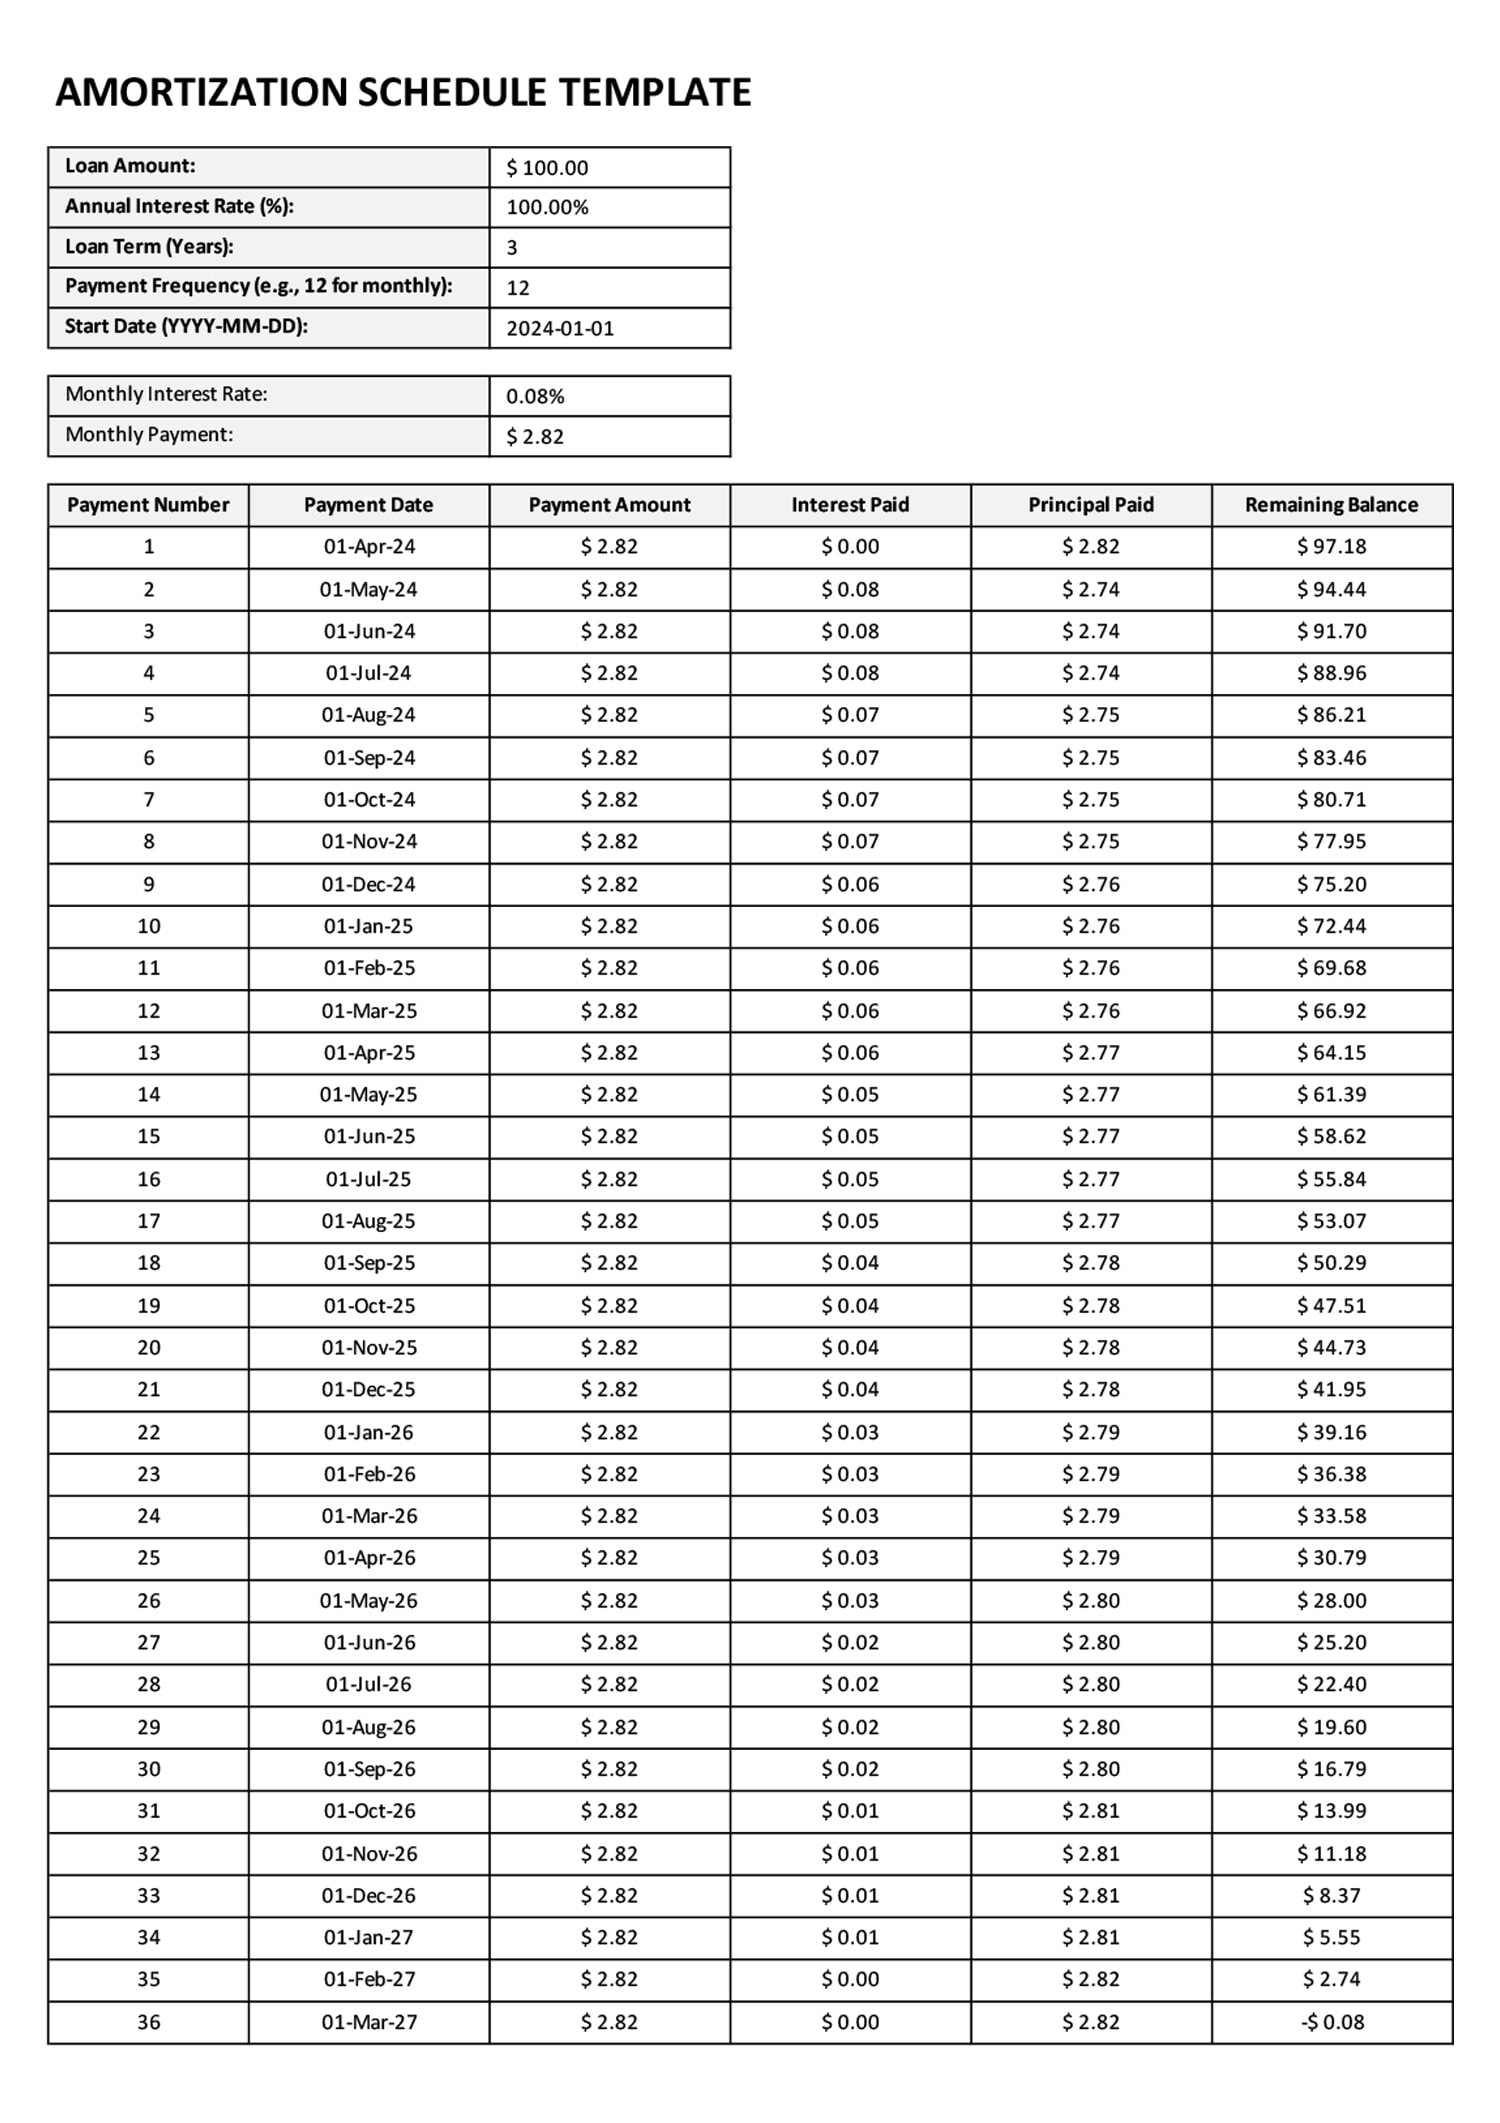
- Enter the Loan Amount: In cell D4, enter the total amount of the loan (e.g., $100). This is the principal amount that you are borrowing and will be repaying over time.
- Enter the Interest Rate: In cell D5, enter the annual interest rate as a percentage (e.g., 1%). The interest rate determines how much you will pay in addition to the principal and is crucial for calculating each payment’s interest portion.
- Enter the Loan Term: In cell D6, enter the loan term in years (e.g., 3). The loan term is the length of time you have to repay the loan, which will affect your monthly payment amounts.
- Enter the Payment Frequency: In cell D7, enter the number of payments per year (e.g., 12 for monthly payments).
- Enter the Start Date: In cell D8, enter the start date of your loan (e.g., 2024-01-01). The start date is important for tracking when each payment is due, allowing you to visualize your payment timeline.

Calculate Key Values –
Now that you have entered the basic loan details, it’s time to use these details to calculate key values. These calculations will help you determine the amount you need to pay each month and understand how much goes to interest versus principal.
- Calculate the Monthly Interest Rate: In cell D10, enter the formula to calculate the monthly interest rate:
=D4/D6/100. This converts the annual interest rate into a monthly rate, which is necessary since most loan payments are made monthly. - Calculate the Monthly Payment: In cell D11, use the PMT function to calculate the monthly payment. Enter the formula as follows:
=PMT(D9, D5*D6, -D3)This formula will give you the monthly payment amount. Calculating the monthly payment upfront helps you know exactly how much you need to budget each month for your loan repayment.

Fill In the Amortization Table –
After calculating the key values, you can start building out the amortization schedule. This is where you will see how much of each payment goes towards interest and how much reduces the principal, giving you a clear picture of how your debt will decrease over time.
- Payment Number (Column B): Start with payment number 1 in cell B14 and drag downwards to fill in all payment numbers up to the total number of payments (e.g., 1 to 36 for a 3-year loan with monthly payments). The payment number helps you track each individual installment.
- Payment Date (Column C): Payment Date (Column C): In cell C14, use the formula
=DATE(YEAR($D$8),MONTH($D$8)+ROW()-11,DAY($D$8))to automatically generate each payment date based on the loan start date. This formula calculates the payment date by using theYEAR,MONTH, andDAYfunctions to extract parts of the start date, then adjusts the month by the row offset to generate consecutive dates. In cell C15, use the formula=C14+1to add a month for each payment. Drag this formula down to fill in all payment dates. - Payment Amount (Column D): Copy the monthly payment amount from D10 down the entire column. This step ensures consistency in the payments throughout the schedule.
- Interest Paid (Column E): In cell E13, enter the formula to calculate the interest paid:
=F12*D9. This formula will calculate the interest portion of the payment. - Principal Paid (Column F): In cell F13, enter the formula to calculate the principal paid:
=C13-D13. This formula will determine how much of each payment goes towards the principal. - Remaining Balance (Column G): In cell G13, enter the formula to calculate the new remaining balance:
=F12-E13. Drag this formula down to update the remaining balance after each payment.

Autofill the Formulas –
Excel’s autofill feature can save you a lot of time and effort. By using autofill, you ensure that all rows in your amortization schedule are calculated accurately.
- Select the Cells: Click on the cells with the formulas in columns D, E, and F.
- Drag Downwards: Drag downwards to copy the formulas to the remaining rows.

Change Cell Formats –
Changing the cell formats can make your schedule easier to read and manage. This includes adjusting currency, percentage, and date formats to ensure clarity.
- Currency Format: Select the cells with monetary values, such as loan amount, payment amount, interest paid, principal paid, and remaining balance. Right-click, select ‘Format Cells,’ and choose ‘Currency’ to make the values easier to understand.
- Percentage Format: For cells that contain interest rates, select them and format them as percentages. This makes it clear that these values represent interest rates.
- Date Format: Ensure that the payment dates are in a consistent and recognizable date format. Highlight the date cells, right-click, select ‘Format Cells,’ and choose the desired date format.

Review the Amortization Schedule –
Finally, it is important to review the entire amortization schedule once all data has been filled in. This will help you verify that everything is correct and that you have an accurate understanding of your repayment plan.
- How much interest you will pay each month. Understanding the interest component will help you see the true cost of borrowing.
- How much principal you will pay each month. Seeing the principal portion will help you understand how quickly you are reducing your debt.
- How your loan balance will change over time. Watching the loan balance decrease will show the progress you are making towards becoming debt-free.
Tips
- Use Online Calculators: If spreadsheets seem too complicated, you can also use free online amortization schedule calculators that only require you to enter basic loan information.
- Adjust for Extra Payments: If you plan to make additional payments, you can add those to your schedule to see how they impact the interest and principal.
- Save for Reference: Select the last row and drag down if you require more rows to cover your payments until the remaining balance reaches zero.
Important
- If your loan has a variable interest rate, this amortization schedule will need to be updated whenever the rate changes.
- If you make extra payments, make sure to update your amortization schedule. Extra payments can reduce the remaining principal faster, so failing to reflect this change will result in inaccuracies.
- Make sure that the payment frequency you set in the schedule matches your loan terms. If your payment frequency changes, you need to update your schedule to maintain accuracy.
FAQs
Yes! You can use an amortization schedule for most types of loans, such as mortgages, car loans, student loans, and personal loans.
Making extra payments reduces the principal balance, which in turn reduces the future interest payments. This can help you pay off the loan faster and save money on interest.


