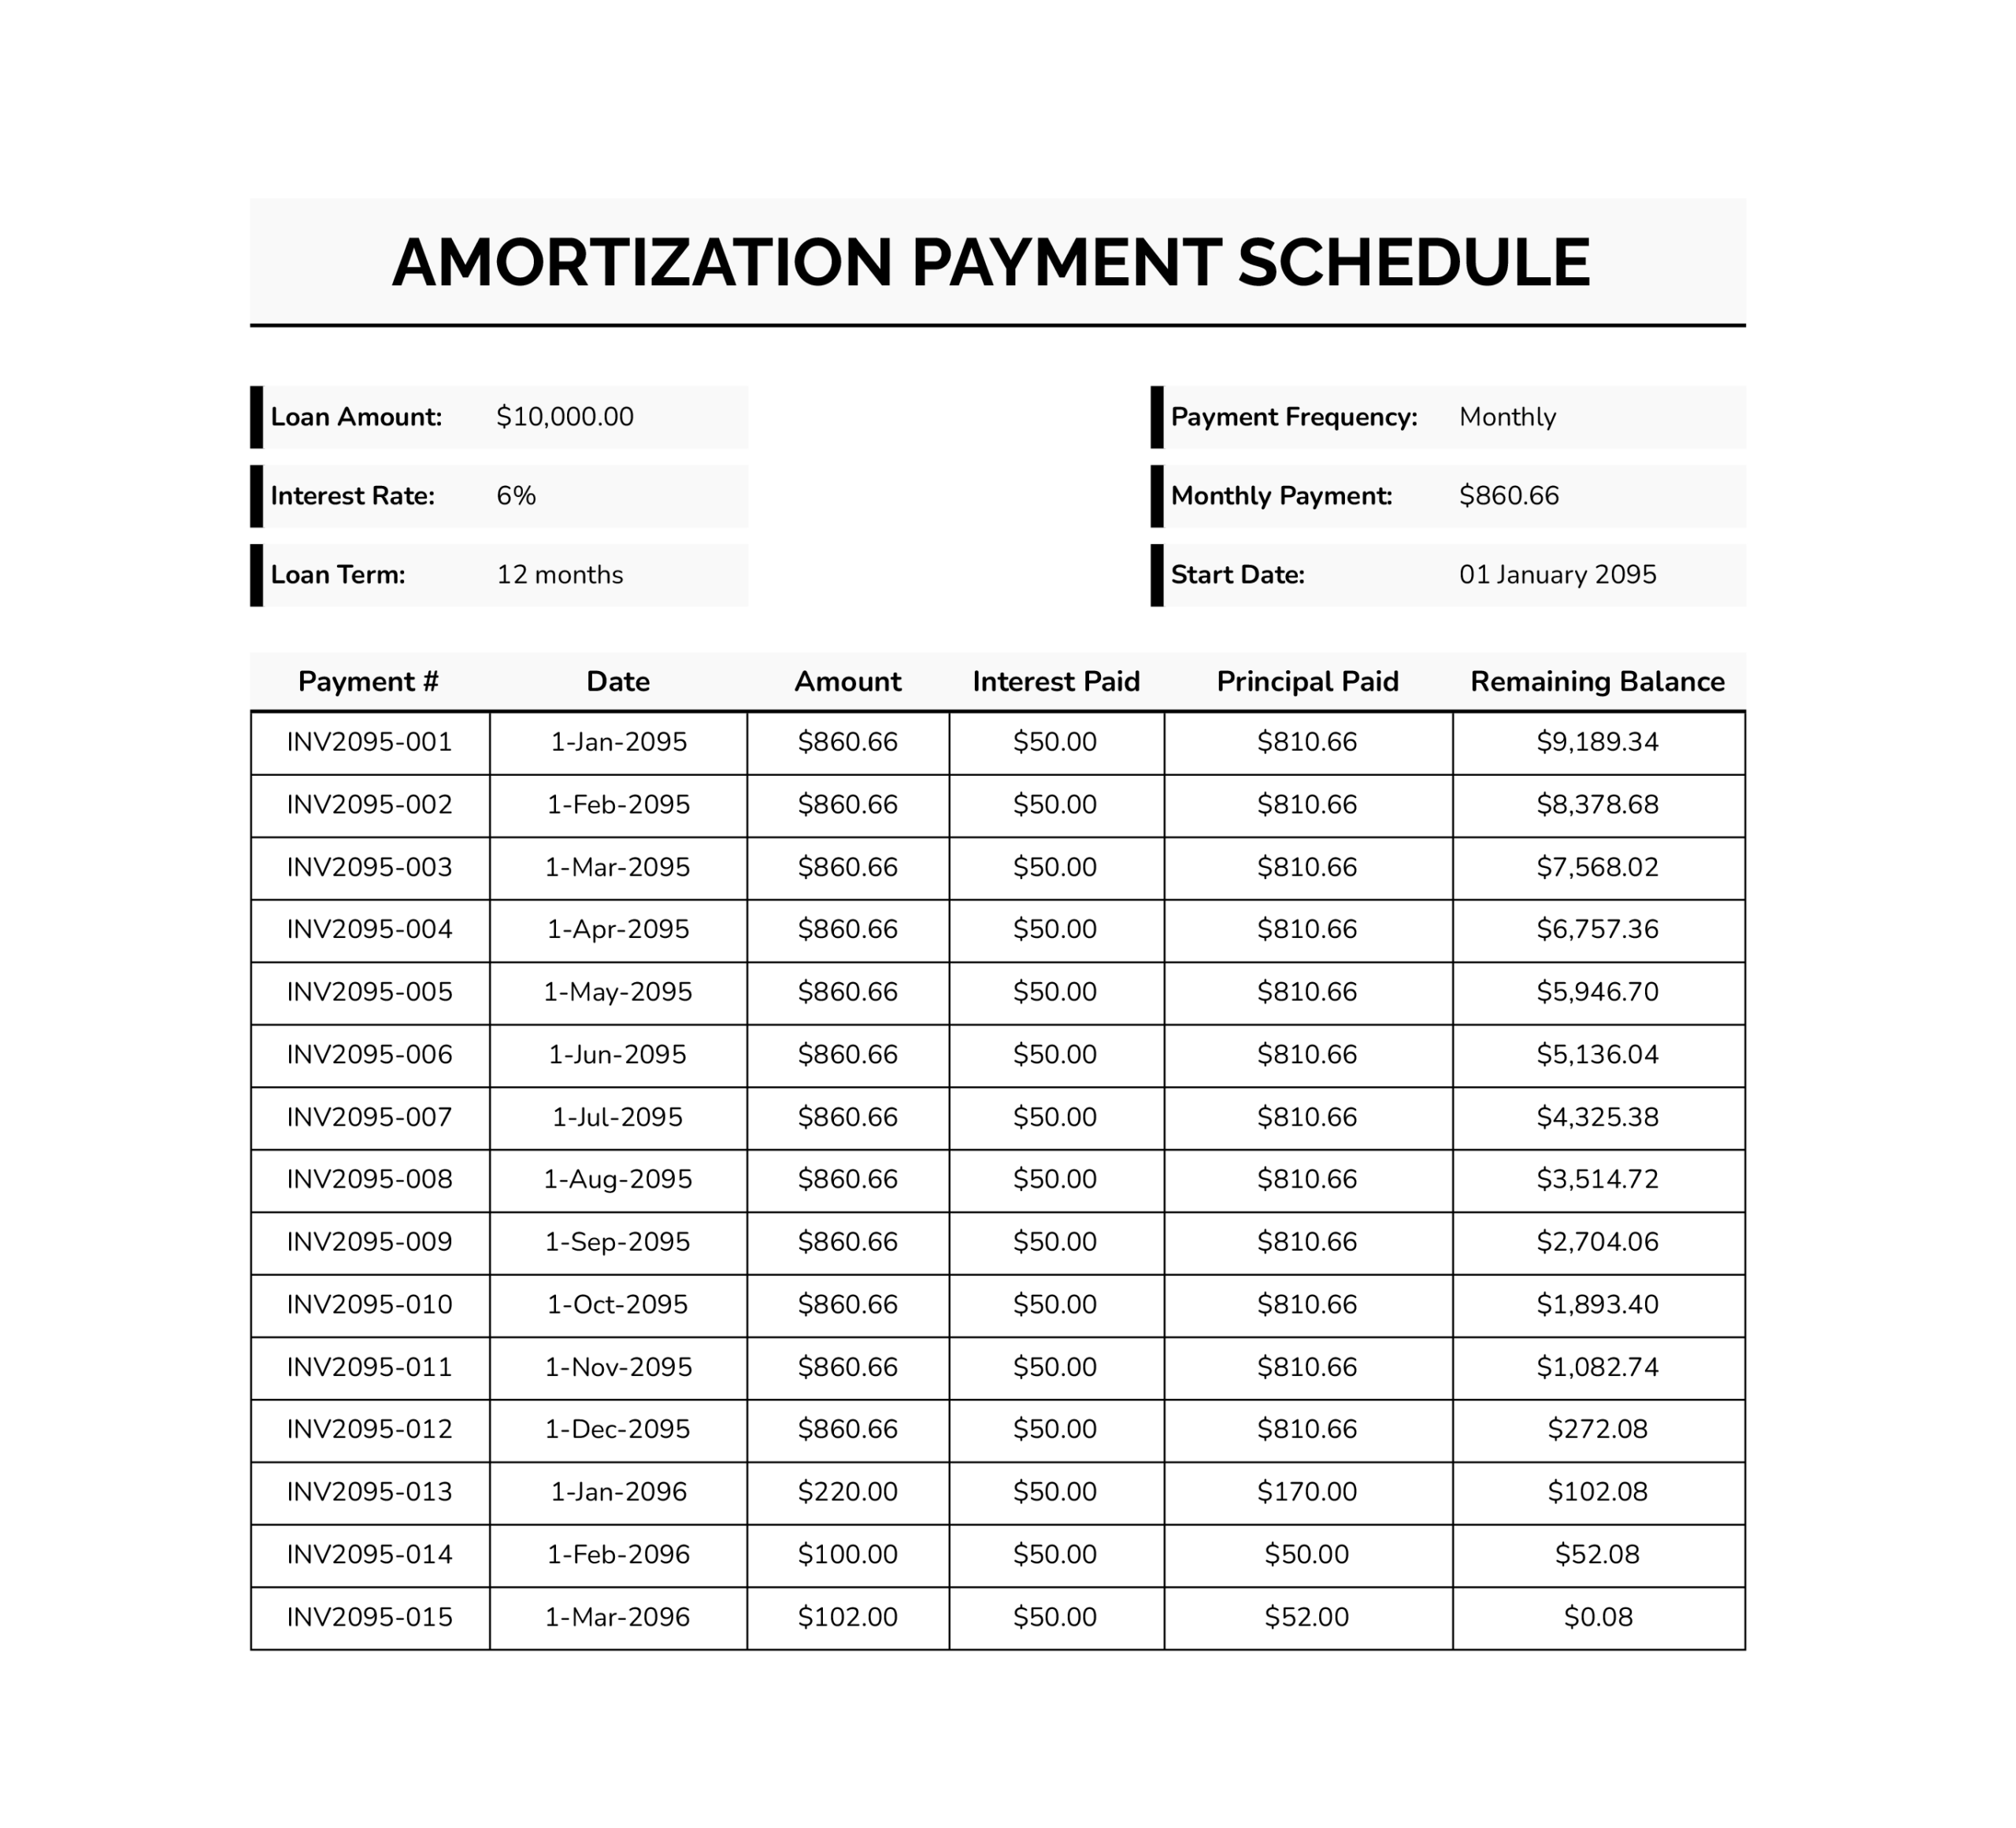
An amortization schedule is a payment-by-payment table for a loan. It shows each due date, the payment amount, how much of that payment goes to interest, how much goes to principal, and how the remaining balance changes after every payment. Early payments usually apply more toward interest because the balance is still higher. As the balance drops, the interest portion declines and more of each payment applies to principal.
This loan amortization schedule template is designed to turn your loan terms into that table automatically. You enter a few inputs in the top section, then the sheet calculates the scheduled payment, builds the schedule, and totals interest so you can understand the long-term cost of the loan. It also includes an extra payment input so you can model paying more than the standard amount and see how that changes the payoff timeline and total interest.
Why You Might Use This Template
You can use this sheet when you want a detailed view of a loan beyond the monthly payment amount. It is useful for comparing loan terms, checking the long-term cost of interest, planning extra payments, or keeping your own payoff record alongside lender statements. Extra payments often reduce total interest and shorten the term because they reduce the balance that future interest is calculated on.
How to Use This Loan Amortization Schedule Template
To use this template well, treat it like a setup and verification process. Start by replacing the sample loan terms, then confirm the scheduled payment and the first one or two payment rows look reasonable for your loan. After that, you can enter an extra payment amount and compare payoff outcomes by saving separate scenario copies.
Enter Your Loan Terms in Loan Information
Replace the sample values in the Loan Information box.
- Loan amount: is the starting principal balance you owe.
- Annual interest rate: should be entered in the same format shown in the cell, such as 22% if the cell displays a percent style.
- Loan period in years: is the term you agreed to.
- Number of payments per year: should match your payment rhythm, such as 12 for monthly.
- Start date of loan: is the date the schedule uses to generate the payment timeline.
In this template, the Date of Payment column is set up for a monthly sequence. If your loan is weekly, biweekly, or semi-monthly, you can adjust the date logic so the dates match your cadence.
You can do this by updating the first date cell in the schedule under Date of Payment, then filling the formula down. In this sheet, the first payment date is in cell D9, and the installment number for each row is in column B. The Date of Payment column begins in column C, starting in row 12.
Use one of the formulas below in cell C12, then fill down.
Monthly
=EDATE($D$9, B12-1)
Weekly
=$D$9 + 7*(B12-1)Biweekly
=$D$9 + 14*(B12-1)Semi-monthly on the 1st and 15th
Set Start date of loan in D9 to the 1st of the first month you want to schedule. Then use
=DATE(
  YEAR(EDATE($D$9, INT((B12-1)/2))),
  MONTH(EDATE($D$9, INT((B12-1)/2))),
  IF(MOD(B12,2)=1, 1, 15)
)
Semi-monthly on the 15th and month-end
Set Start date of loan in D9 to the 15th of the first month you want to schedule. Then use
=IF(
  MOD(B12,2)=1,
  DATE(YEAR(EDATE($D$9, INT((B12-1)/2))), MONTH(EDATE($D$9, INT((B12-1)/2))), 15),
  EOMONTH($D$9, INT((B12-1)/2))
)
After filling the formula down, look at the first four or five dates to confirm the pattern matches your real due dates. When the date pattern and number of payments per year match, the schedule is easier to read and the timeline aligns with your plan.
Confirm the Summary Before You Read the Full Table
The Payment Overview panel is your first checkpoint. Review it right after entering your loan terms.
Focus on the scheduled payment first. If the scheduled payment looks off, do not scroll down and try to interpret the schedule yet. Go back to Loan Information and re-check that the interest rate format and the payment frequency match your loan terms.
Next, look at the totals and counts shown in the overview. This area is meant to give you a quick way to confirm that the sheet is interpreting the term and frequency in the way you intended before you use the table for decisions.
If your lender payment includes items beyond principal and interest, such as escrow for taxes or insurance, keep that separate from this schedule. This sheet is designed to focus on the loan math itself, so mixing in non-loan charges can make the principal and interest breakdown misleading.
Add an Extra Payment Amount
Use the Extra Payments input when you want to model paying more than the scheduled amount each period. The schedule reflects that value in the Additional Payment column and updates the table as the balance declines. Extra payments are commonly used to reduce total interest and reach a zero balance sooner because the principal is reduced faster.
Real-world payoff results depend on how your lender applies extra funds. Some lenders apply extra money directly to principal, while others may treat it differently unless you specify principal-only application. When you use this sheet for payoff planning, confirm your lender’s policy so your estimate lines up with real posting rules.
Read the Payment Schedule Table
Each row in the table represents one installment. The columns are set up so you can answer the questions people usually have when they look at a loan over time.
- Installment No: identifies the sequence of payments.
- Date of Payment: shows the planned payment date based on the start date and the schedule pattern.
- Opening Balance: is the balance before that payment is applied.
- Standard Payment: is the scheduled payment amount used for the row.
- Additional Payment: reflects the extra payment amount tied to the Extra Payments input.
- Total Amount Paid: is the combined amount paid for that row.
- Interest Charge: is the interest portion calculated for that period.
- Principal Payment: is the amount reducing the balance after interest is accounted for.
- Remaining Balance: is what you still owe after the payment.
- Interest Accumulated: shows total interest across the schedule up to that row.
A practical way to use the table is to scan down the Remaining Balance column and note the point where it reaches zero. That row is your payoff point under the current settings. After payoff, the template continues listing rows, and you may see zeros in the payment and balance fields. That behavior keeps the table length stable while still showing that the loan is fully paid.
If you are comparing scenarios, focus on two numbers. Use the final payoff row to compare the payoff date, and use the total interest figure to compare the interest cost across versions.
Compare Scenarios Without Overwriting Your Baseline
If you want to test different payoff plans, keep one version as your baseline with Extra Payments set to zero. Then make a copy for each scenario and change only the extra payment amount. This keeps your comparisons simple, because every scenario starts from the same loan inputs and only one variable changes.
If you want to track real payments, keep the calculation area intact and add your own tracking fields beside the table.
- Actual payment date for what you really paid and when.
- Actual amount paid if payments vary.
- Notes for fee reversals, skipped payments, or principal-only payments.
When Matching the Schedule to a Lender Statement
This template is designed around a standard amortization view. Some differences between the table and a lender statement can still happen, even when your inputs are correct.
Daily-interest methods, payment posting cutoffs, and due-date shifts for weekends or holidays can change the exact interest amount shown on a given statement line. When accuracy matters for a specific month, use the schedule as the plan and the lender statement as the final record.
Try the On-Page Amortization Calculator
Use the on-page loan amortization schedule calculator below to generate an amortization schedule before you edit the loan amortization schedule template spreadsheet. It creates a full loan payment schedule with an interest and principal breakdown for each installment, plus a running remaining balance and projected payoff date. This is useful when you want a quick estimate for a mortgage, auto loan, personal loan, student loan, or refinance scenario, then move the same numbers into the spreadsheet for deeper tracking.
Enter your terms, generate the schedule, then review the summary and the table. If you are comparing options, save scenarios so you can switch between them and see how the payment amount, total interest, and payoff date change.
- Loan amount, annual interest rate, and loan term in years. These values drive the core amortization math and the total number of installments.
- Payments per year and date pattern. Pick a frequency such as monthly, biweekly, weekly, or semi-monthly so the schedule follows the timing you plan to pay.
- Start date. Sets the first payment date shown in the table and builds the date series that follows.
- Extra payment each period. Adds an additional amount to every installment so you can see the impact on principal reduction, total interest, and payoff timing.
- One-time lump sum at an installment number. Applies a single extra payment on the exact installment you choose, which is useful for bonuses, tax refunds, or a planned principal-only payment.
- Payment override. Use this when your lender assigns a fixed payment amount you want the schedule to follow, even if it differs from the calculated payment.
After you generate the table, use Download CSV for a copy you can save or send, and use Print to print only the generated output. Saved scenarios stay available in the same browser so you can compare baseline vs extra payments without re-entering every input.


The on-page amortization calculator builds payment dates based on the selected date pattern. If your lender uses a different due-date rule, adjust the date pattern or the date logic before comparing against a lender statement. Small differences in posting rules and rounding can change the interest shown for a specific period, so treat the schedule as the plan and the statement as the final record for that month.
FAQs
Interest is calculated based on the outstanding balance. Early in the loan, the balance is larger, so the interest charge for each period is larger. As payments reduce the principal, the balance drops, and the interest portion declines. The principal portion grows over time because less of each payment is needed to cover interest.
Locate the first row where Remaining Balance reaches zero. The Date of Payment in that row is the payoff date under the current loan terms and extra payment amount. If the table continues with rows showing zero balances afterward, use the first zero-balance row as your payoff point.
Create two copies of the template. Keep all loan inputs the same in both copies and change only the Extra Payments value. Then compare the payoff row and the total interest figure. This avoids confusion that can happen when you change multiple inputs at the same time.
This template applies one extra payment value across the schedule. For occasional extra payments, use a phase approach. Set Extra Payments to your planned value, note the balance after the period you plan to pay extra, then continue in a new copy using that balance and the remaining term assumptions. This gives a closer estimate than leaving a single extra payment value in place for the entire schedule.