


Construction payments rarely follow one clean path. Deposits, progress billing, change orders, retainage, and approvals can overlap, and that is when it becomes harder to see what is still outstanding, what has already cleared, and what balance remains with each contractor.
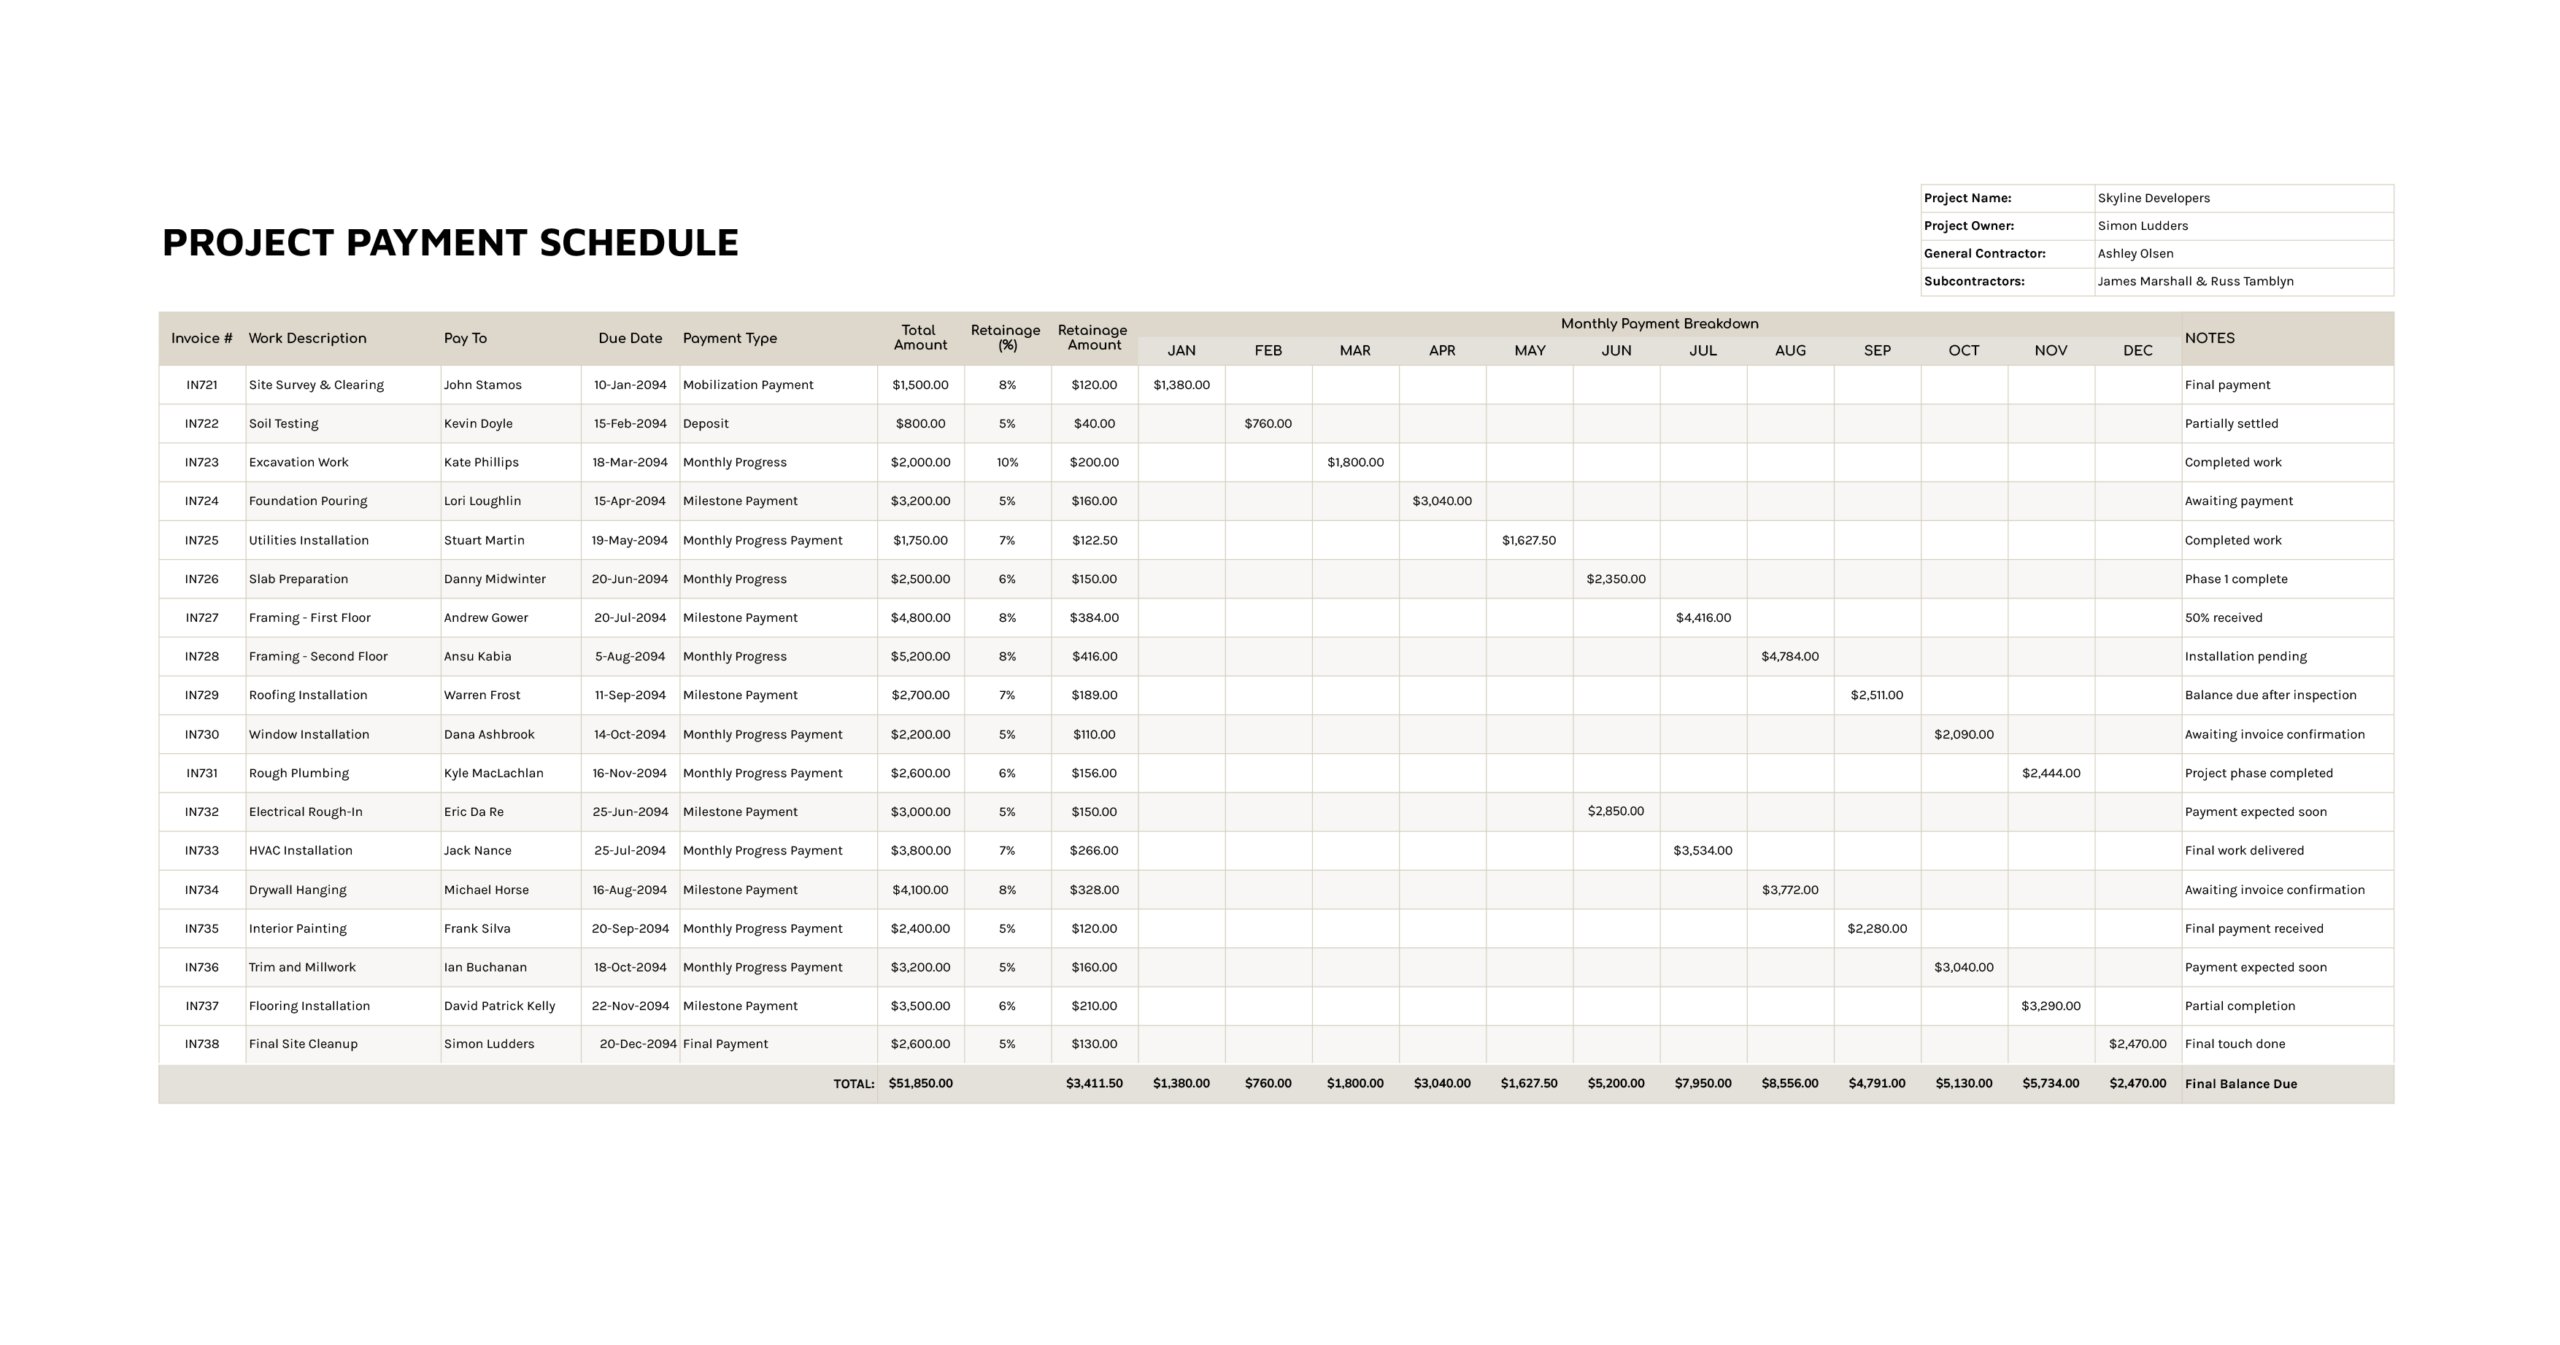
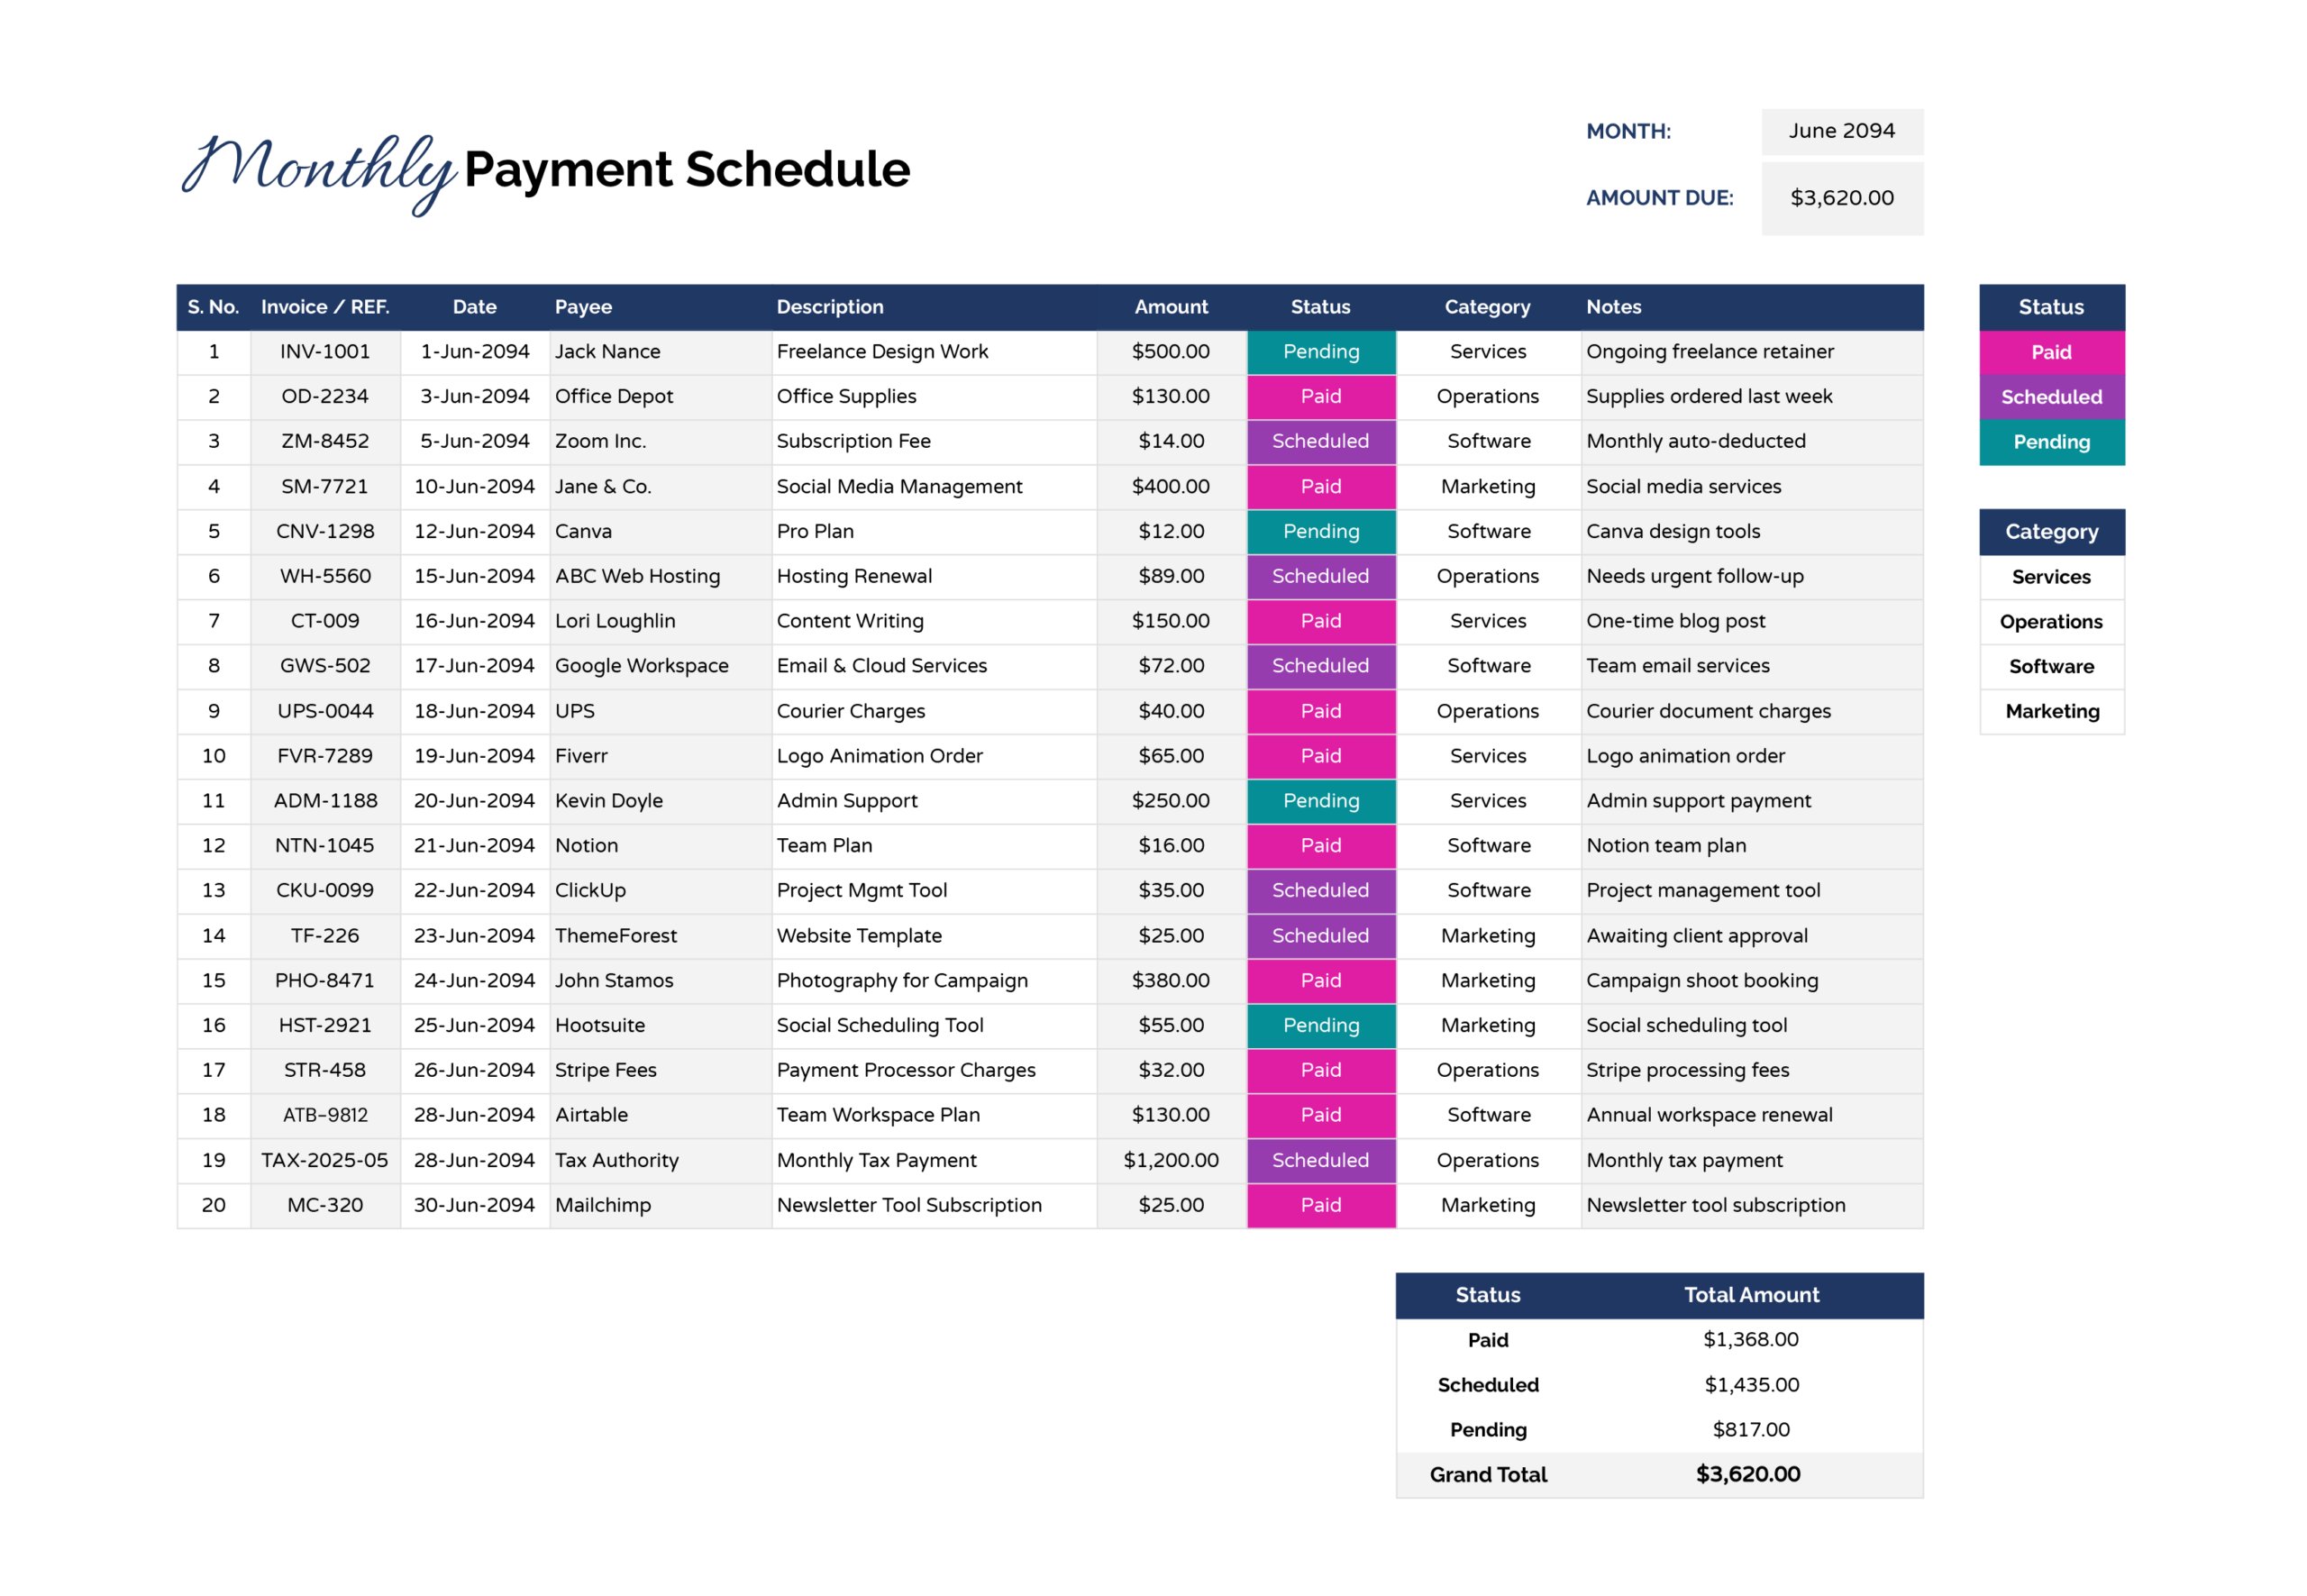
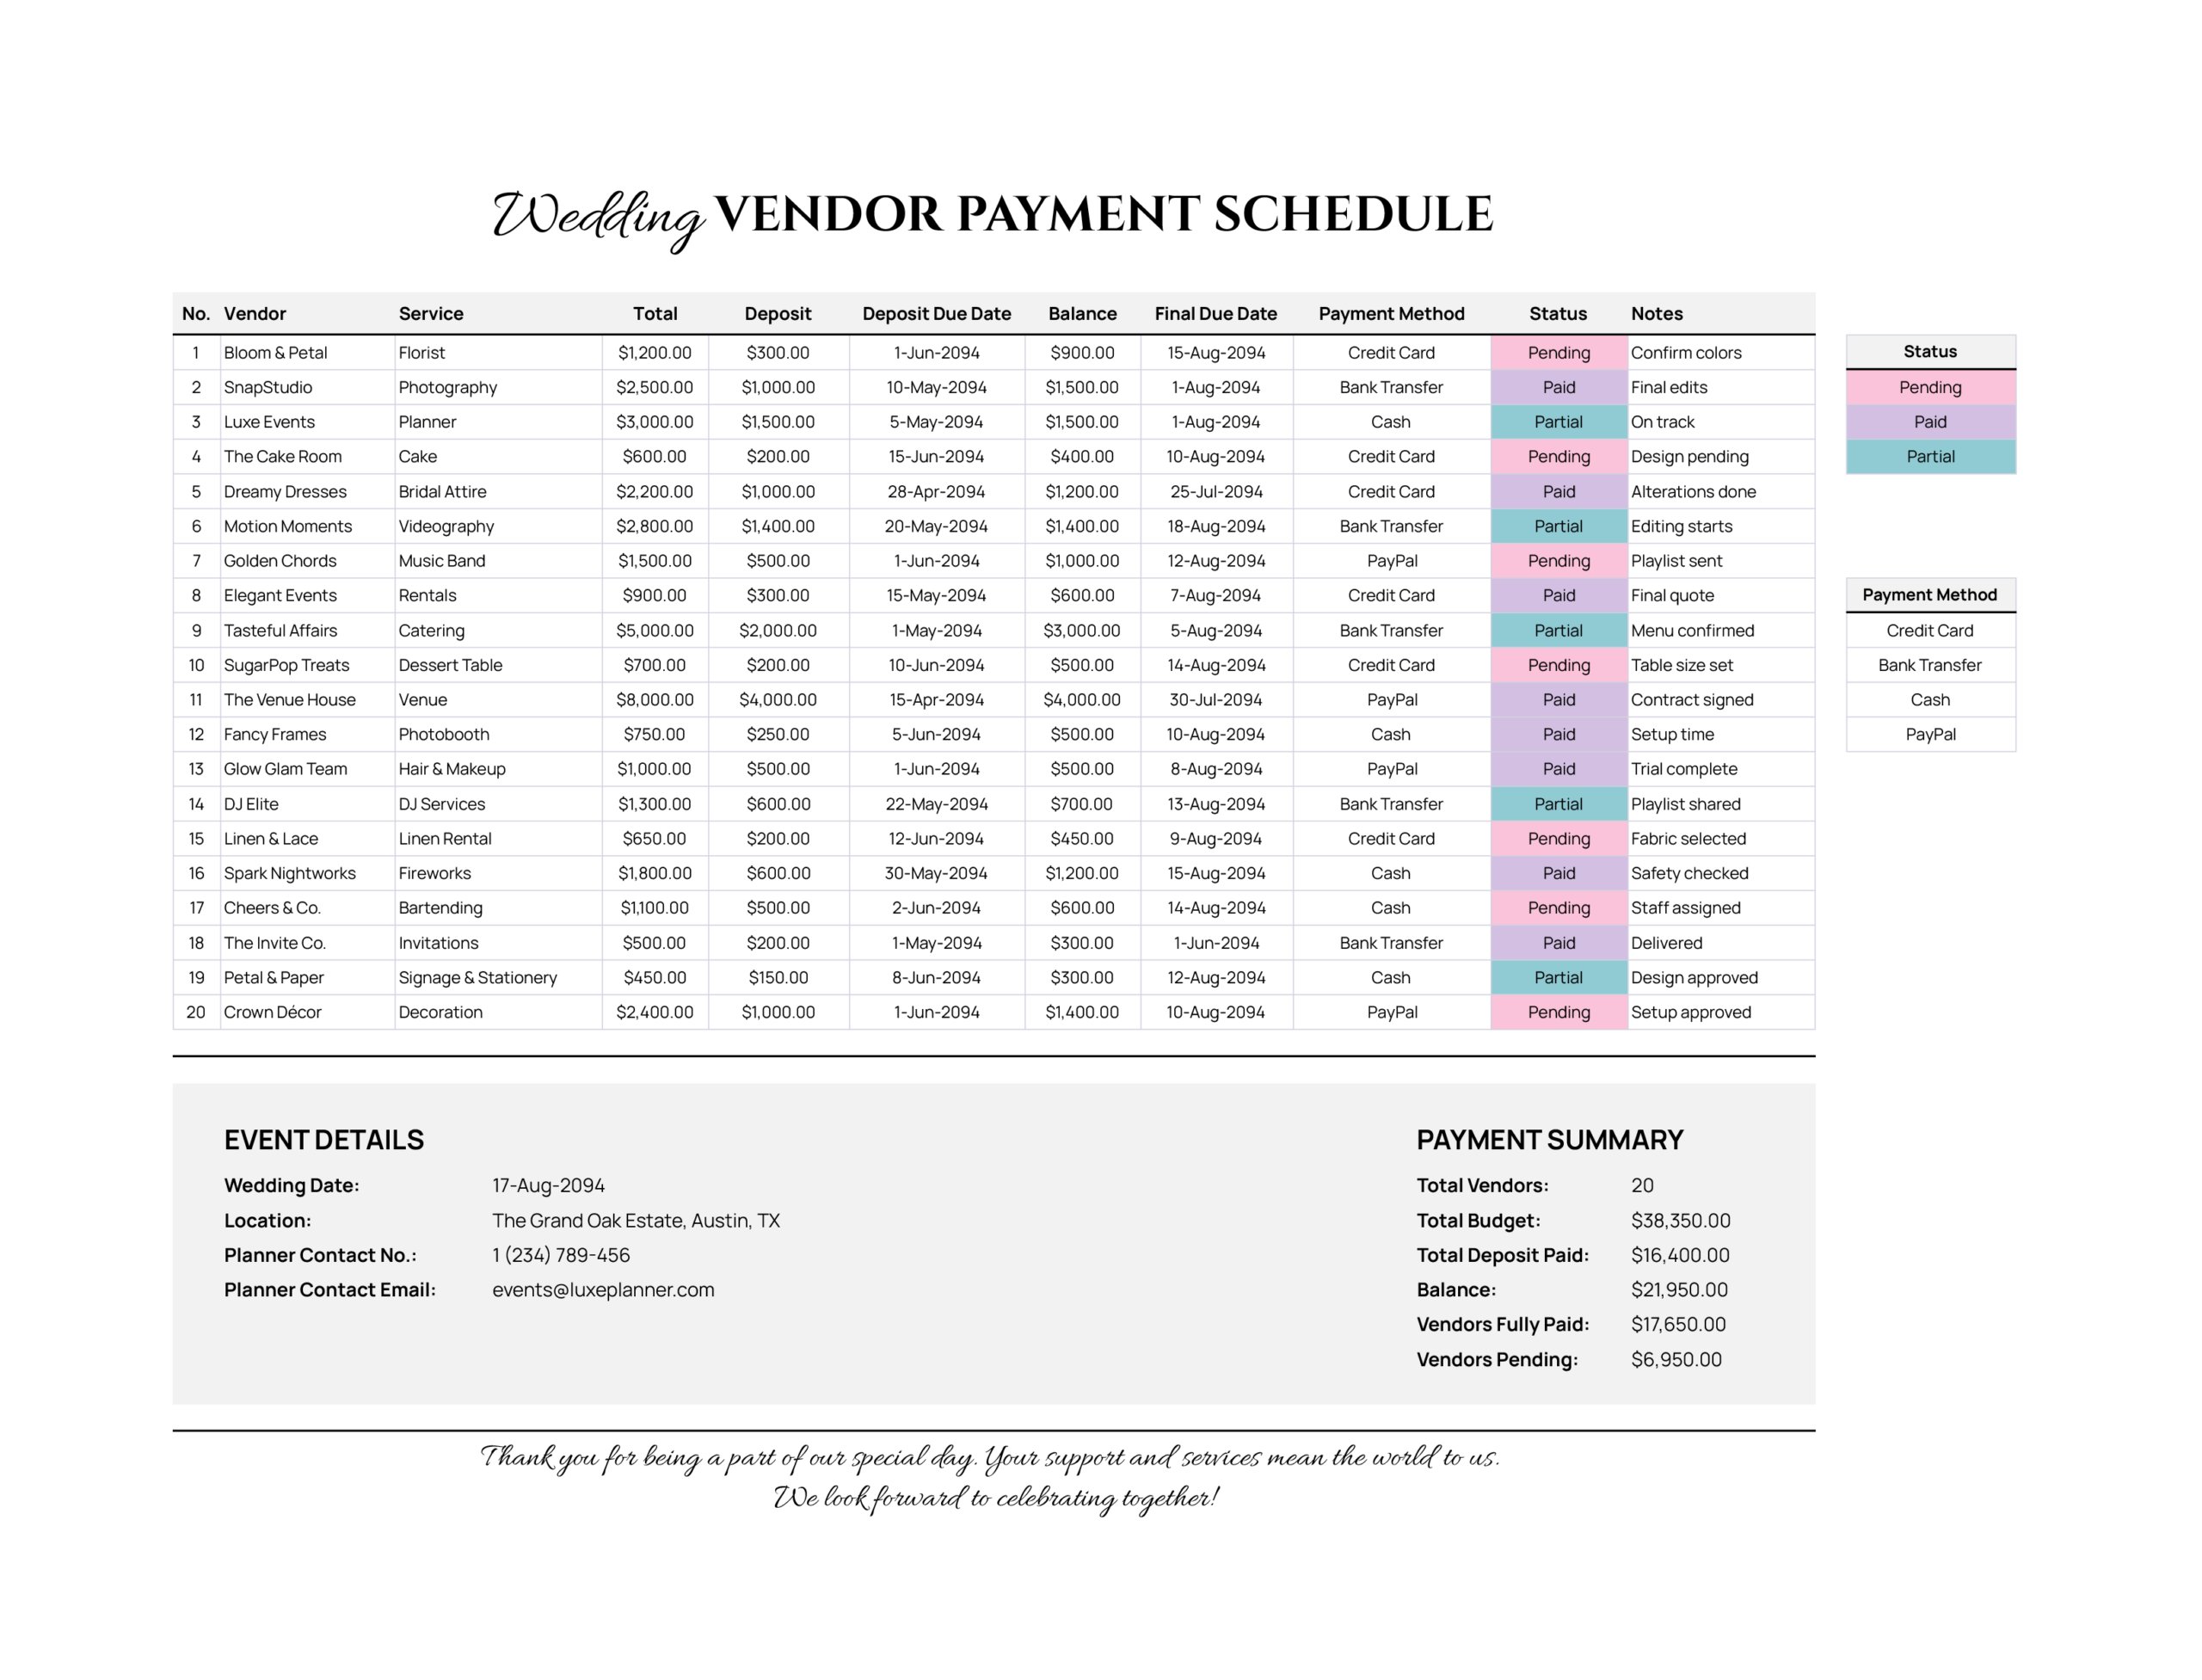
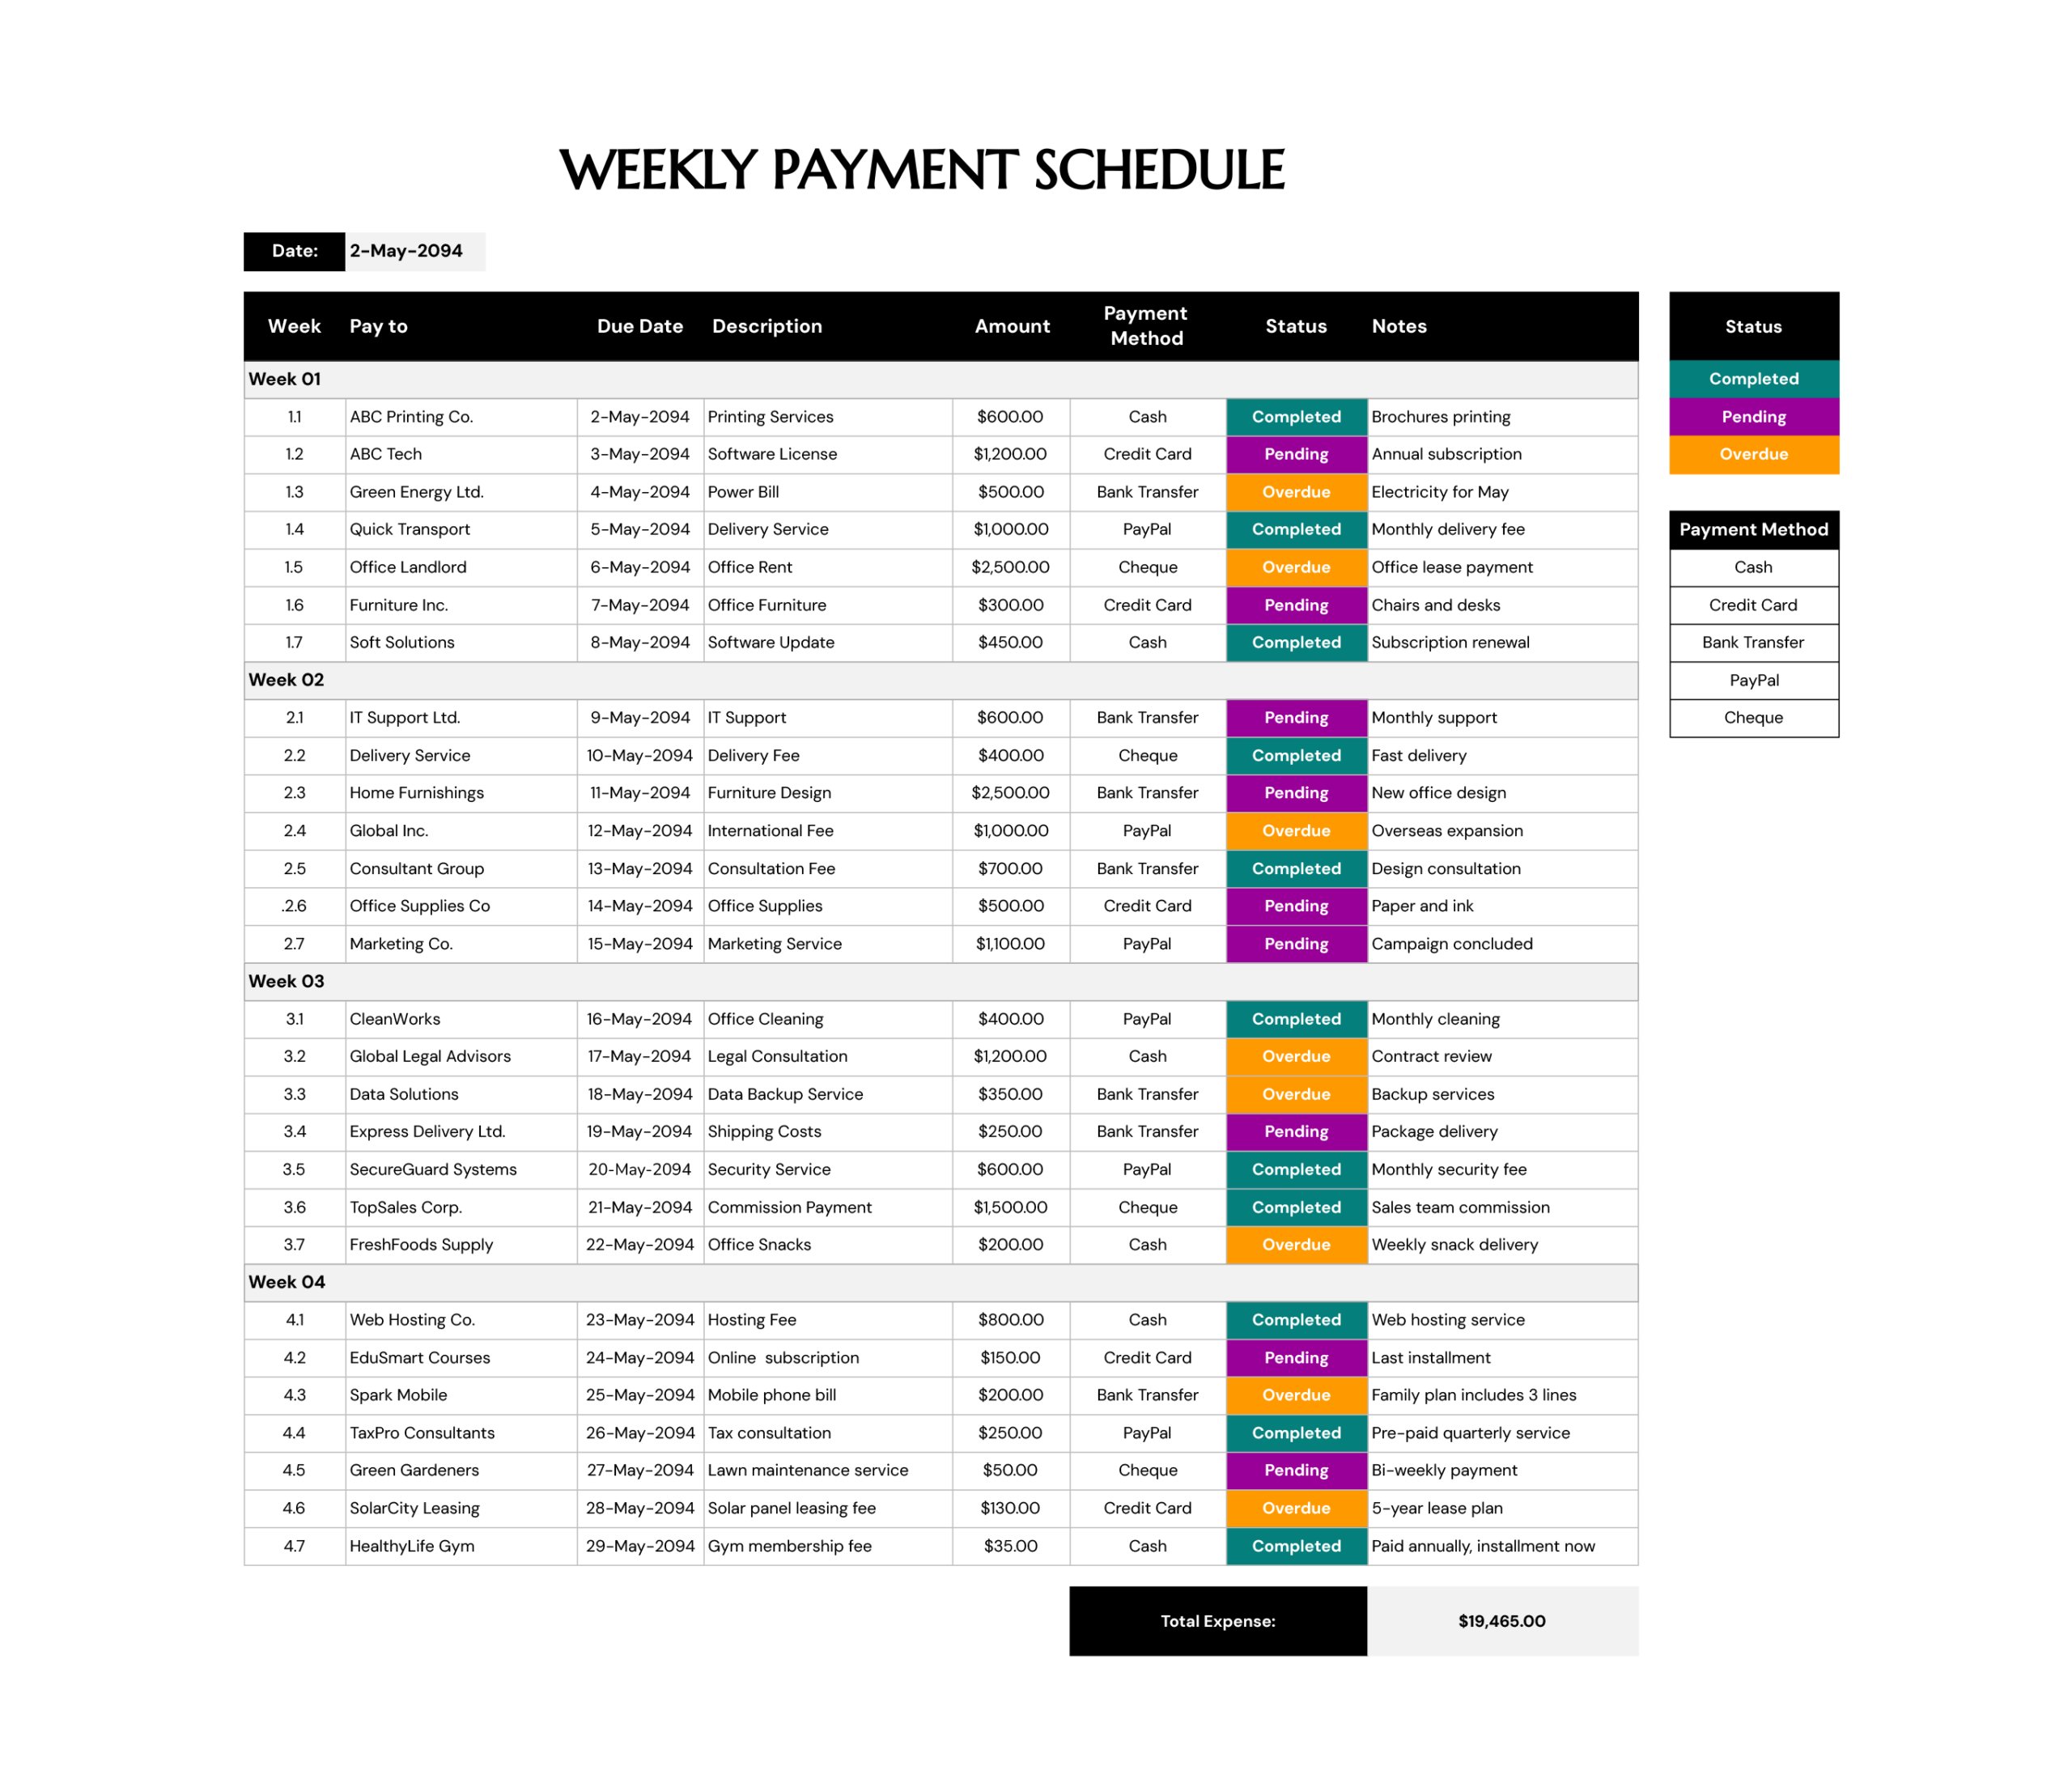
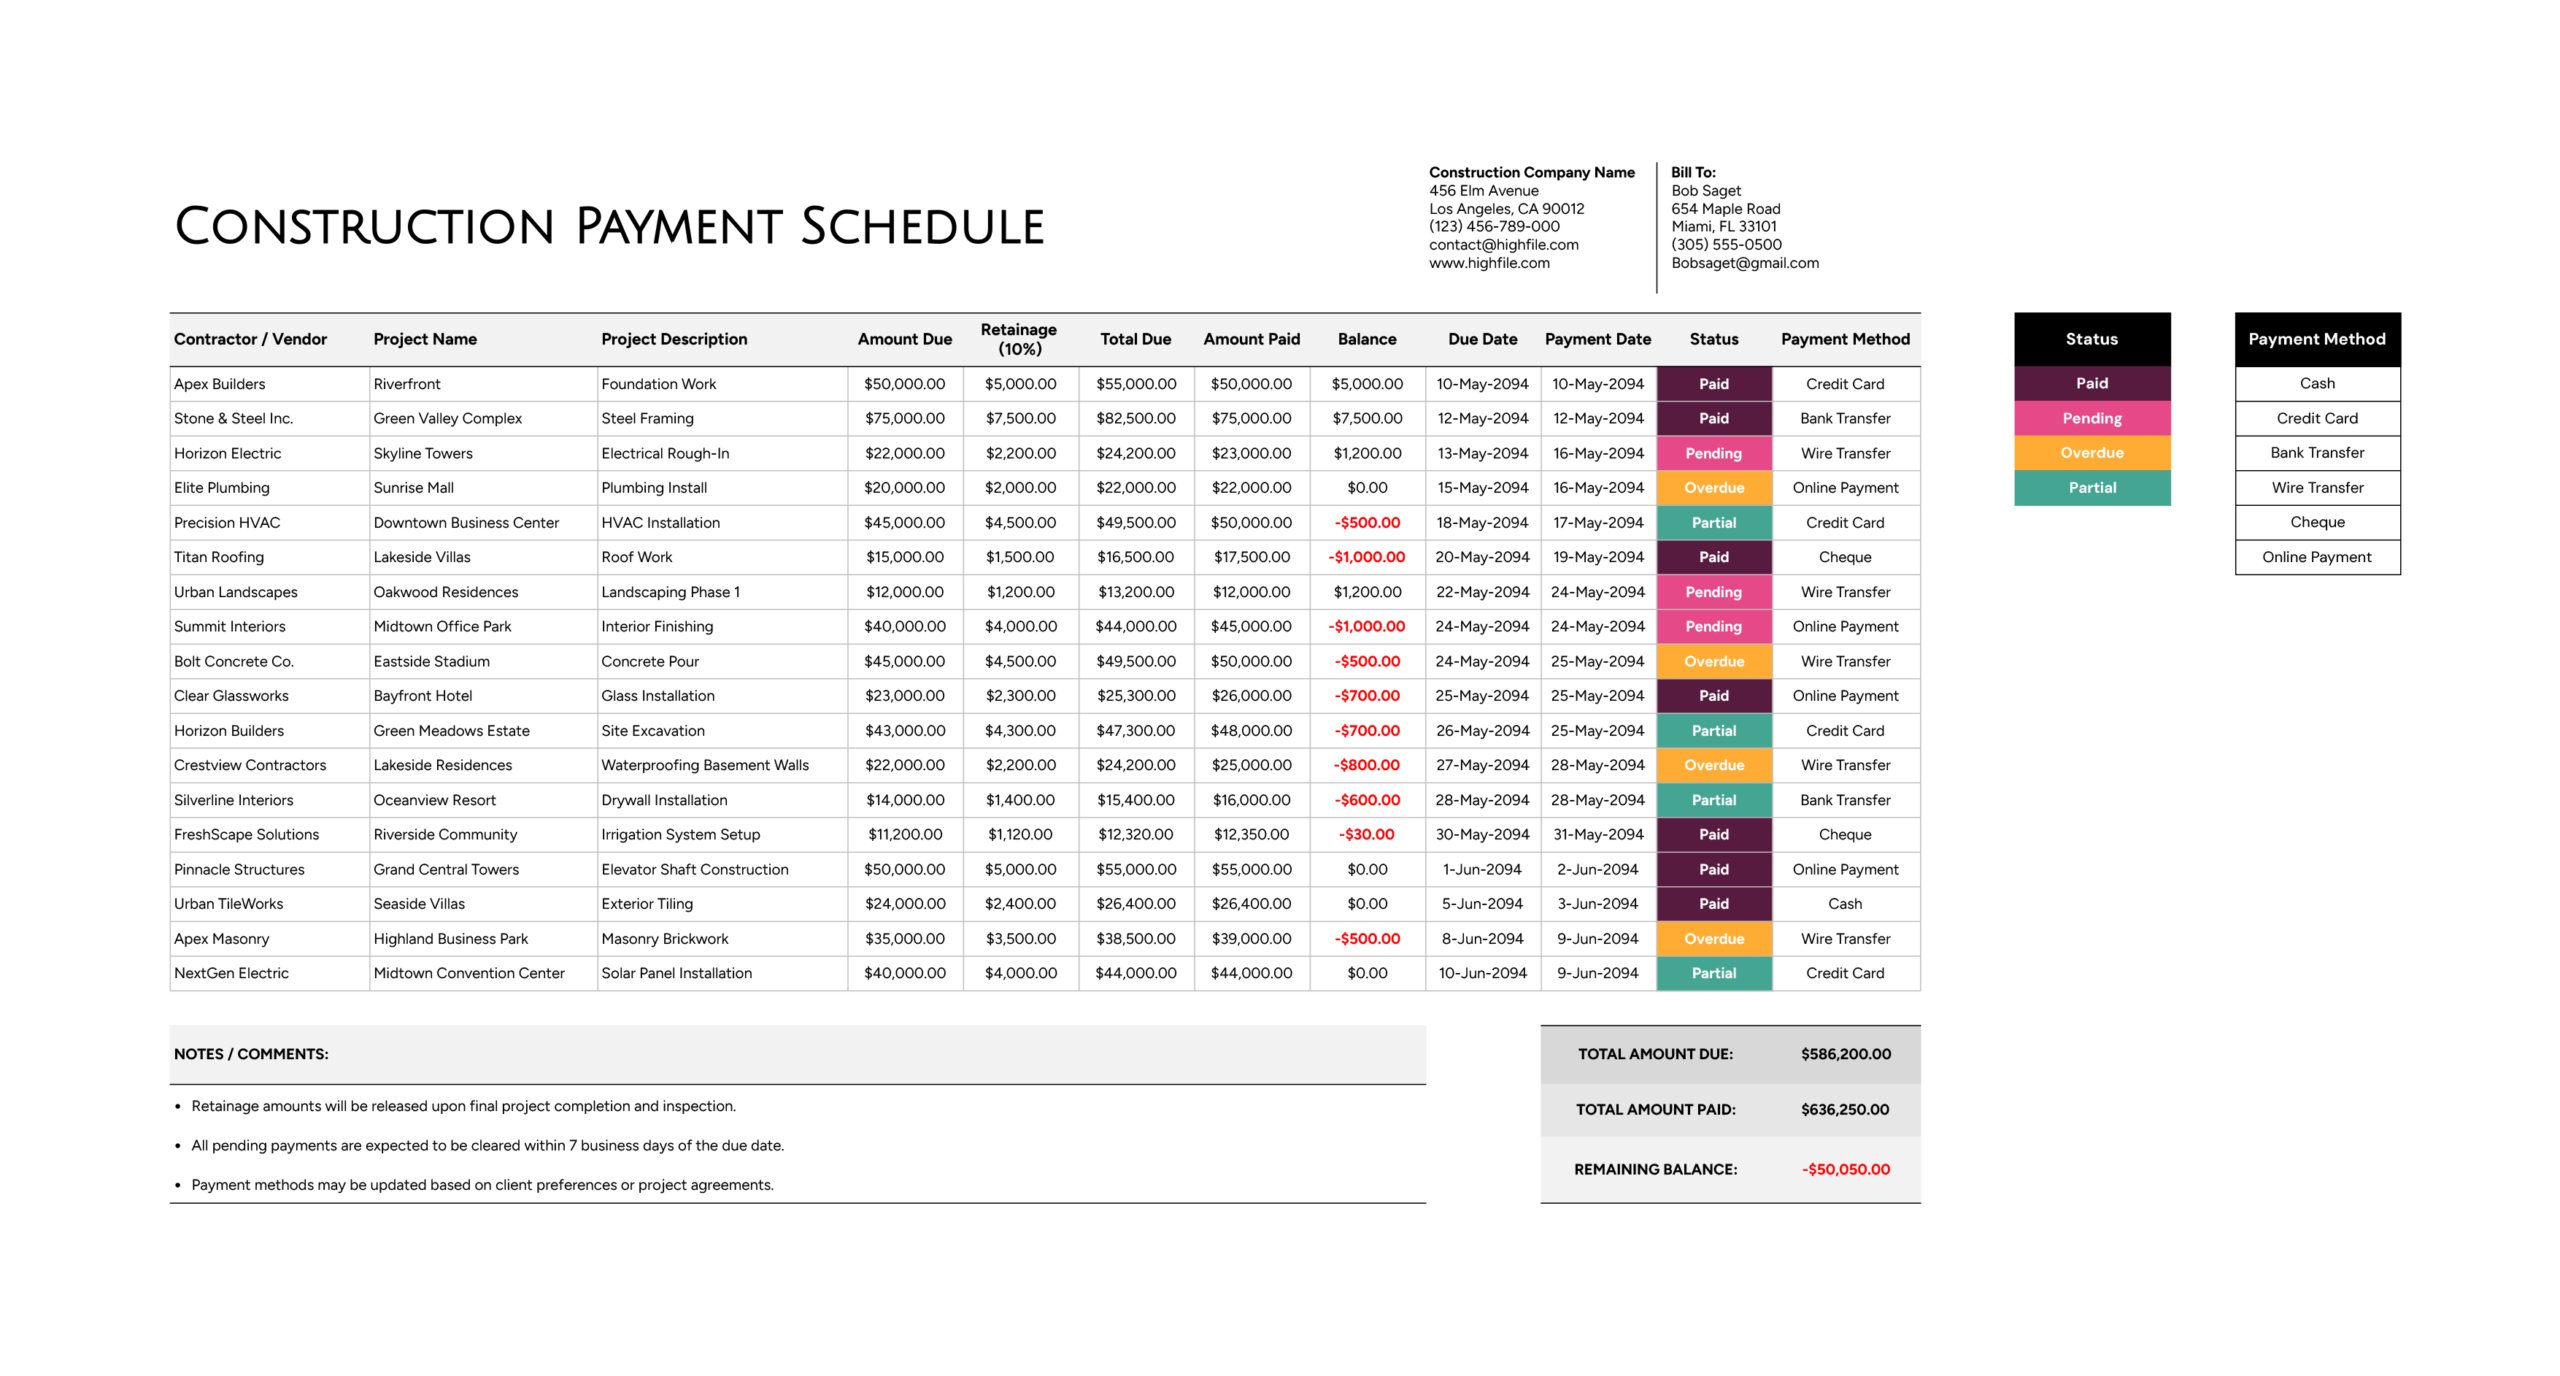
This construction payment schedule template is a spreadsheet built for tracking contractor and vendor payments line by line. It records the work reference, billed amounts, retainage, total due, amounts paid, remaining balances, and payment timing. It also includes payment status and payment method entries for quick review, plus a totals area that summarizes total amount due, total amount paid, and the remaining balance.
After you enter your company and bill-to details, the workflow stays consistent. Add a payment line, update payment activity as it happens, and keep the status current so the schedule stays dependable during reviews.
Set Your Tracking Rules First
Decide what a single row represents before you begin. One row per invoice works well when each invoice has its own due date and payment date. One row per billing event also works when you track progress by phase, such as rough-in, framing, and final completion. The sheet reads better when you stick to one method across the entire table.
The template uses a retainage rate shown as 10%. If your retainage rate differs by contract, update the retainage calculation early so the balance and totals reflect the agreement you are using.
Add Company and Client Details
Use the top section to enter your construction company details and the bill-to client details. This is useful when the schedule is exported to PDF or printed, since the document still carries the basic identification information without relying on a file name.
If you keep separate schedules for multiple projects or clients, keep the naming format consistent across files so you can locate the right schedule quickly when follow-ups come in.
Log Contractor and Project Entries
Start each line by entering the identifying details first, since those fields are what keep the schedule readable months later. Enter the contractor or vendor name in “Contractor / Vendor”, then enter the job reference in “Project Name”, and a short scope description in “Project Description”.
Consistency matters here. If the same vendor appears under different name variations, filtering and review becomes slower, especially when you are reconciling totals across the project.
Enter Amount Due and Retainage
Enter the billed amount in “Amount Due”. The “Retainage (10%)” value reflects the retained portion based on the template’s rate, and “Total Due” reflects the combined figure shown on the sheet.
If your process treats retainage as a holdback that is released later, this layout keeps that unpaid portion visible until it is actually settled. If your contracts calculate retainage differently, adjust the retainage logic so the numbers match your contract language and billing practice.
Record Due Dates and Payments
Use “Due Date” for the date the payment is expected under the invoice terms or contract timeline. Use “Payment Date” for the date the payment actually went out. When payment timing shifts, keep the due date intact and update the payment date when payment occurs, since that preserves both the obligation and the payment history.
If partial payments are common, you can update “Amount Paid” as installments are made and record the installment detail in the notes area, or you can use separate rows for each installment when you want each payment tied to its own payment date inside the table.
Track Amount Paid and Balance
Enter the amount issued so far in “Amount Paid”. The “Balance” field reflects what remains after comparing total due against what has been paid.
If the balance turns negative, treat it as a signal to review that line. It can indicate an overpayment, a deposit recorded against the wrong line, or an amount due entry that needs correction. It is better to correct the line than to leave an unexplained negative value in the schedule.
Set Status and Payment Method
Use “Status” to show where the payment stands, such as paid, pending, overdue, or partial. The template includes a status legend with color cues, which can speed up reviews when you scan for items that still need action.
Use “Payment Method” to record how the payment was made, such as cash, credit card, bank transfer, wire transfer, check, or online payment. When payment disputes come up, this field reduces guesswork during reconciliation.
Use Notes and Comments for Exceptions
The notes and comments area is where you capture the details that do not belong inside the table cells but still matter for payment follow-up. This includes items such as retainage release conditions, inspection dependencies, invoice revisions, back-charges, missing documents, or an internal approval update. Keep notes short and specific so the schedule stays readable, even when it becomes a longer running record.
Review the Totals Box
The totals box summarizes total amount due, total amount paid, and remaining balance. This section is useful for quick internal check-ins, payment planning conversations, and client updates where you need the high-level picture without reading every row.
If you extend the table beyond the original entry area, expand the totals formulas so new rows are included in the totals.
FAQs
Update the retainage calculation so it uses your contract rate, then test a few lines to confirm the retainage amount matches what you expect. Once the rate is correct, the “Total Due” and “Balance” values will reflect the updated retainage logic across the schedule.
A negative balance often points to an overpayment or a mismatch between the billed amount and the payment entered. It can also happen when a deposit is recorded against a line that was not meant to carry it. Review the invoice and the payment record, then correct the entry so the schedule reflects the real position.
Pending fits items that are not yet paid but are still within the due date window. Overdue fits items that have passed the due date and still carry a balance. Partial fits items where some amount has been paid but a balance remains.
This construction payment schedule template is available in Microsoft Excel and Google Sheets, which makes it useful for ongoing updates, sorting, filtering, and shared access when multiple people review payments. You can also export it to PDF when you need a fixed copy for approvals, client updates, or internal filing.