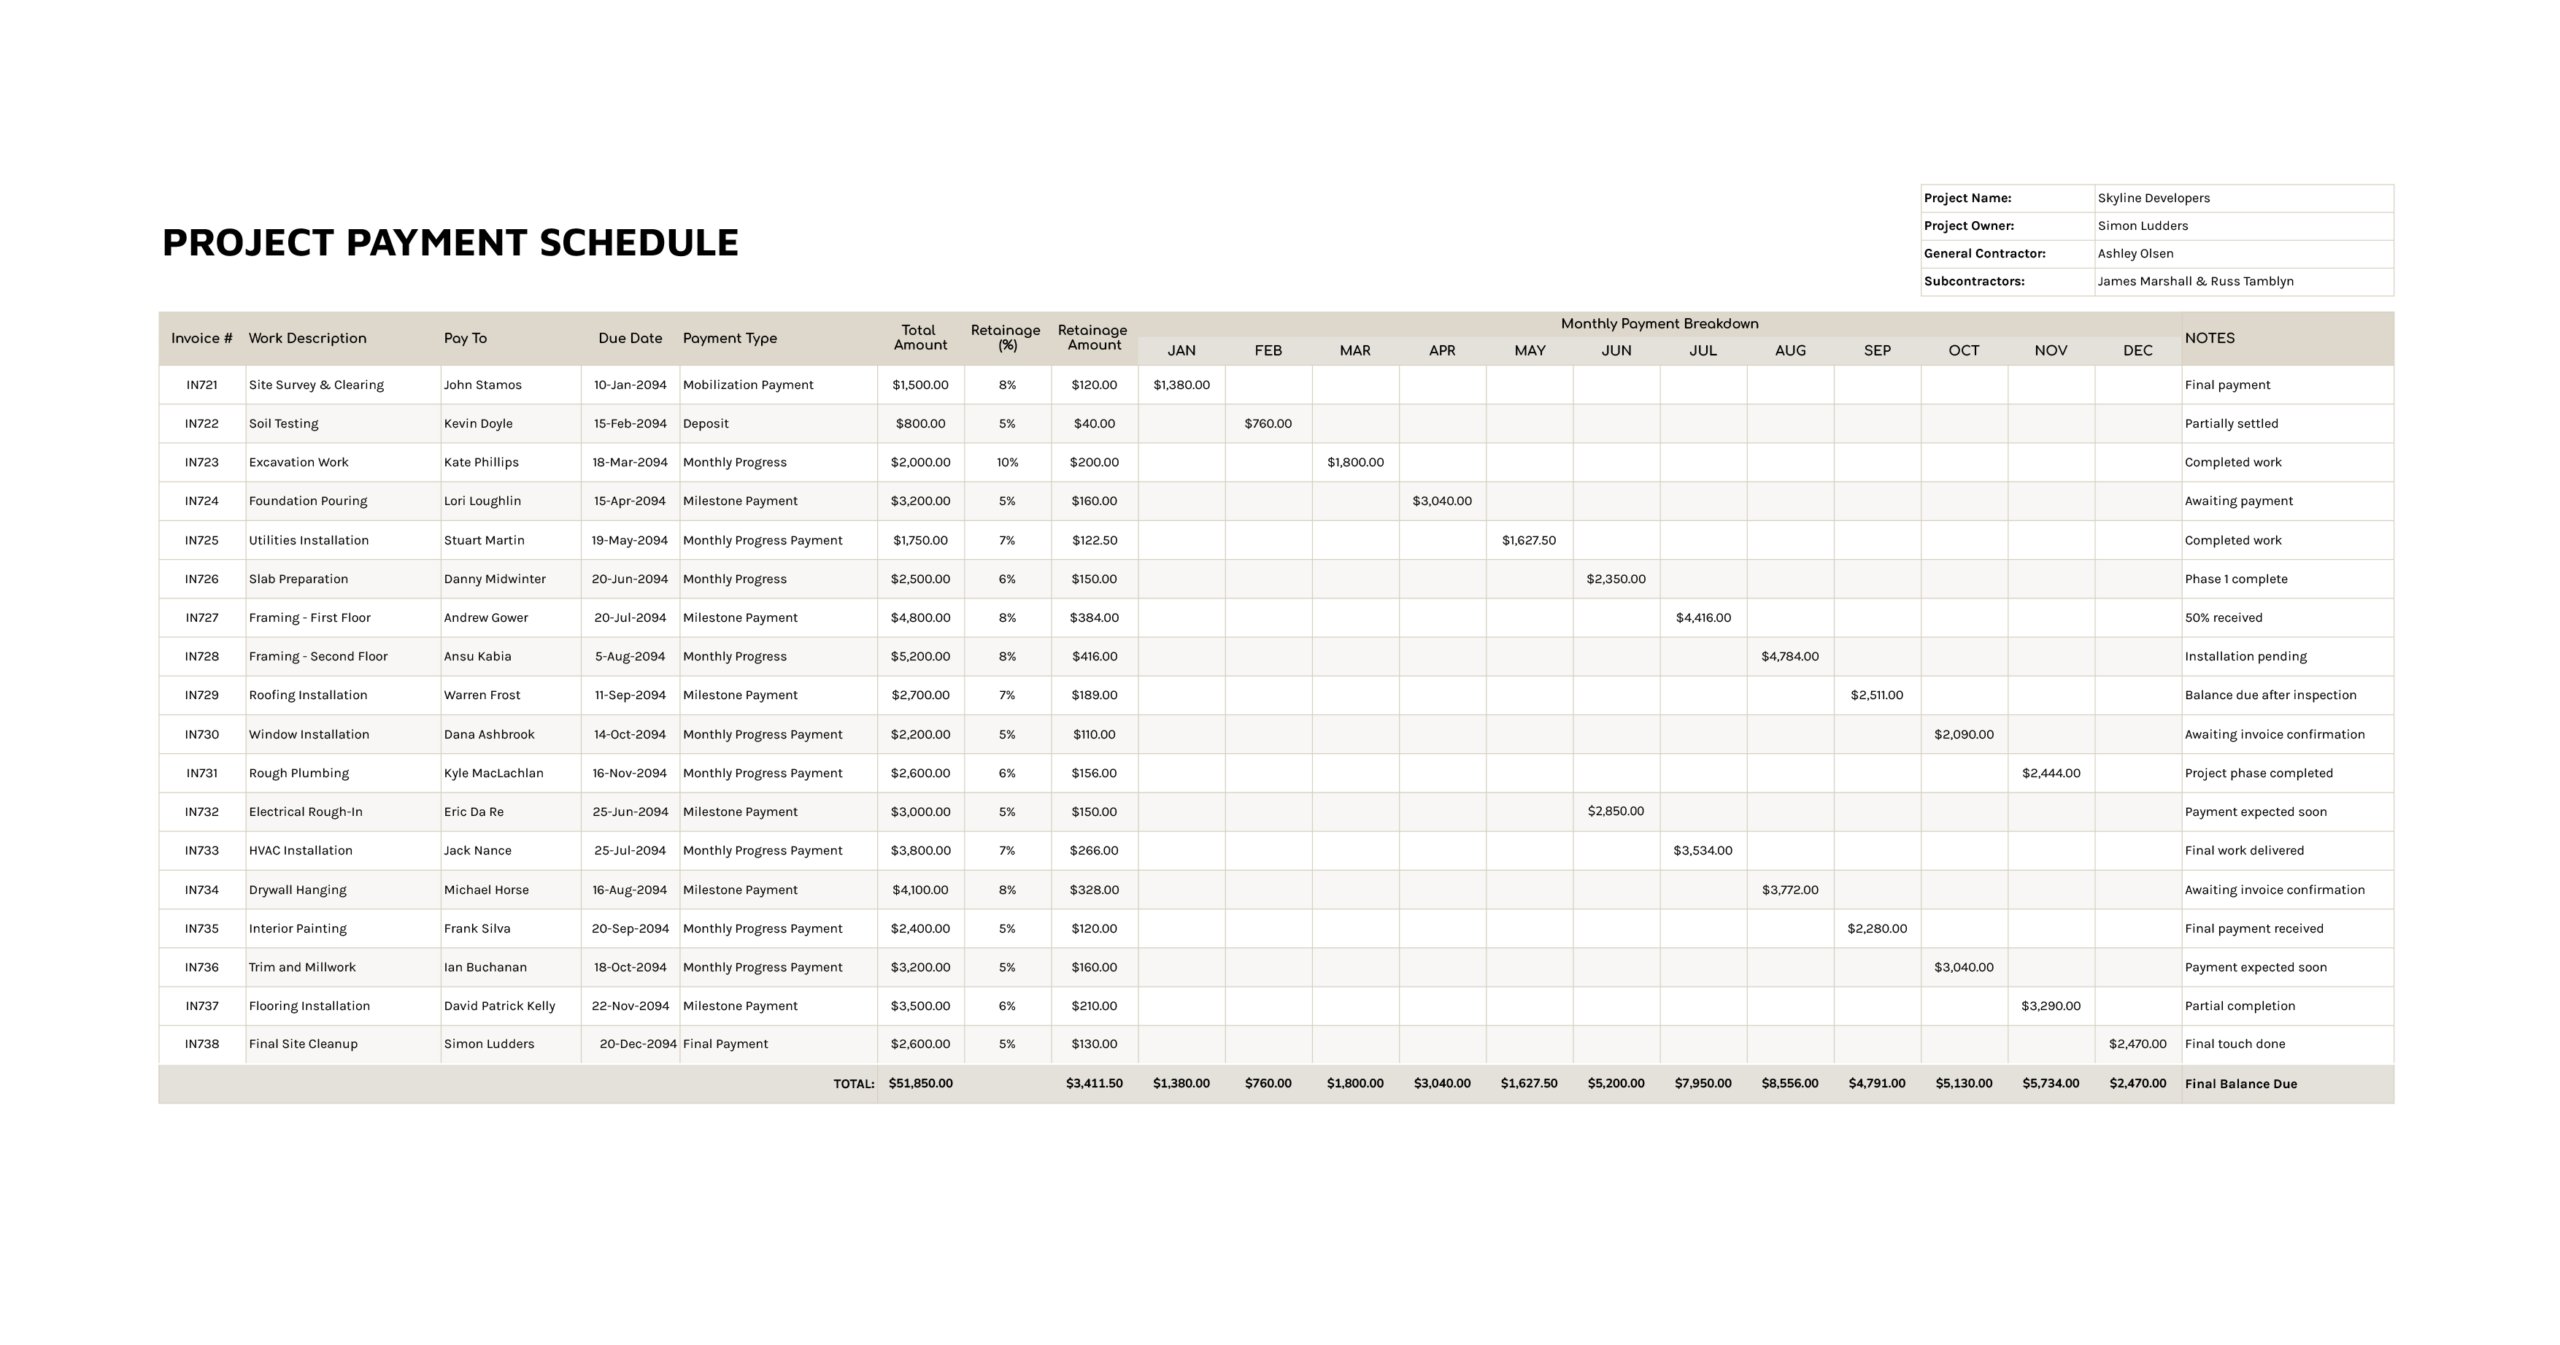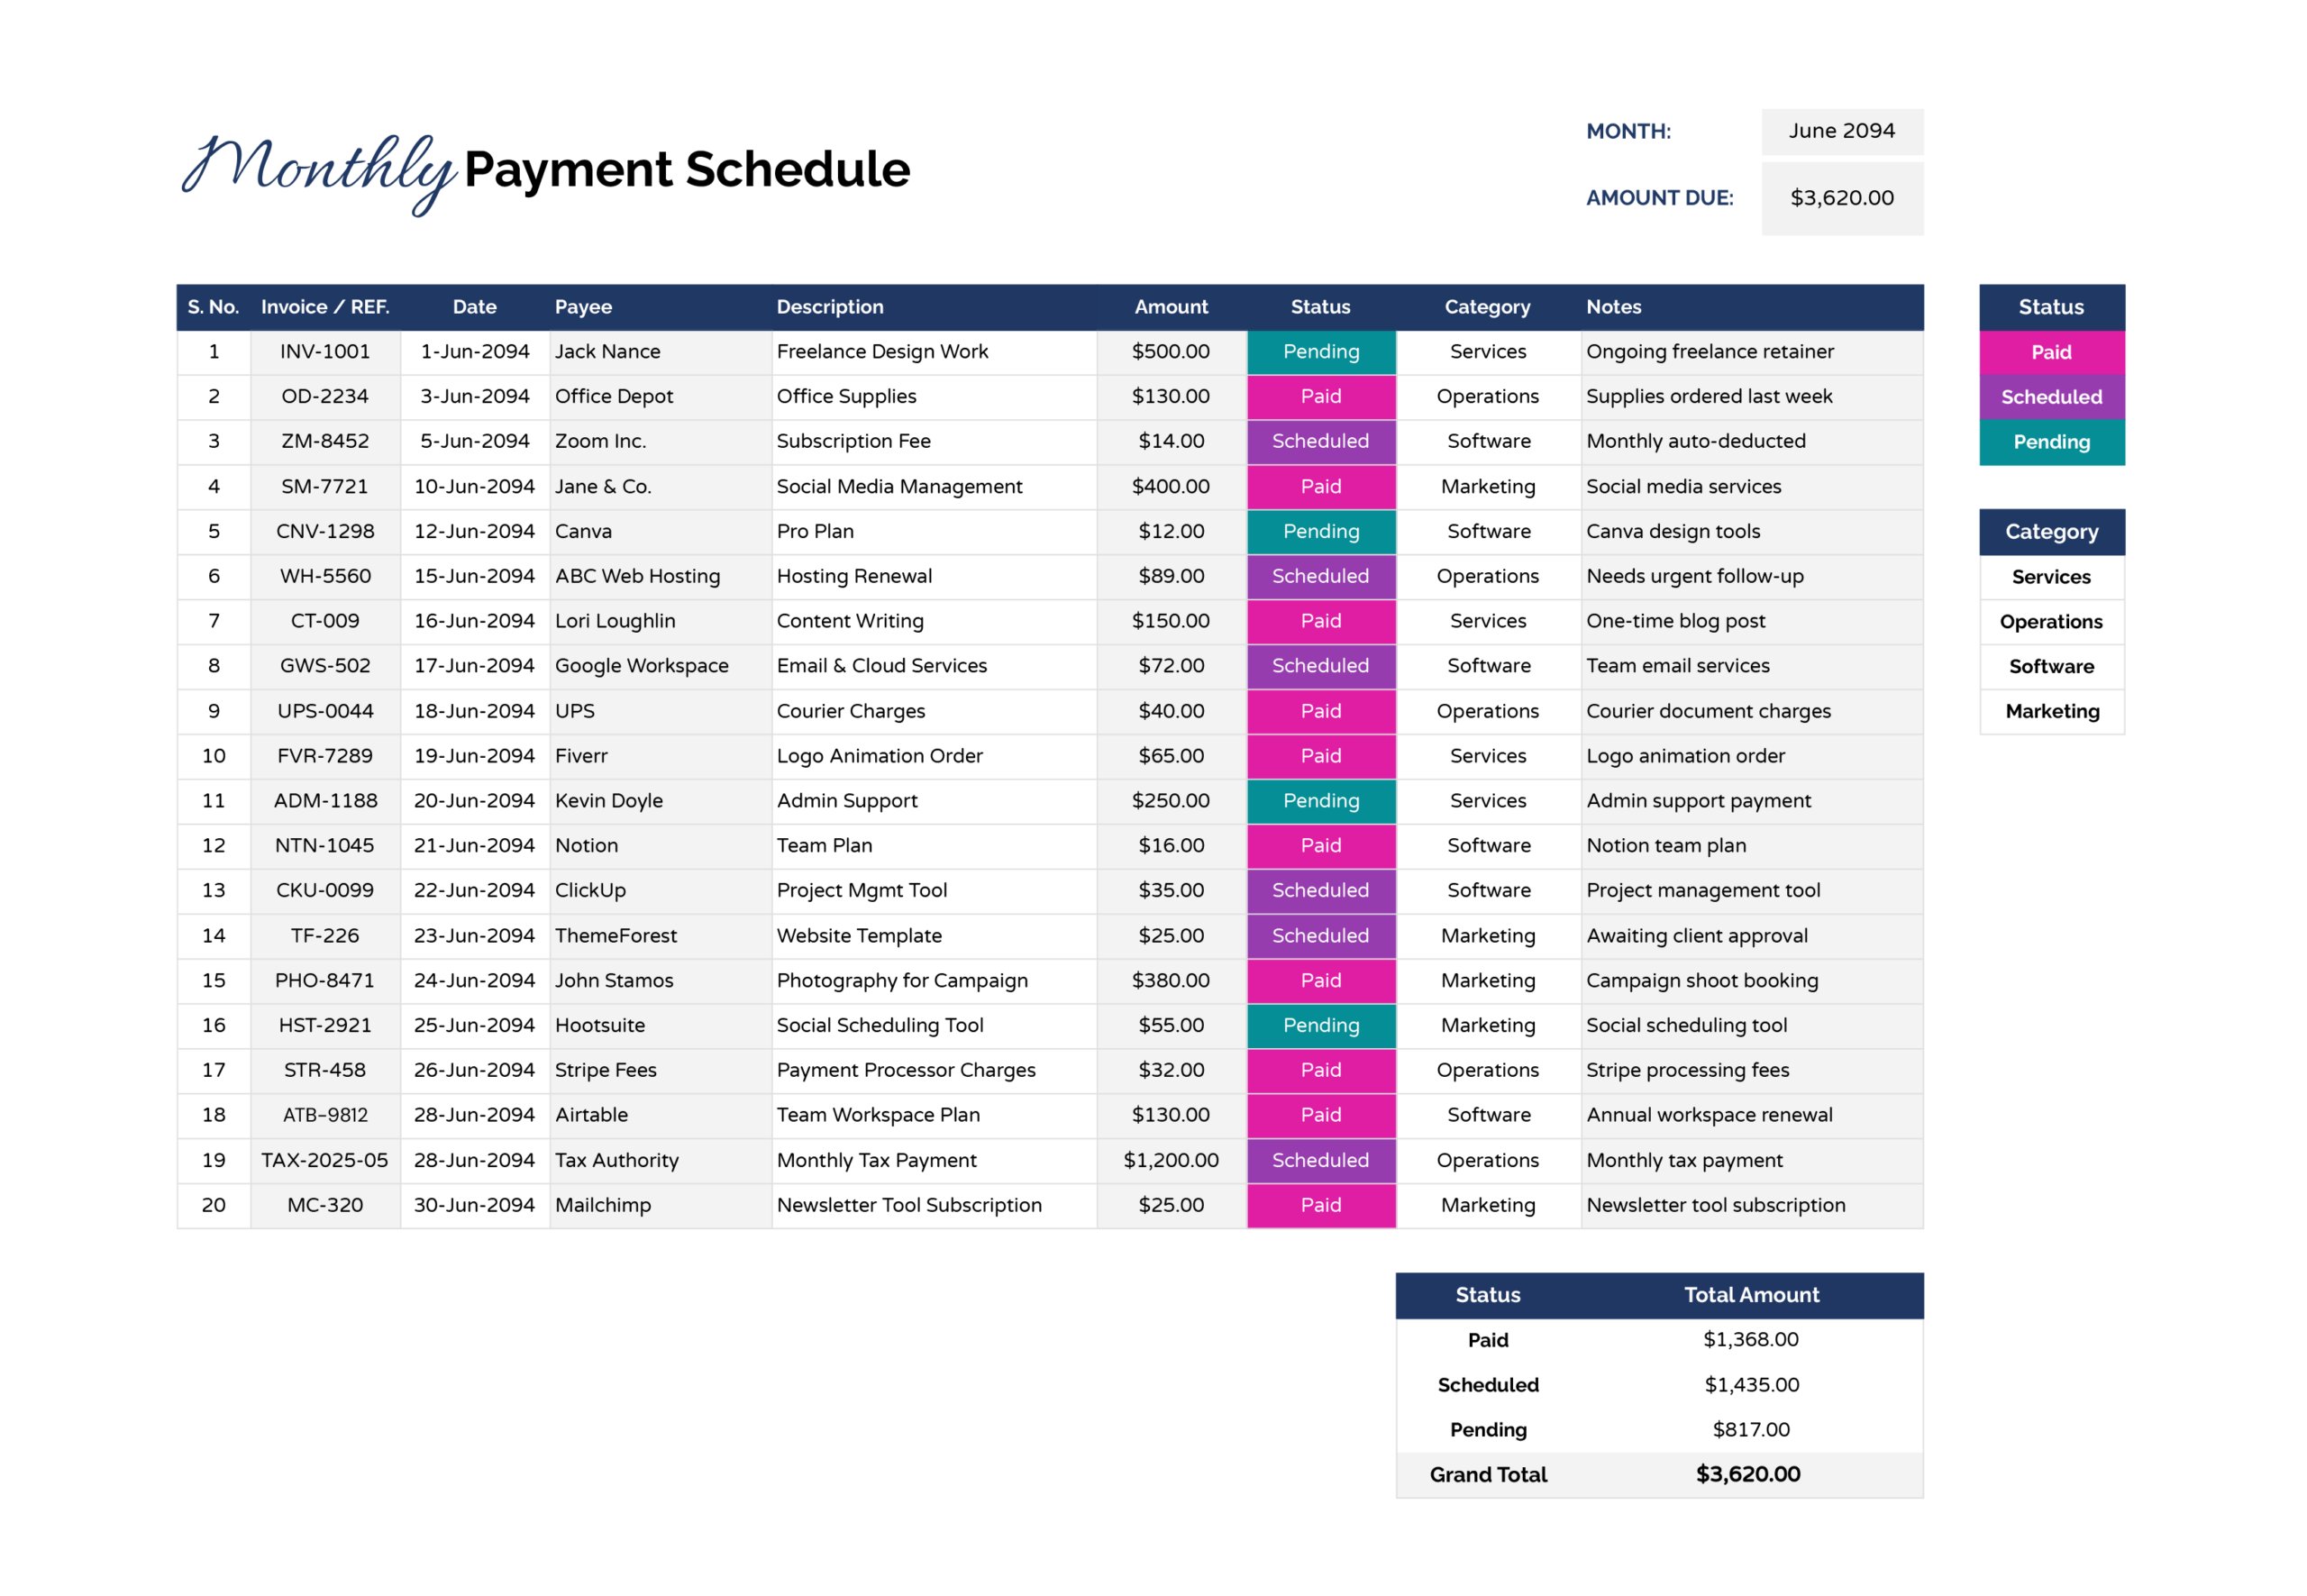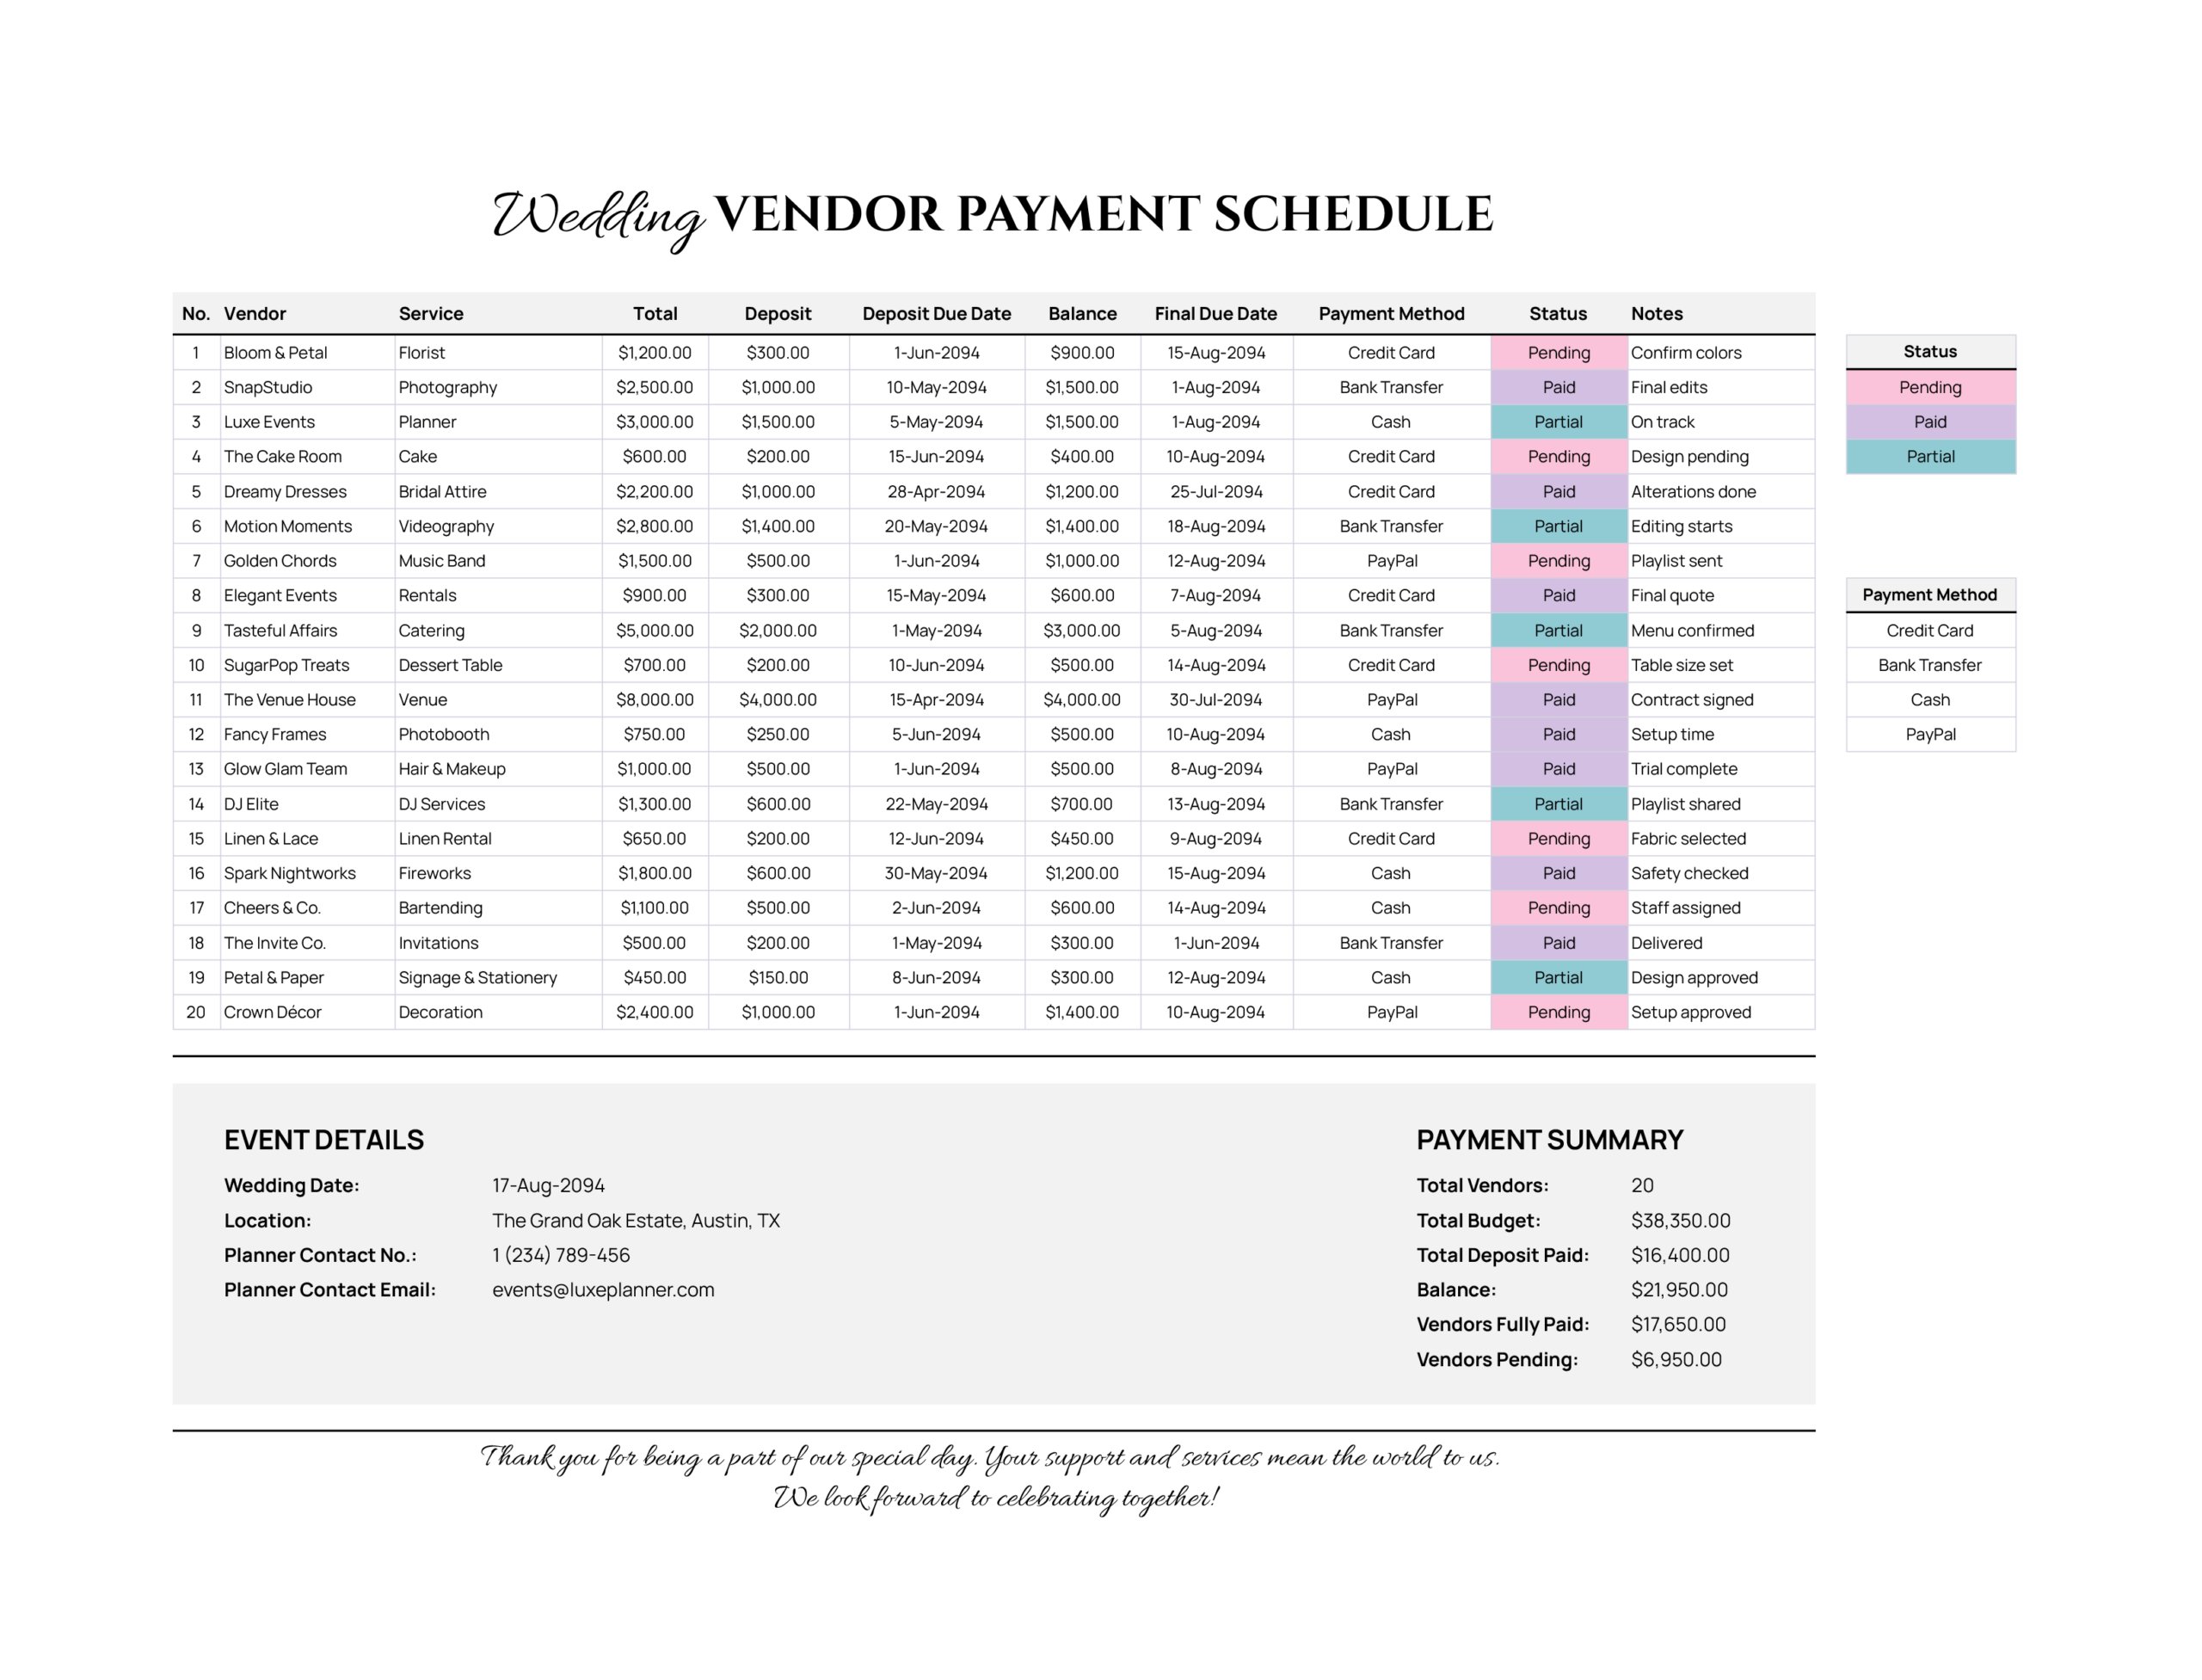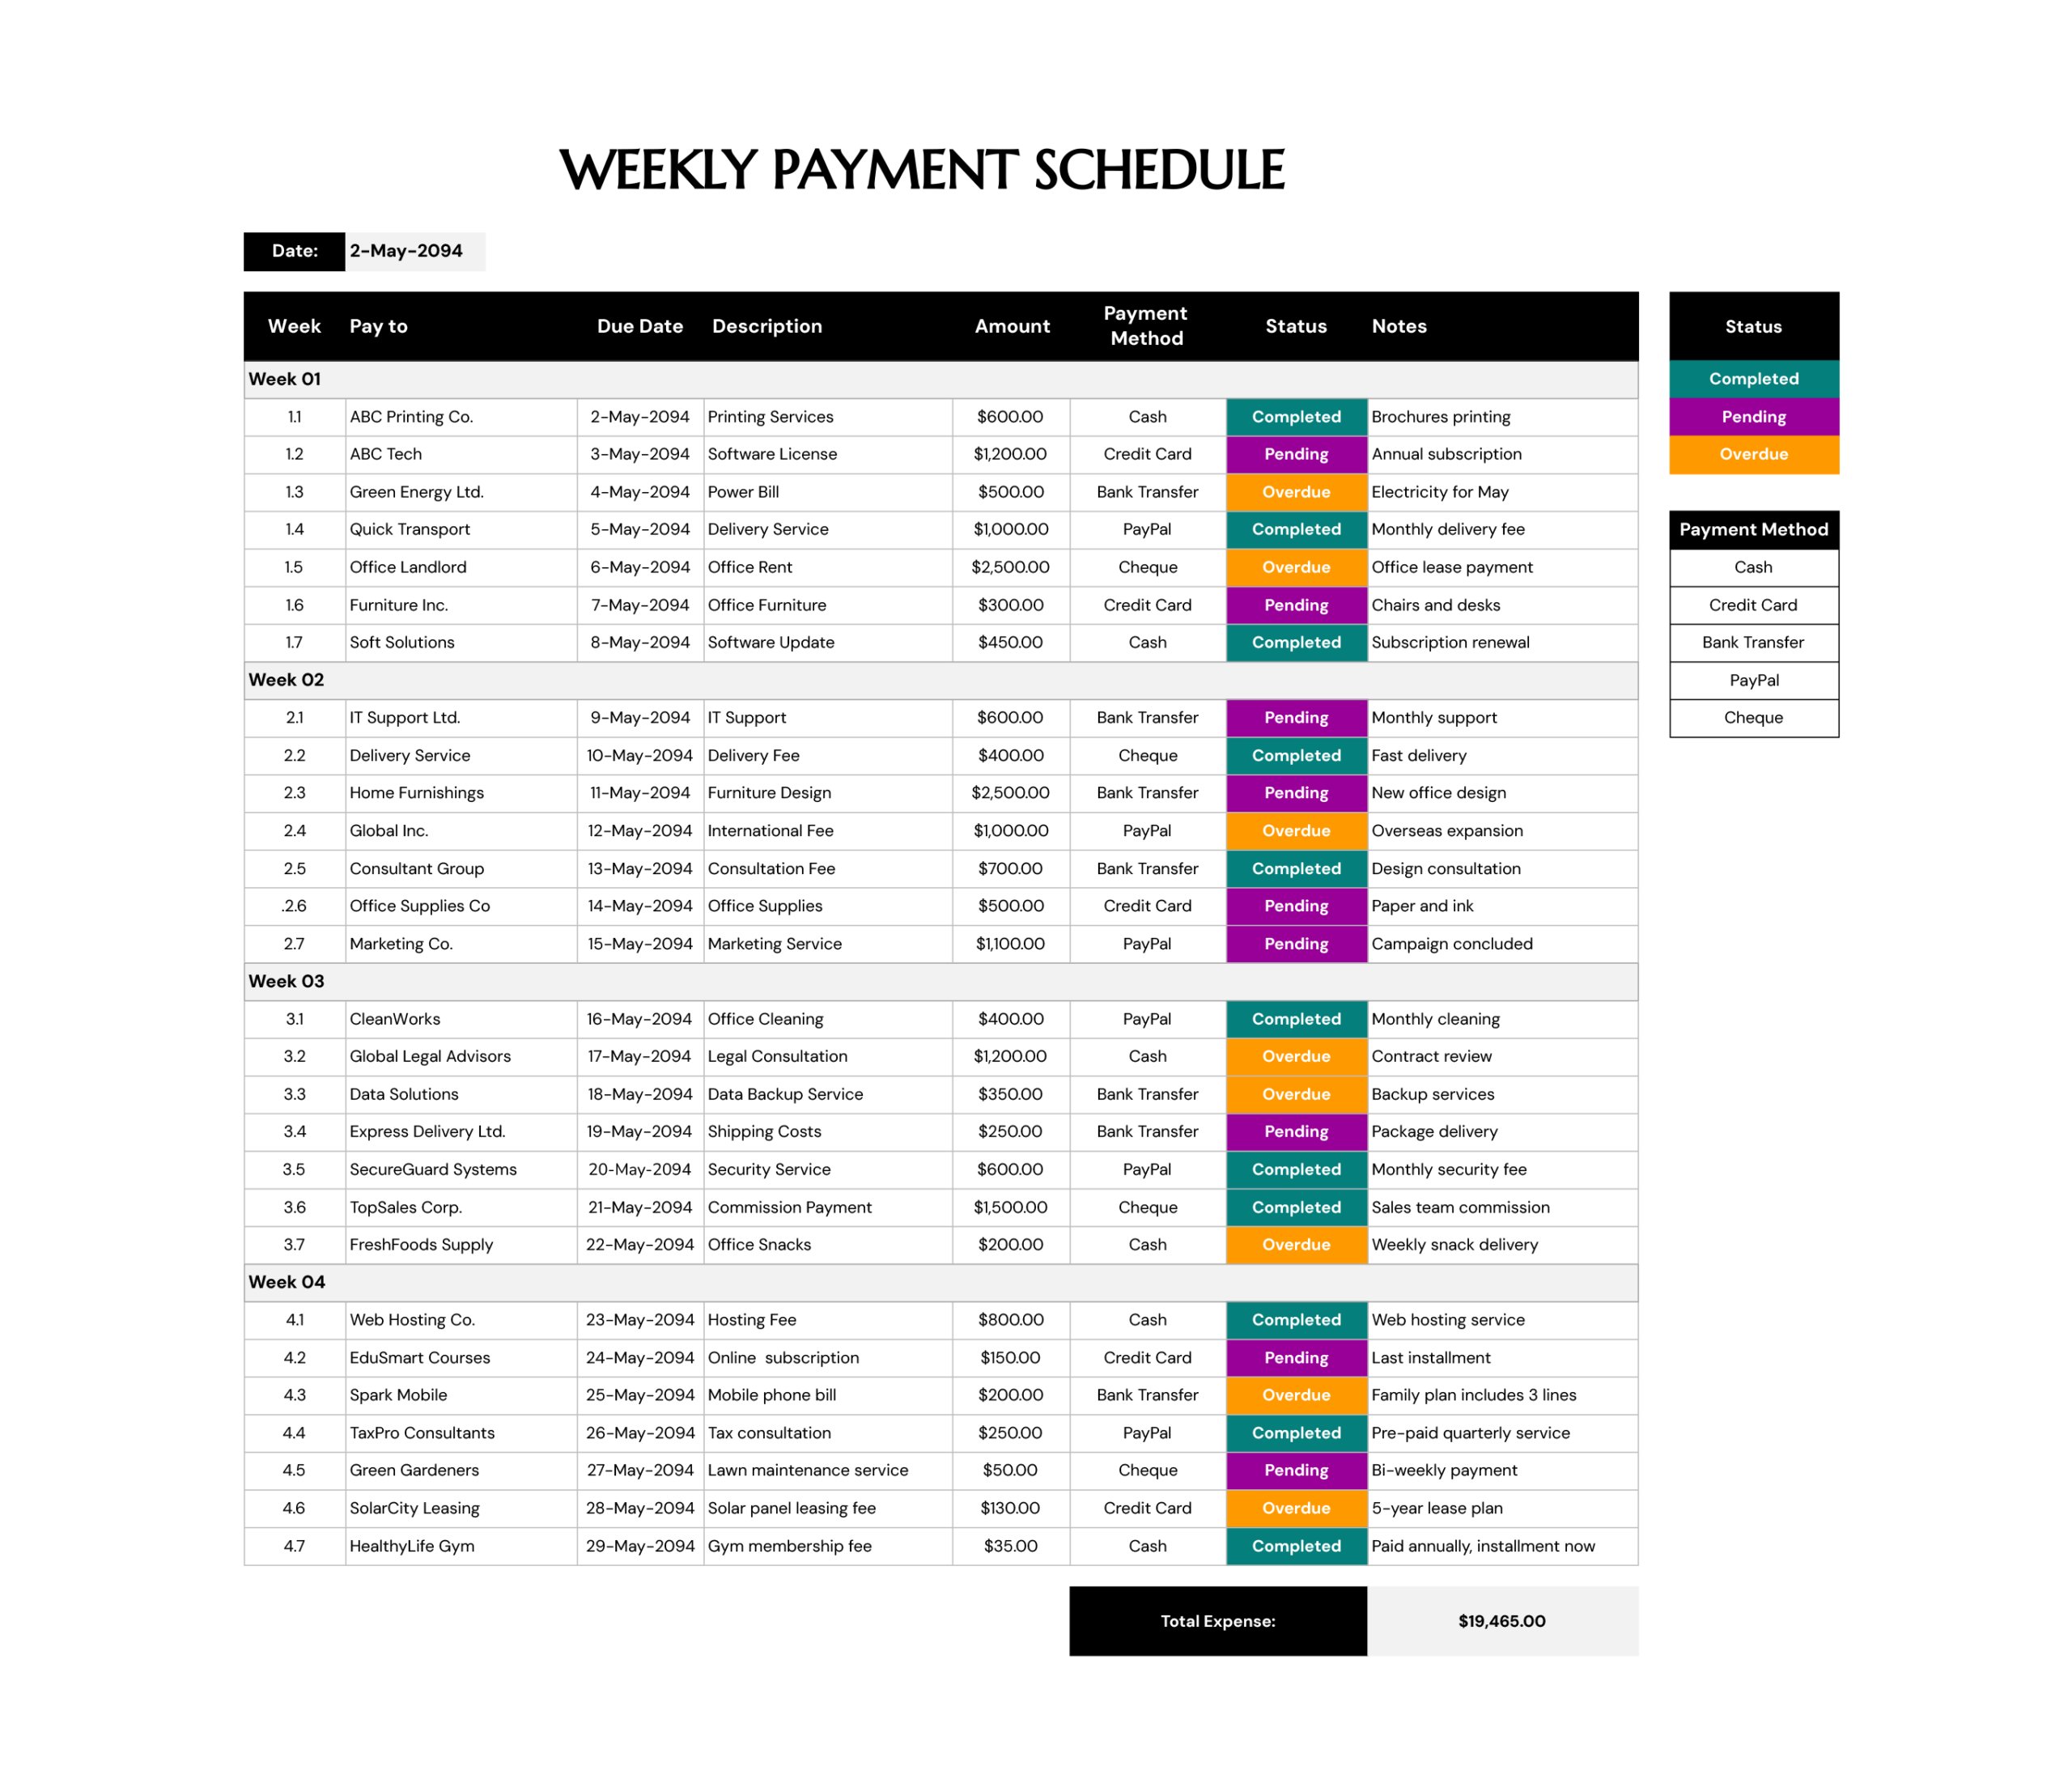


Bills tend to get messy for one simple reason. They arrive from different places, on different due dates, with different payment routines. Some are fixed every month, some change, and some only show up a few times a year. This bill payment schedule template is built for that real-world mix. It uses one monthly table where each bill becomes a single line item, so upcoming payments can be planned early and then checked off as they are completed.
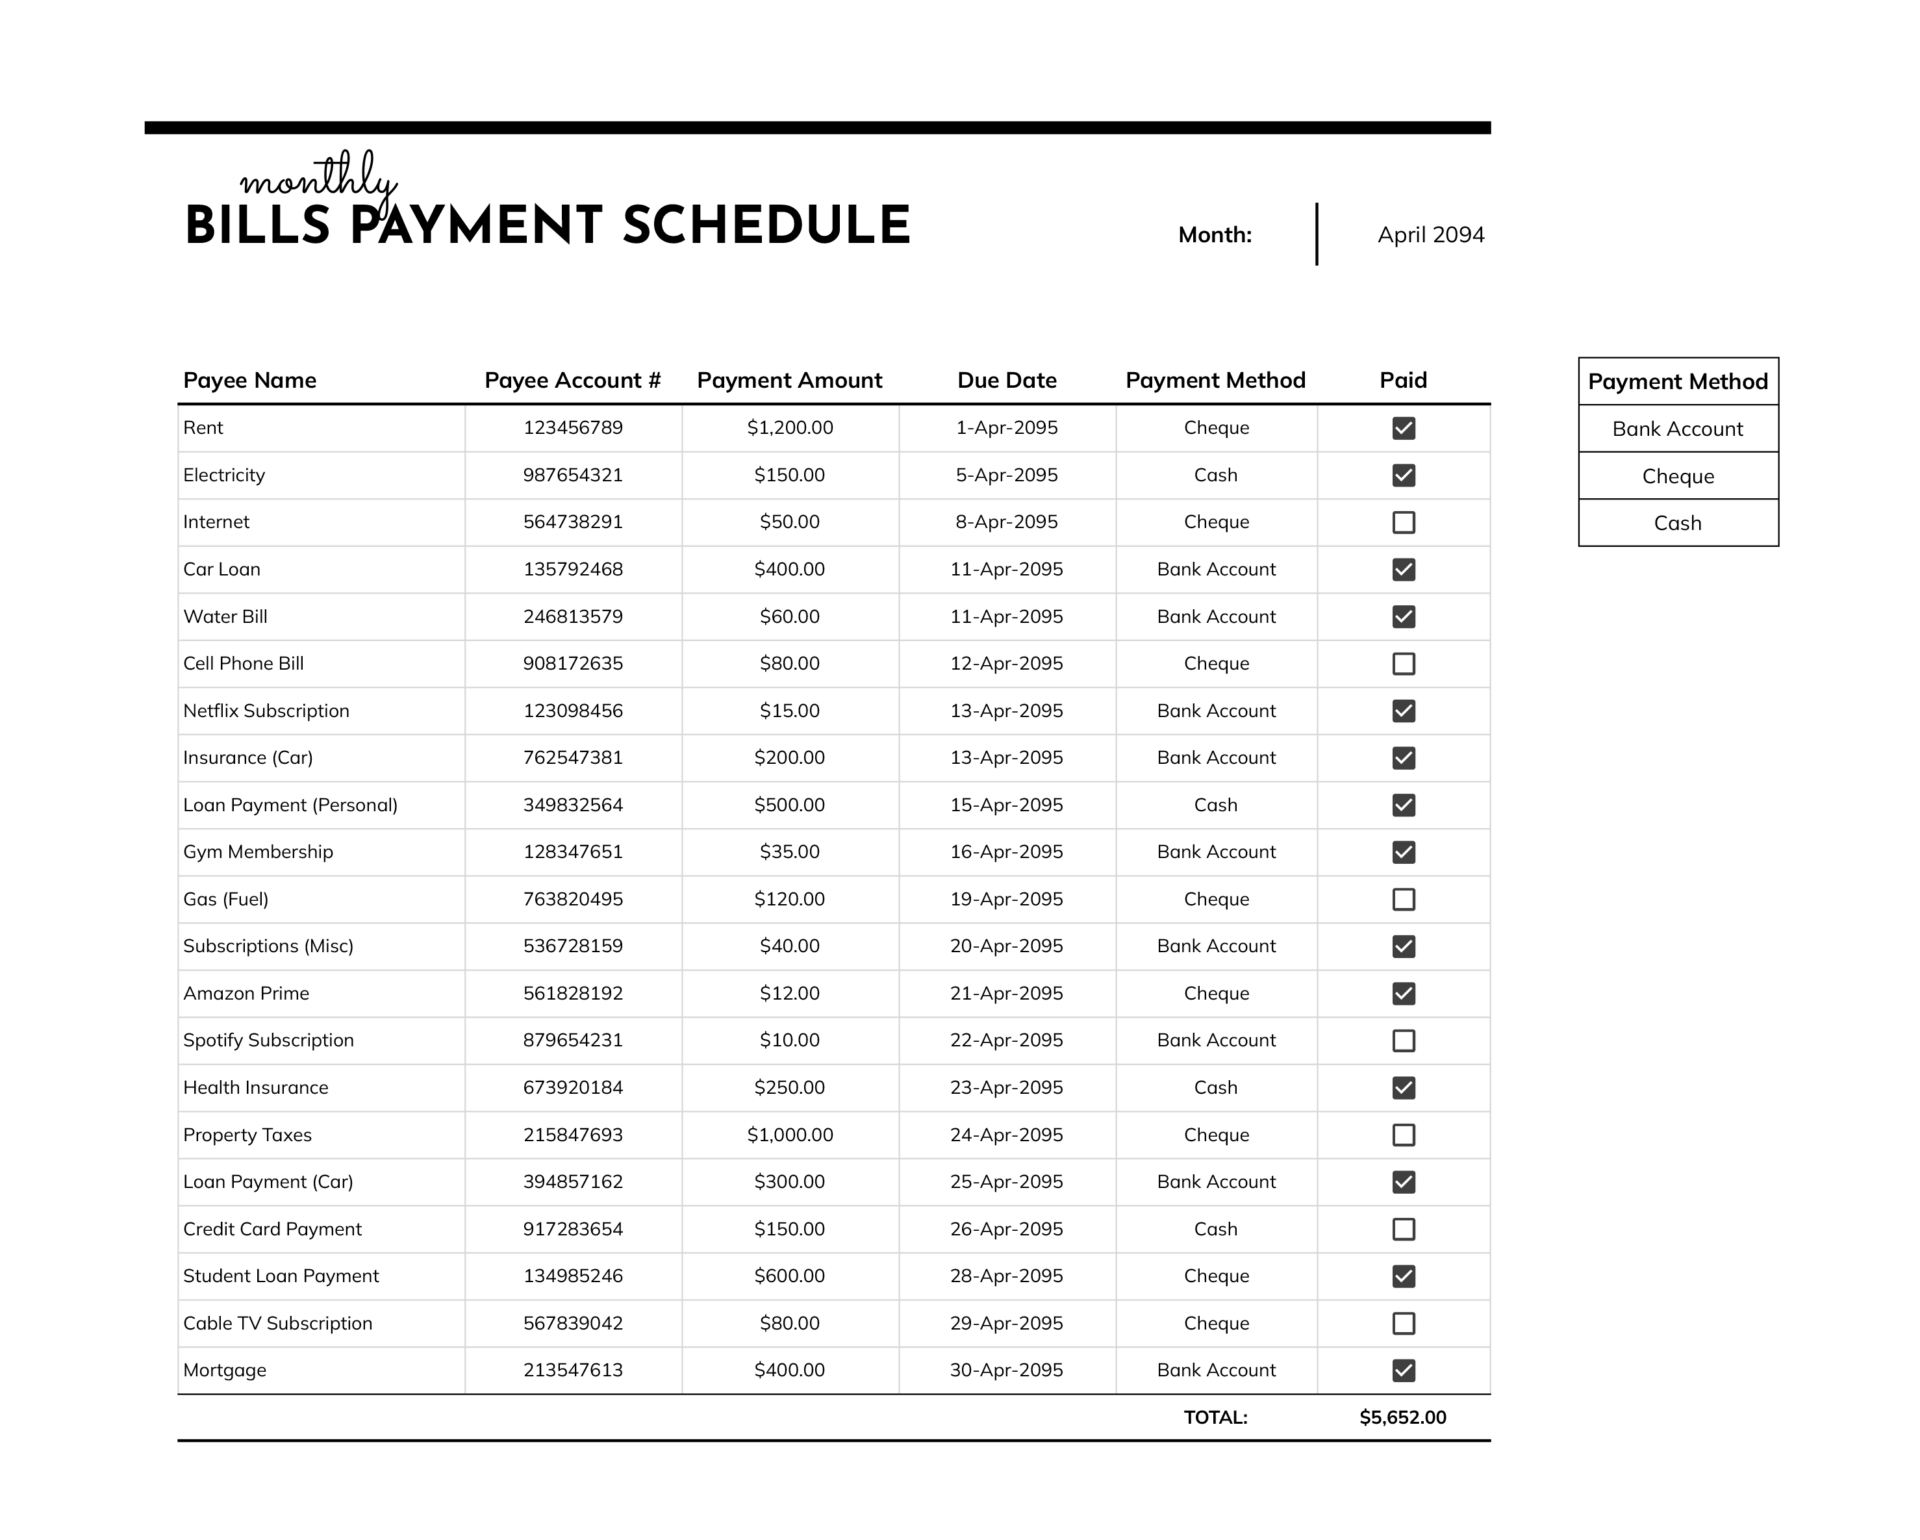
The layout of this schedule template is intentionally simple and consistent. The “Month” field at the top is formatted to display the month and year, which makes it easy to keep printed copies or PDFs organized. The main table is set up with standard bill identifiers such as “Payee Name” and “Payee Account #”, a currency-formatted “Payment Amount”, and a date-formatted “Due Date” so sorting and review stay readable. “Payment Method” uses a drop-down list tied to the small list shown on the right side of the sheet, and the “Paid” column is designed for checkbox-style tracking. A running “TOTAL” at the bottom sums the full month’s planned payments automatically.
How to Use This Bill Payment Schedule
A smooth setup matters more than filling every line on day one. The goal is to build a dependable monthly routine that stays easy to update.
Set the Month Header
Start by entering the month in the “Month” field near the top. This cell is formatted to show a month and year view, so entering a date within that month keeps the display consistent. Many people enter the first day of the month so it stays uniform across saved copies.
If this schedule will be saved monthly, use the same naming pattern each time, such as “Bills Payment Schedule – April 2094”, so older months stay easy to find later.
Add Bills One Line at a Time
Work down the table and add one bill per row. In “Payee Name”, enter the bill name in the way it appears on statements. Consistent naming pays off later when comparing the schedule against bank activity, especially for subscriptions or services that use a brand name on the charge.
In “Payee Account #”, enter the reference that actually matters for payment or confirmation. For some bills this is an account number. For others it might be a customer ID, invoice number, policy number, or simply a short internal reference. If account numbers are not relevant, the column header can be renamed to match the preferred reference type.
In “Payment Amount”, enter the expected amount for the month. For fixed bills, this stays the same. For variable bills, an estimate can be entered early and updated once the statement arrives.
If this schedule will be shared with someone else, consider shortening account references or removing them before sharing to avoid exposing sensitive account identifiers.
Enter Due Dates in a Consistent Way
Use “Due Date” for the date the payment must be completed, not the date it was scheduled. That distinction matters when reviewing late fees, grace periods, or recurring autopay charges.
For bills that post earlier than the actual due date, it can be useful to set the due date to the true deadline and then rely on “Paid” for completion tracking. That keeps the schedule focused on what still needs attention during the month.
Use the Payment Method Drop-Down
The “Payment Method” field is set up as a drop-down, and its options come from the small “Payment Method” list on the right side of the sheet. Choose the method that matches how the bill is normally paid, such as bank transfer, cheque, or cash.
This is also a simple way to spot patterns. If many bills are marked as cash, that may signal a need to plan withdrawals before due dates. If most are bank-based, it becomes easier to match charges against online banking history.
If a specific method is used repeatedly, it may be worth expanding the list to match real habits, such as adding “Autopay” or “Credit Card” so month-end review becomes more accurate.
Mark Bills as Paid Without Losing Track of Timing
Use the “Paid” checkbox column as the month progresses. The main value of the checkbox is that it turns the schedule into a live month tracker rather than a one-time planning sheet.
A practical routine is to check items off only after the payment is confirmed, not when it is merely scheduled. That keeps the schedule dependable when bank processing time varies or when an online payment is pending.
Review the Total at the Bottom
The “TOTAL” row automatically sums the “Payment Amount” column for the month. This is useful for a quick budget check-in and for confirming that all planned bills were captured, especially when some bills only appear quarterly or yearly.
The total is designed to reflect the full month’s planned payments. If a remaining balance view is needed, an additional subtotal can be added later for unpaid items, but the current total is meant to represent the month’s complete bill load.
Carry the List Forward to Next Month
For recurring bills, the fastest workflow is often a copy-forward routine. Duplicate the sheet or save a copy for the next month, update the “Month” field, and then adjust only what changes, such as variable amounts and shifting due dates. Keeping the same row order month to month also makes comparisons easier.
Add More Rows When Needed
The table is prebuilt with a set number of rows for a typical month. If more lines are needed, copy an existing row from within the table and paste it directly beneath the last row so formatting and the “Paid” checkbox behavior remain consistent.
After adding rows, update the “TOTAL” formula range so new amounts are included. Also extend the “Payment Method” drop-down range to cover any new rows so the same selection list stays active.
FAQs
Edit the small “Payment Method” list on the right side of the sheet. The drop-down in the table pulls from that list. If additional options are added beyond the current list area, the drop-down range may need to be updated so the new entries become selectable. A simple approach is to expand the list area first, then update the data validation range for the “Payment Method” column.
Use two separate rows with the same “Payee Name” and matching reference in “Payee Account #”. Enter each partial payment amount with its own due date and mark each as paid separately. This keeps the schedule accurate when a payment plan, split payment, or staged charge occurs.
Enter an estimate early in the month so the schedule reflects expected cash needs. When the statement arrives, update “Payment Amount” with the final number. If it is important to keep a record of the original estimate, add a note in the “Payee Name” field such as “Estimate” and then remove it after updating, or create a duplicate line temporarily for comparison before finalizing.