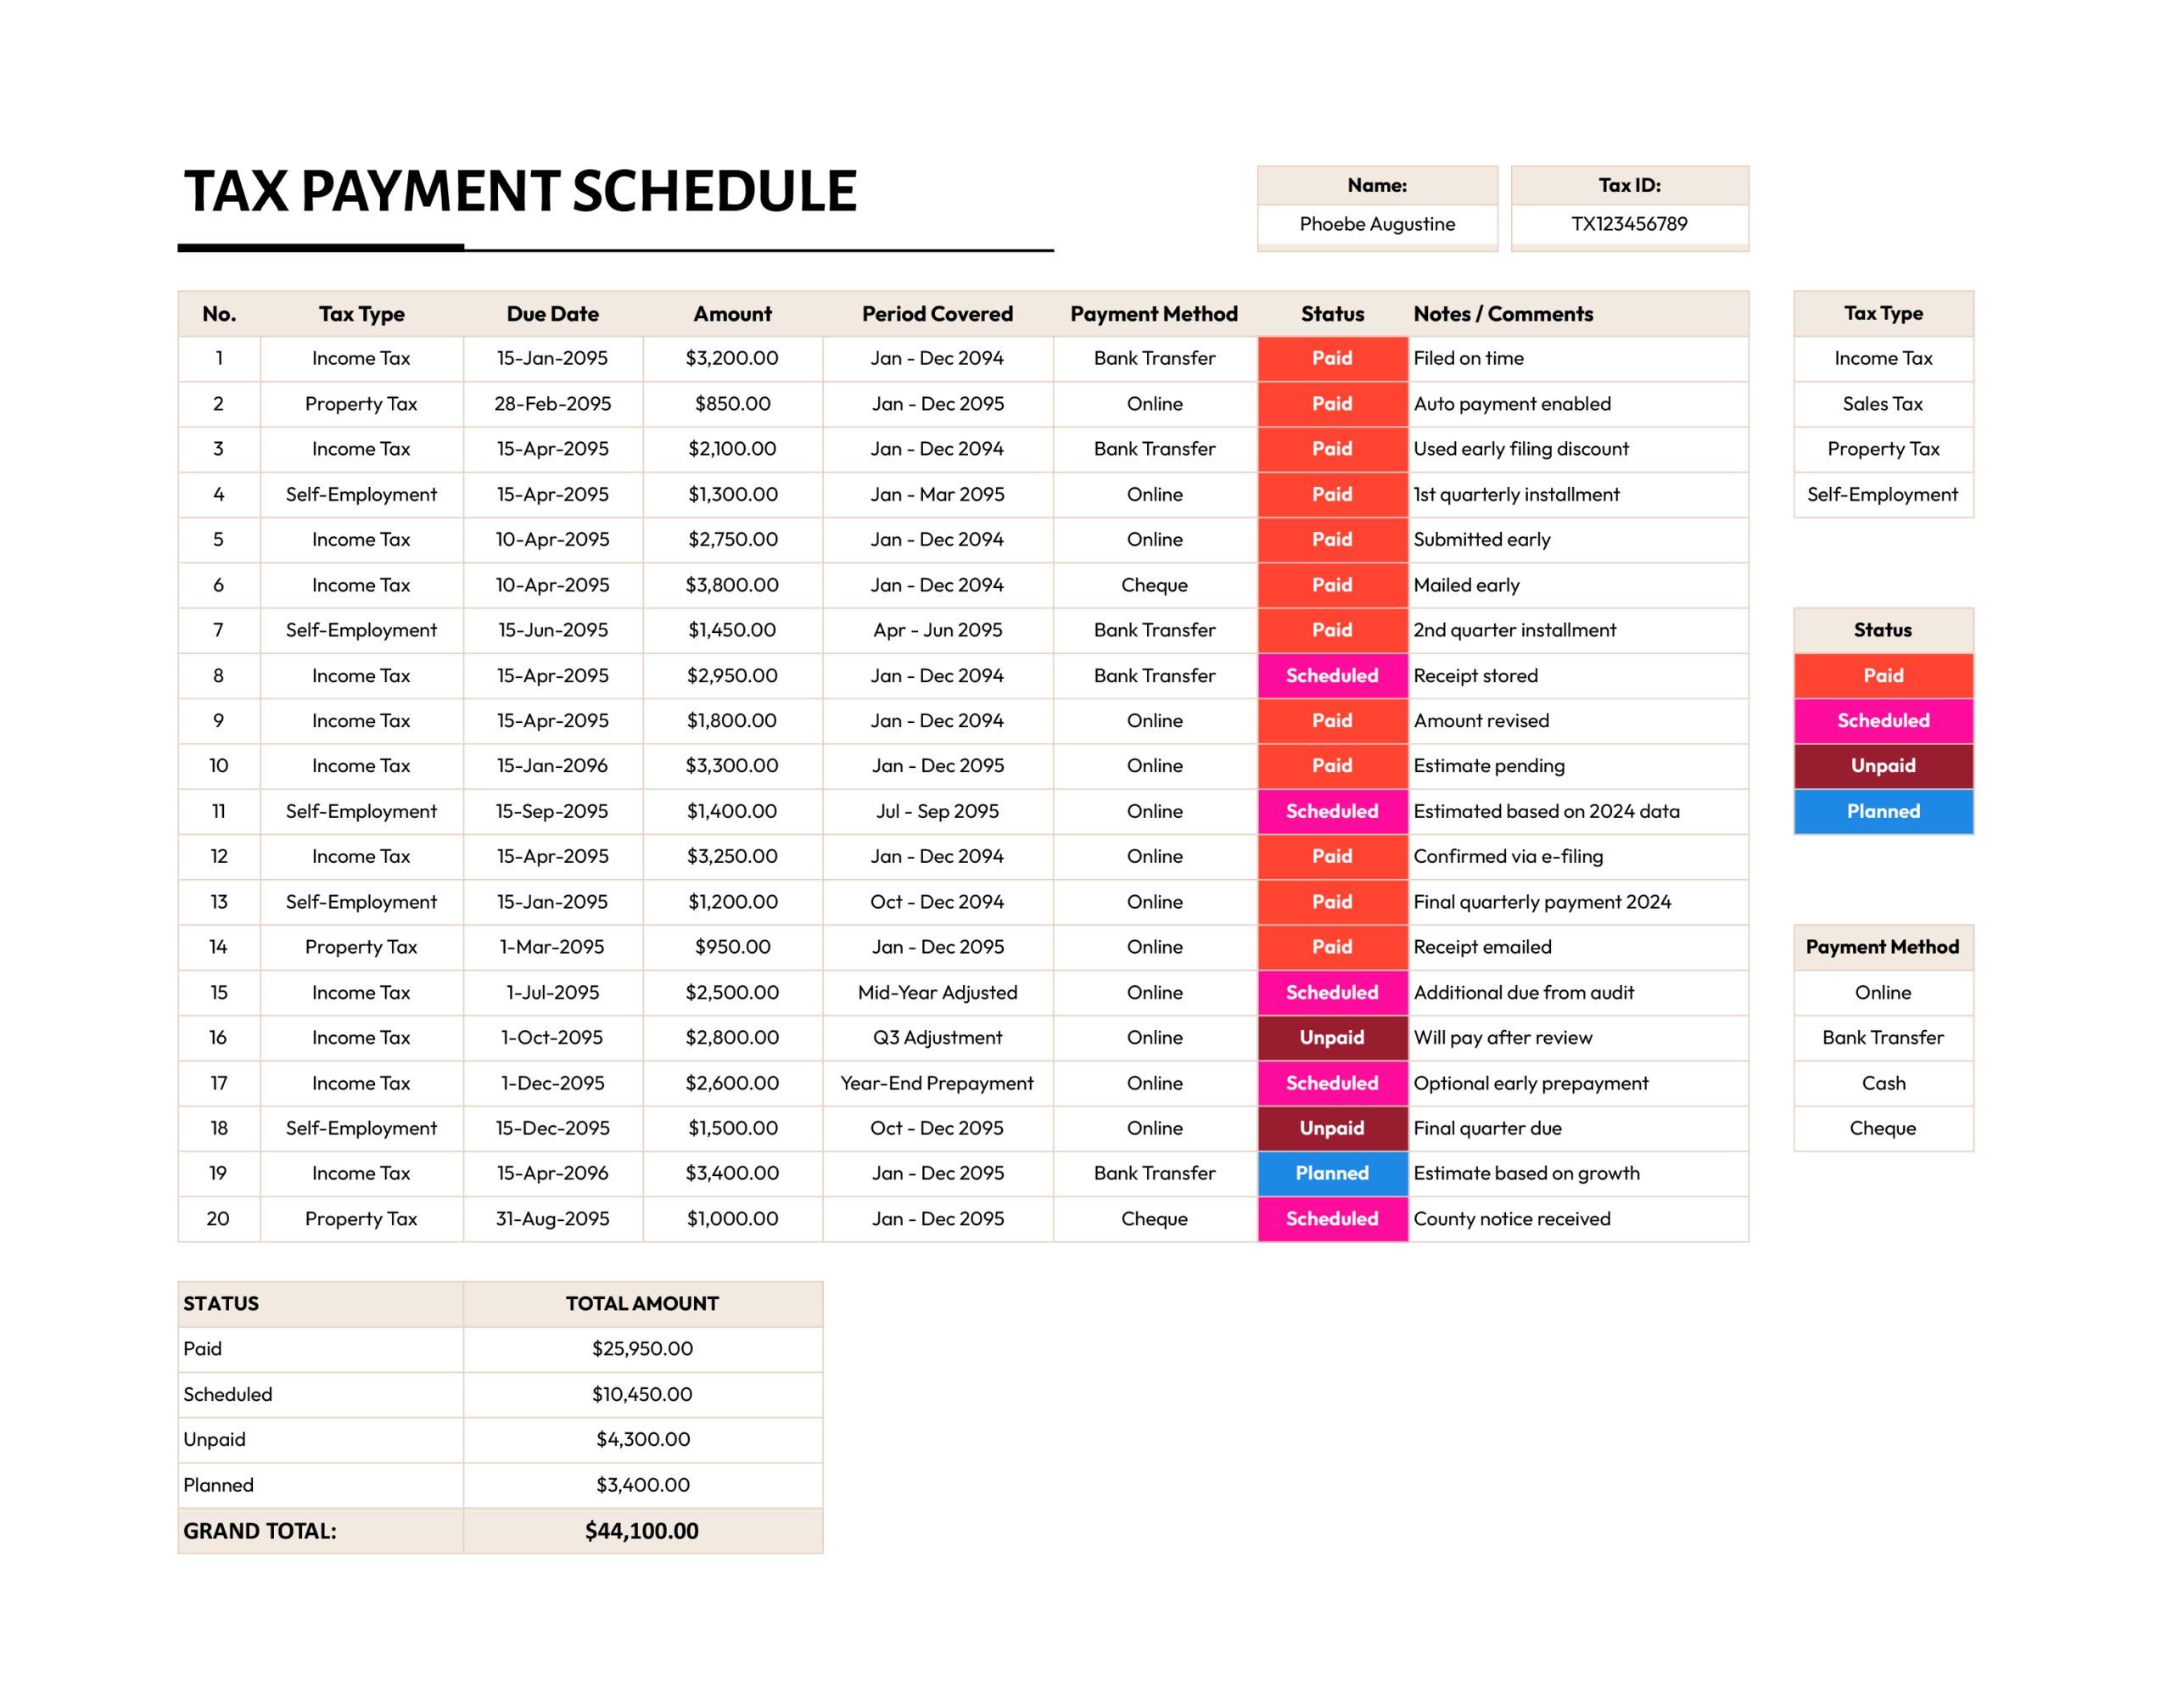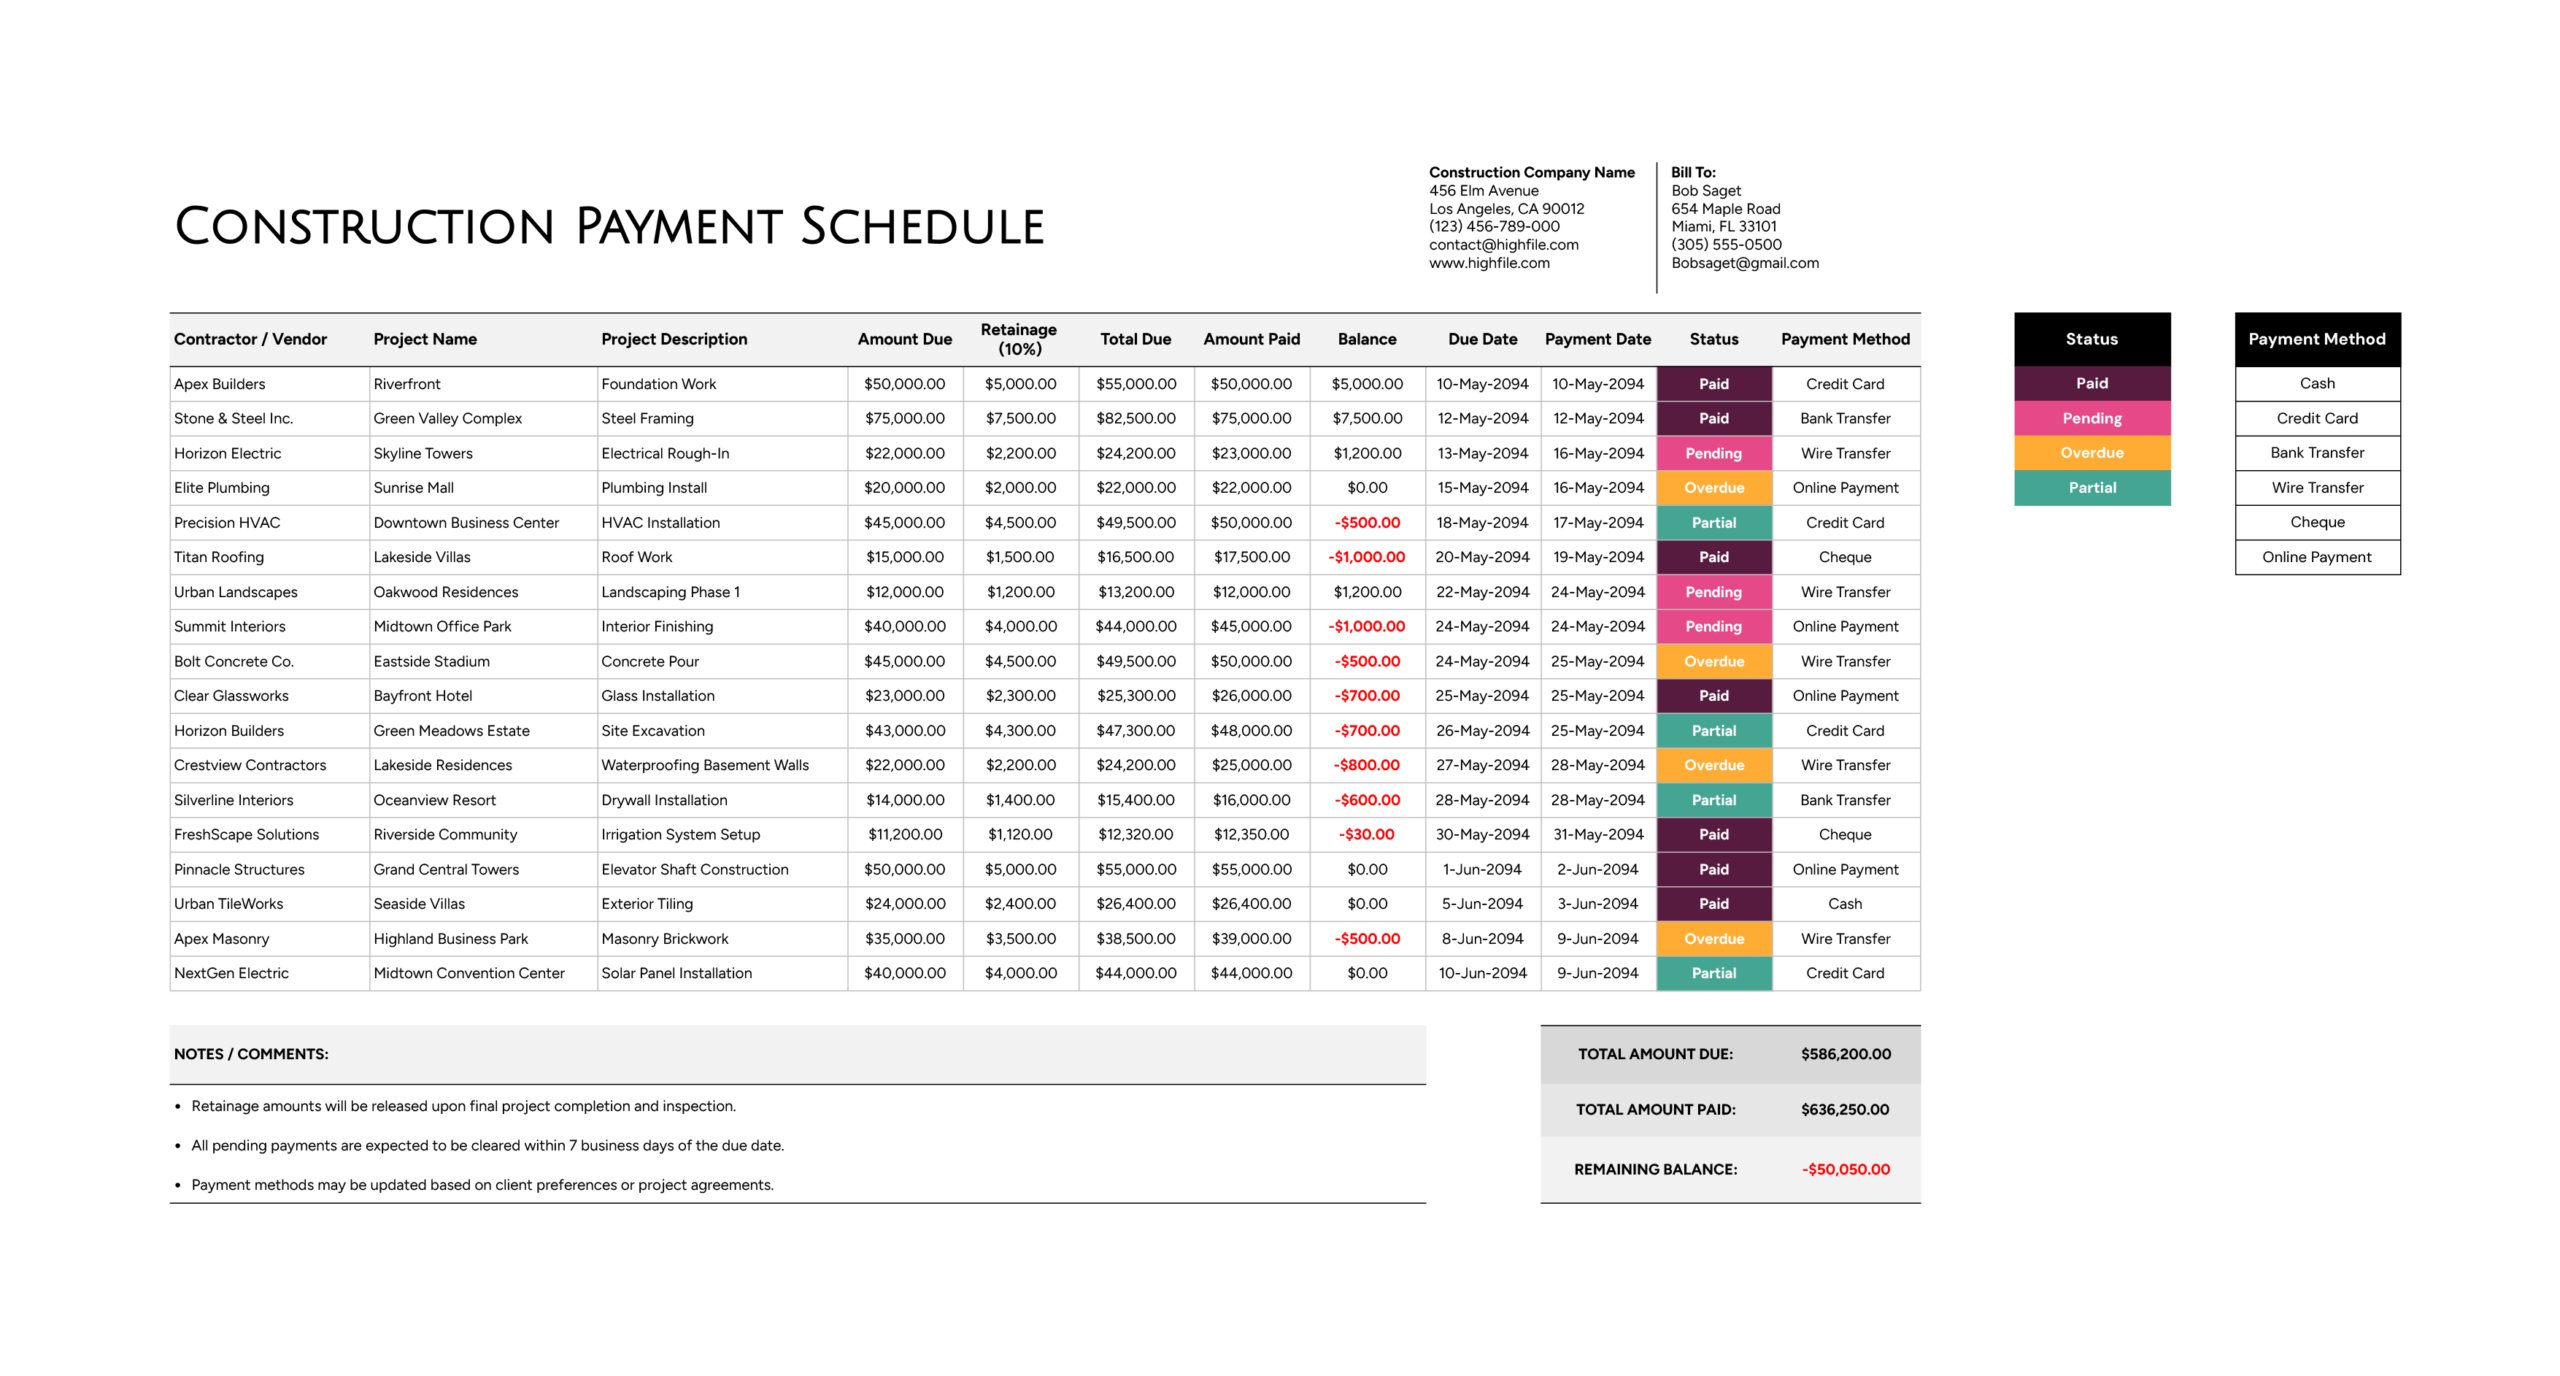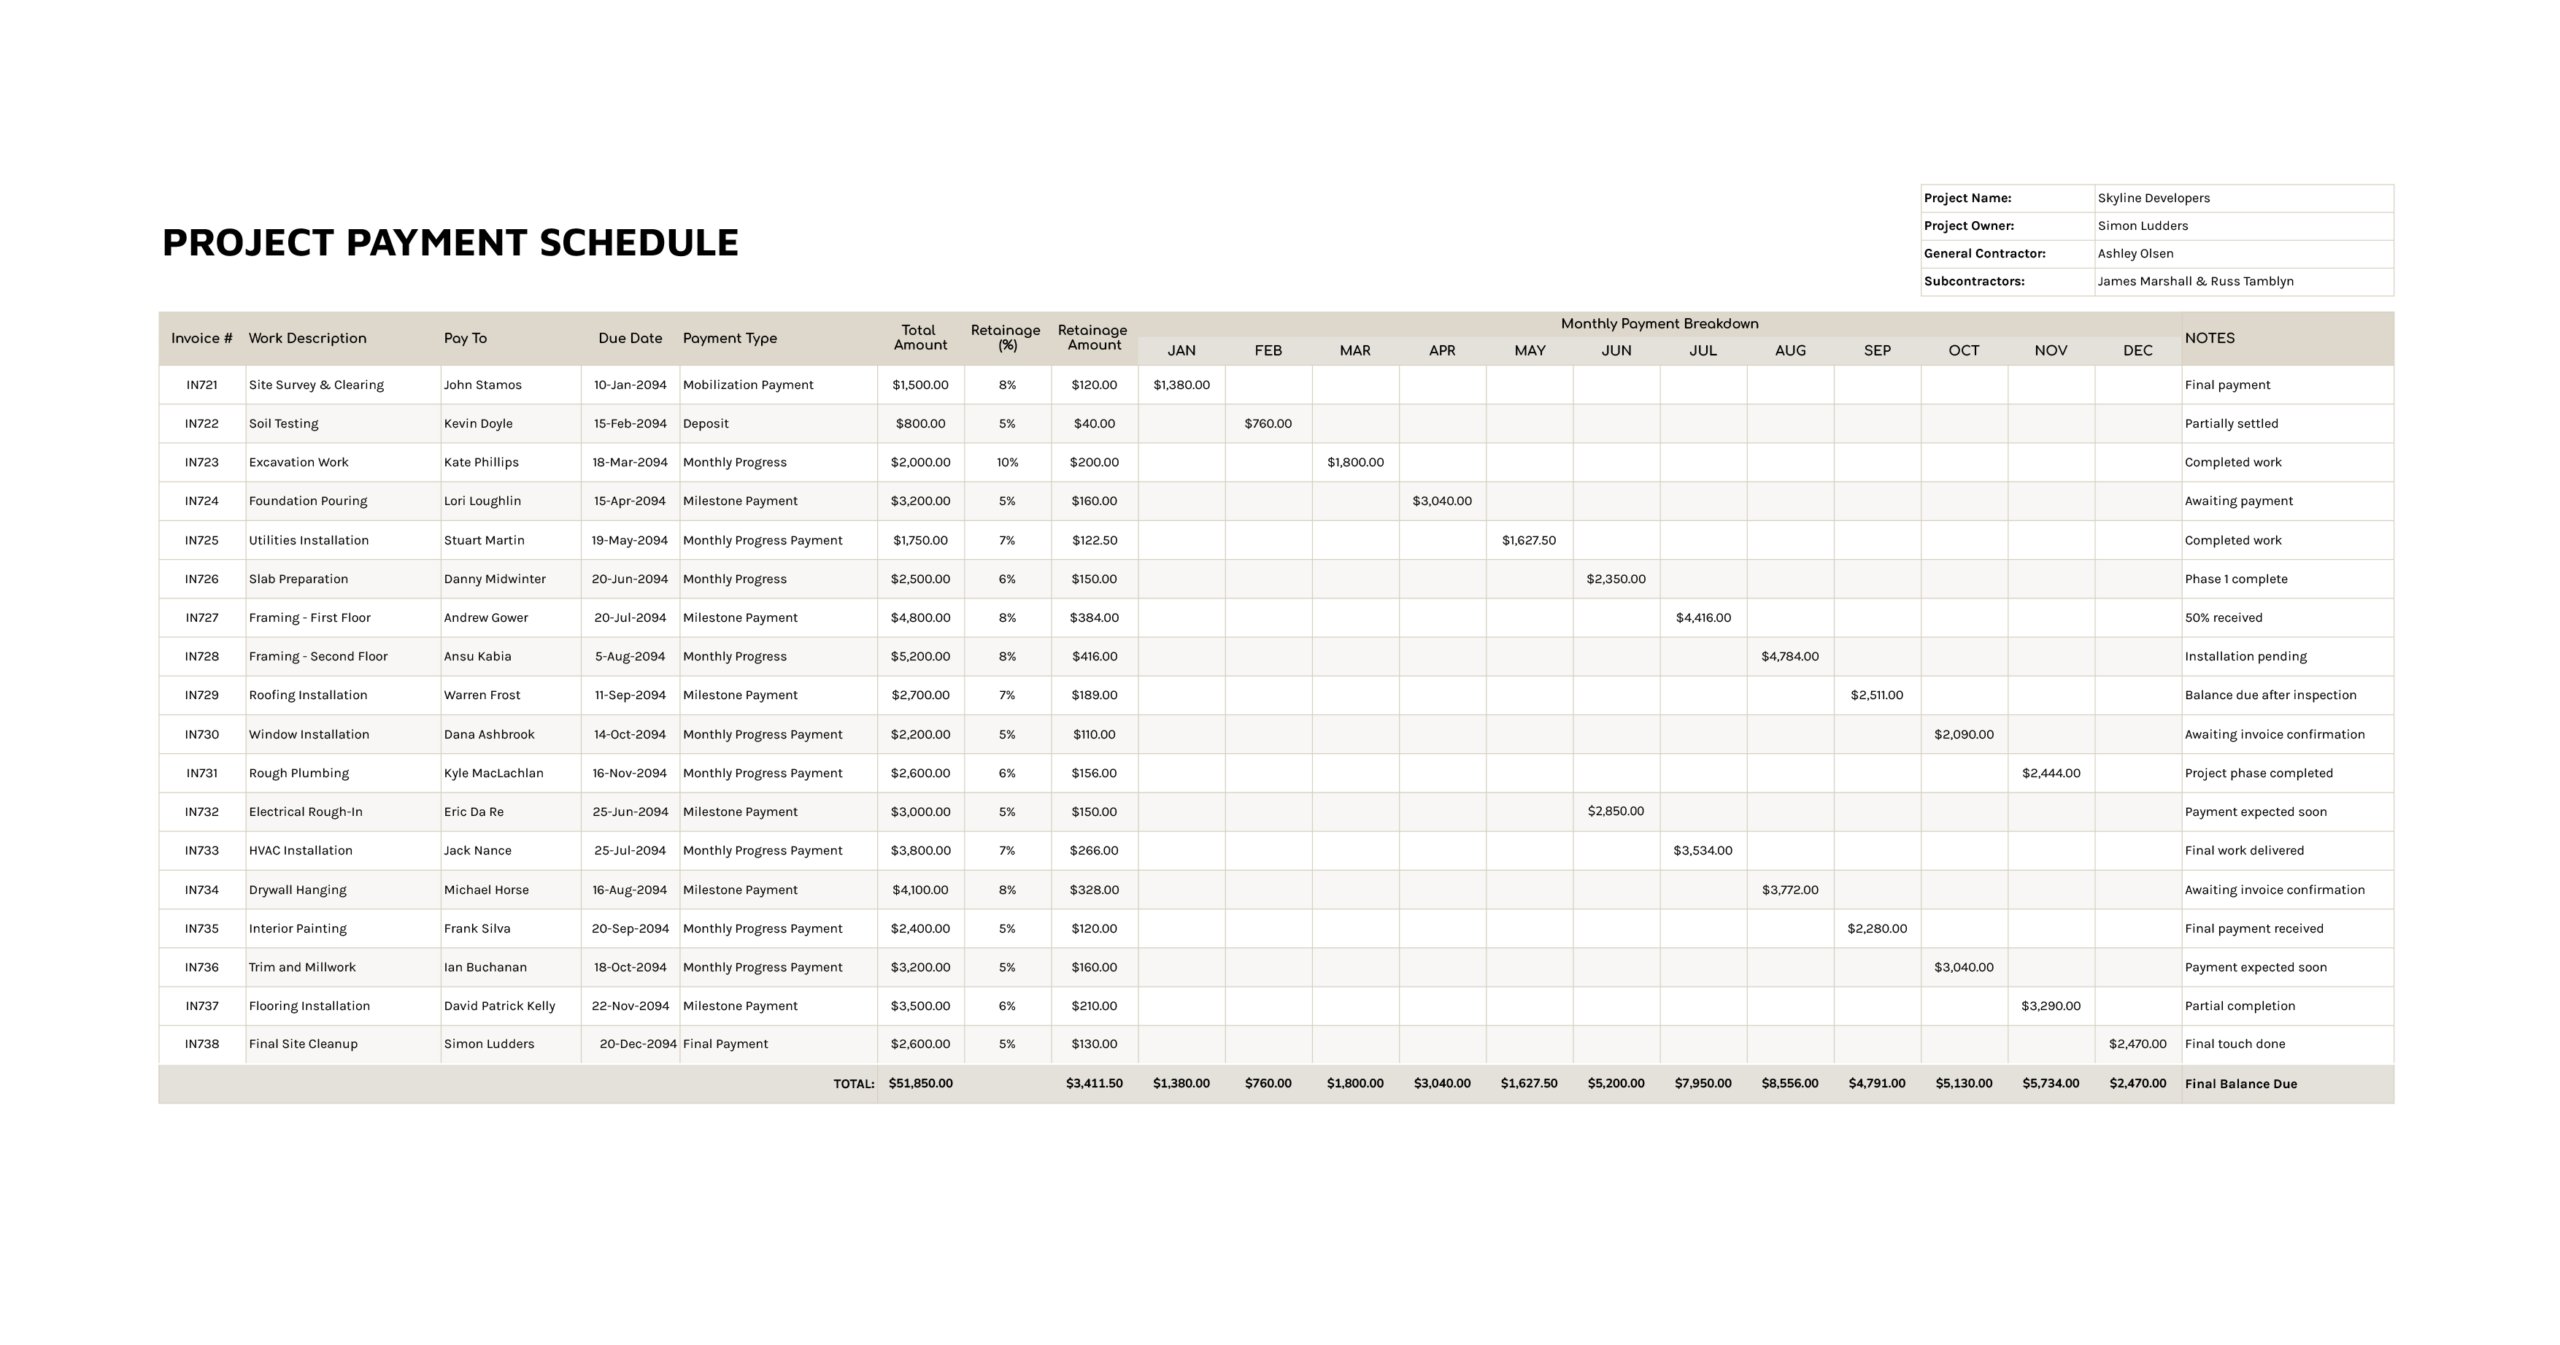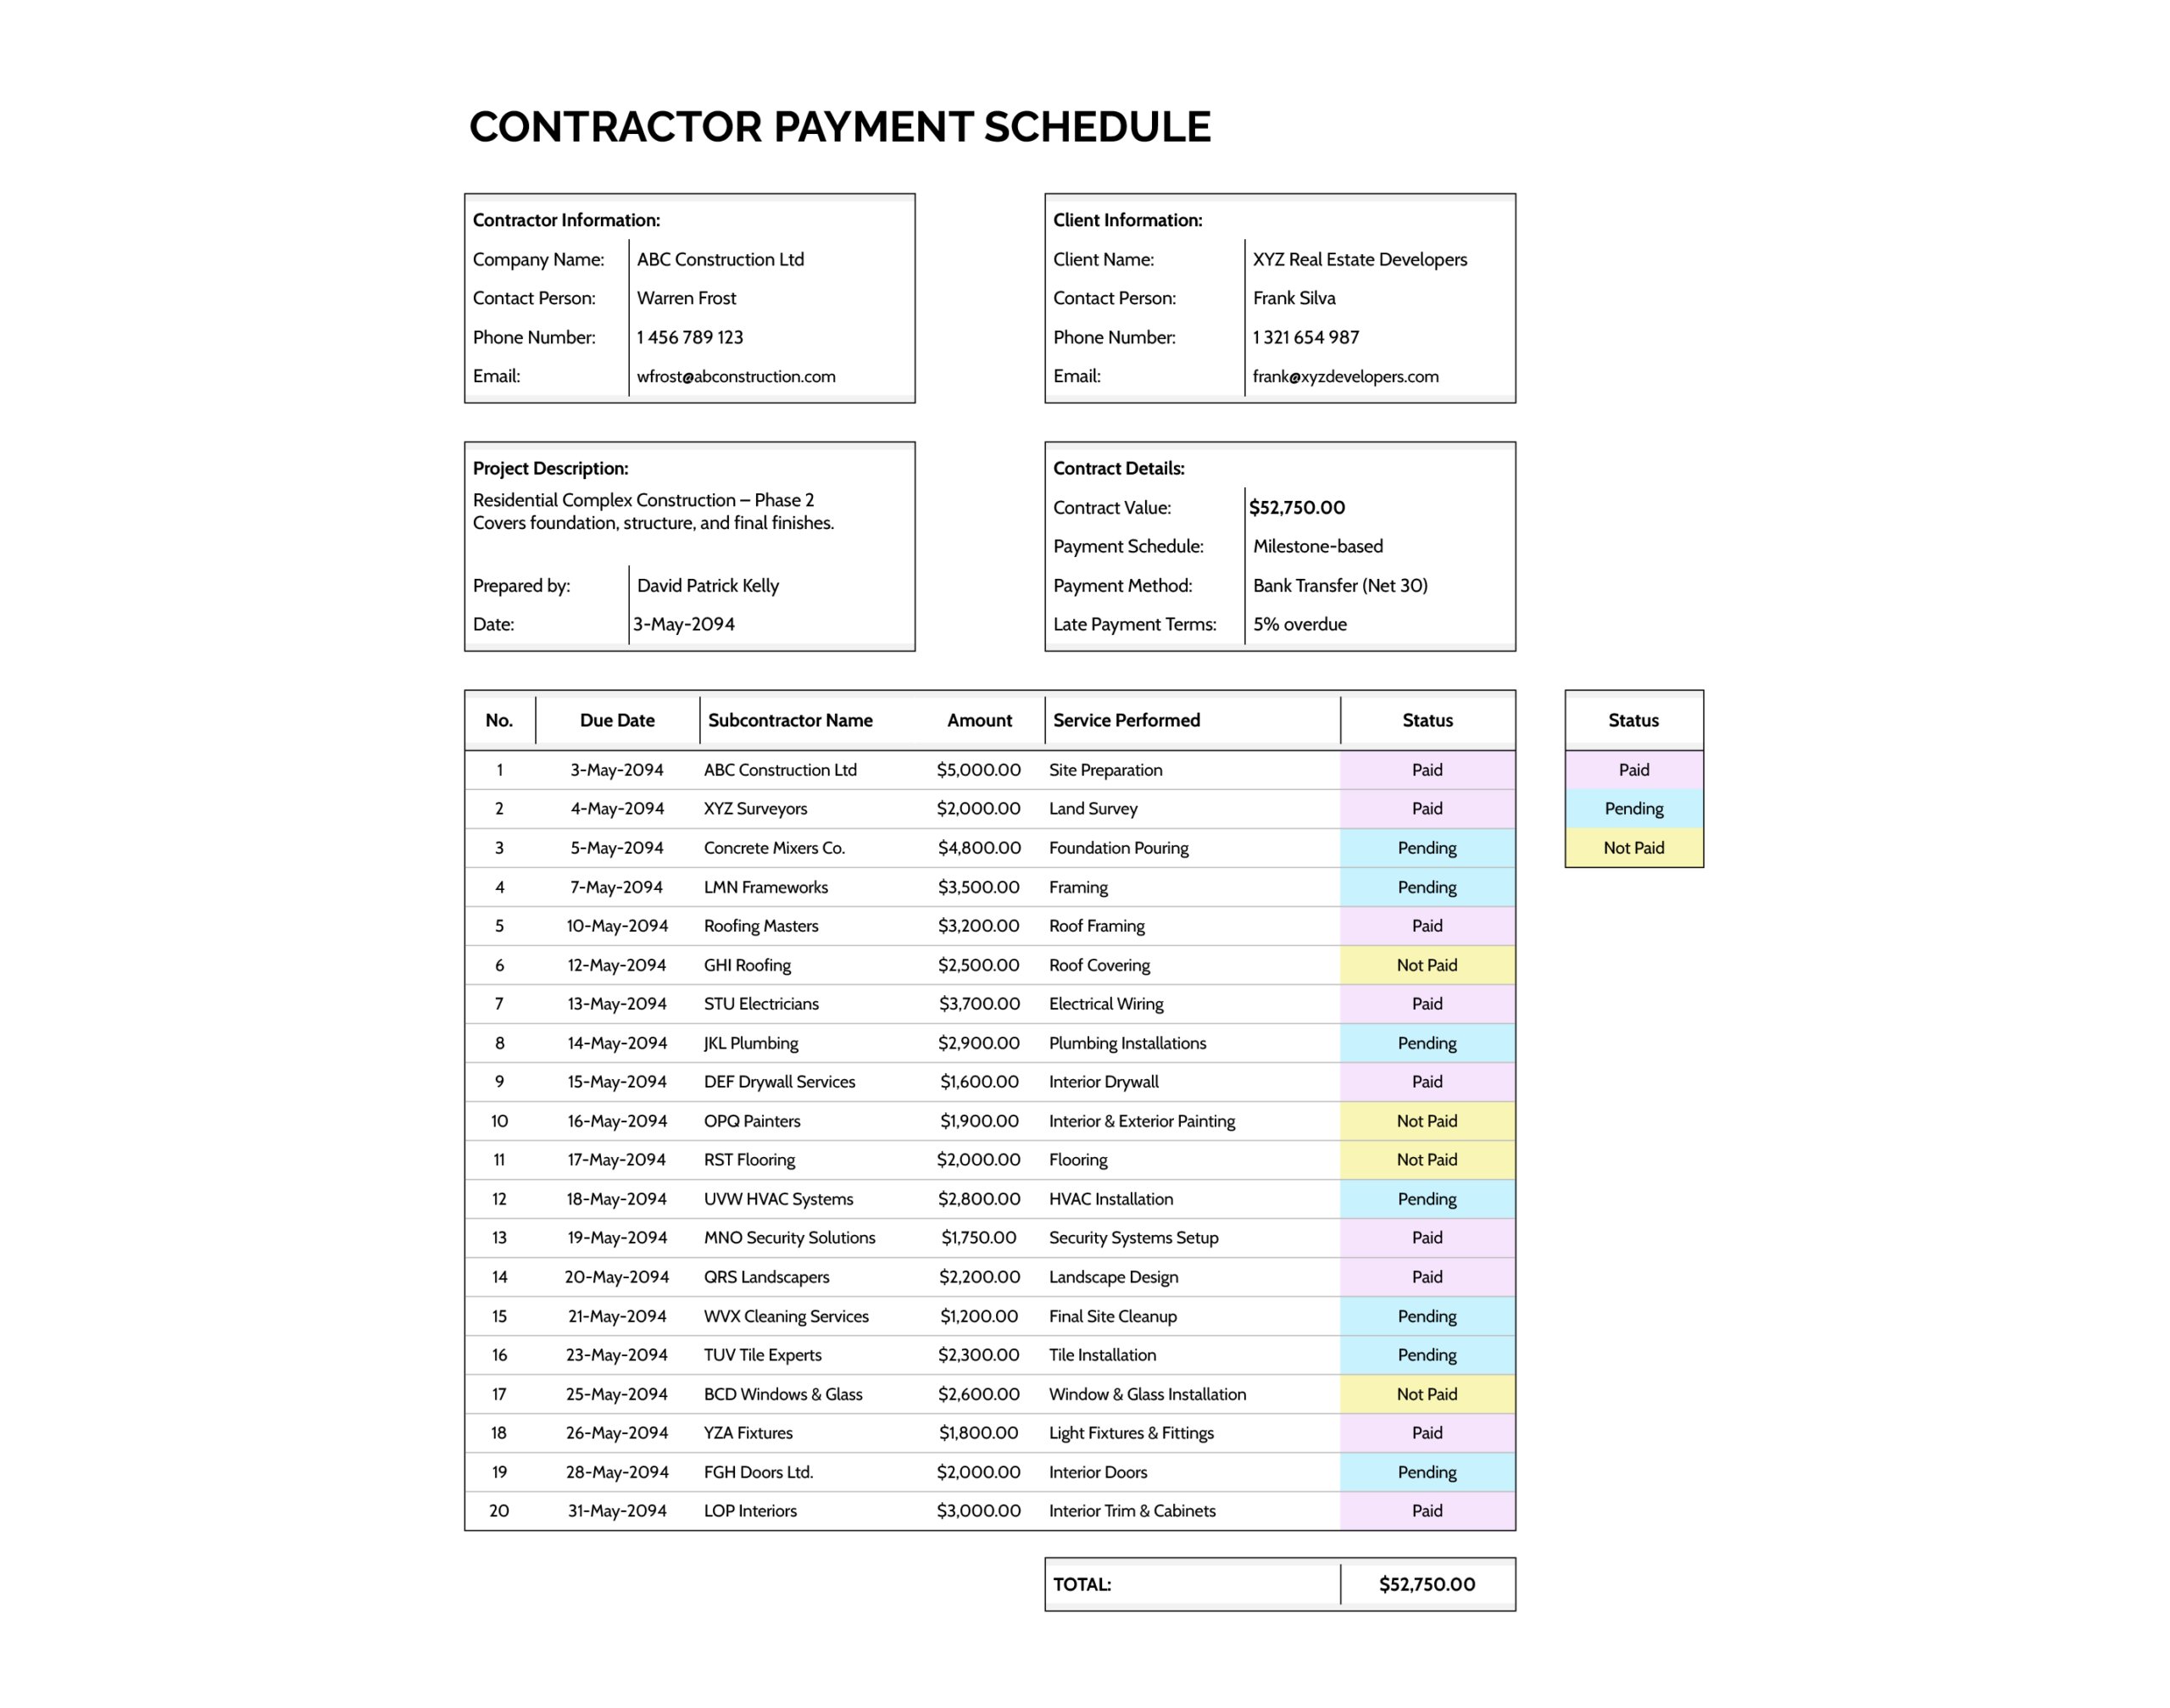


A contractor payment schedule turns the payment terms in a construction contract into a working list that can be checked throughout the job. This contractor payment schedule template is designed with a top section for the project and contract context, followed by a payment register that tracks each subcontractor payment against a due date, scope reference, and payment status.
It is intended for general contractors managing multiple trades, subcontractors tracking incoming payments from a client, and project managers or owners who need one reference during billing reviews. It can be used to plan expected payouts before invoices start coming in, then kept active as a record through closeout when final trade payments, retainage releases, and punch list items are being finished.
The sheet links the “Contract Value” to the amounts entered in the payment table, so the headline number stays aligned with the schedule total. The “Status” column uses a drop-down Data Validation list with visual cues to make it easier to review what is already paid versus what is still pending or not yet paid.
How to Use This Contractor Payment Schedule Template
Set up the header first, then build the payment schedule rows based on how billing and approvals work on the project. A quick decision early on makes the register easier to maintain later. Decide what one row represents for this job, such as one invoice, one milestone, or one trade package, then keep that approach consistent across the table.
Enter Contractor and Client Details
Complete the “Contractor Information” and “Client Information” blocks using the same names shown on the contract and invoices. This keeps the schedule aligned with payment memos and accounting records. If there is a dedicated billing contact for either side, list that person in “Contact Person” so questions about due dates and approvals go to the right place.
Write a Project Description That Matches Billing Reviews
Use “Project Description” for a short scope summary that matches how payments are discussed internally. A phase reference, lot reference, or a brief note about what the job covers is usually enough. Add “Prepared by” and “Date” so it is easy to confirm when the schedule was drafted or last refreshed.
Confirm Contract Payment Terms
Use the “Contract Details” box to mirror the payment language in the agreement. “Payment Schedule” can describe the billing approach, such as milestone based, progress billing, or weekly draws. “Payment Method” can reflect how payments are sent, such as ACH, check, or bank transfer, and can also include invoicing terms like Net 30 if that is part of the process.
For “Late Payment Terms,” capture the clause that affects aging and disputes. If the contract uses a grace period or a specific trigger for late fees, note it here so the schedule reflects what the parties actually follow.
Build the Payment Register
Fill the main table row by row using the project’s approval rhythm. “Due Date” works best when it reflects the expected release date under the contract or pay application cycle, not the day an invoice was emailed. “Subcontractor Name” can be the trade company, vendor, or service provider tied to that payment line. “Service Performed” should match the wording that appears on invoices or pay applications, and it can also carry an invoice number if that detail is needed during reconciliation. “Amount” should match what is expected to be paid for that line under the agreed terms, including tax when tax is part of the billed amount.
Many teams keep retainage releases as separate rows with their own due dates so the closeout phase is easier to track, especially when final payment depends on inspections, lien waivers, or turnover documents.
Track Status and Reconcile Payments
Use the “Status” drop-down to mark each payment as “Paid,” “Pending,” or “Not Paid.” Keep the meaning of each status consistent. A common internal approach is to treat “Pending” as approved and in processing, while “Not Paid” stays for items not yet approved or not yet released.
When a payment is sent, compare the schedule against the bank confirmation and the invoice or pay application. If a payment is short due to retainage or a partial release, adjust the original row to the amount actually paid and add a follow-up row for the remaining balance. This keeps the register aligned with real cash movement instead of forcing one line to represent multiple payment events.
Review statuses at the end of each billing cycle, then sort by “Due Date” to see upcoming payouts and items that may need approvals before they become urgent.
Keep Totals Accurate When Adding Rows or Editing Status Terms
The “TOTAL” line sums the “Amount” column, and the “Contract Value” references that same total. If the project needs more payment lines than the preset table, extend the table by copying the last formatted row downward, then expand the total range so added rows are included.
If status terms need to change to match an internal workflow, edit the status list used for the drop-down and then update the status color rules to match the new wording. Keeping the status list short keeps the table readable during billing calls.
FAQs
Pick the unit that matches approvals. If approvals happen per invoice, keep one invoice per row and place the invoice number in “Service Performed.” If approvals happen per milestone, use milestones per row and keep invoices as reference documents. If one subcontractor bills many times, separate rows for each release usually read better than trying to fit multiple payments into one line.
Retainage is easiest to track as a separate line item. Record progress payment rows at the amount expected to be released after withholding, then add a retainage release row tied to the closeout trigger used on the project, such as final inspection, lien waiver receipt, or turnover documentation. This keeps the remaining balance visible without recalculating every trade line.
Copy the last row of the payment table and paste it downward to continue the same formatting, then expand the total range so added amounts are included in “TOTAL” and reflected in “Contract Value.” Extend the status drop-down and color rules to cover the new rows so status marking stays consistent.