


Onboarding often breaks down for one simple reason. The work is shared, but the ownership is not always visible. HR may be waiting on IT access, managers may assume paperwork is done, and a new hire may not know what “good progress” looks like by the end of the first month. This onboarding schedule template is designed for teams that want a time-based plan with clear ownership, so every department knows what to do across the first 90 days and beyond.
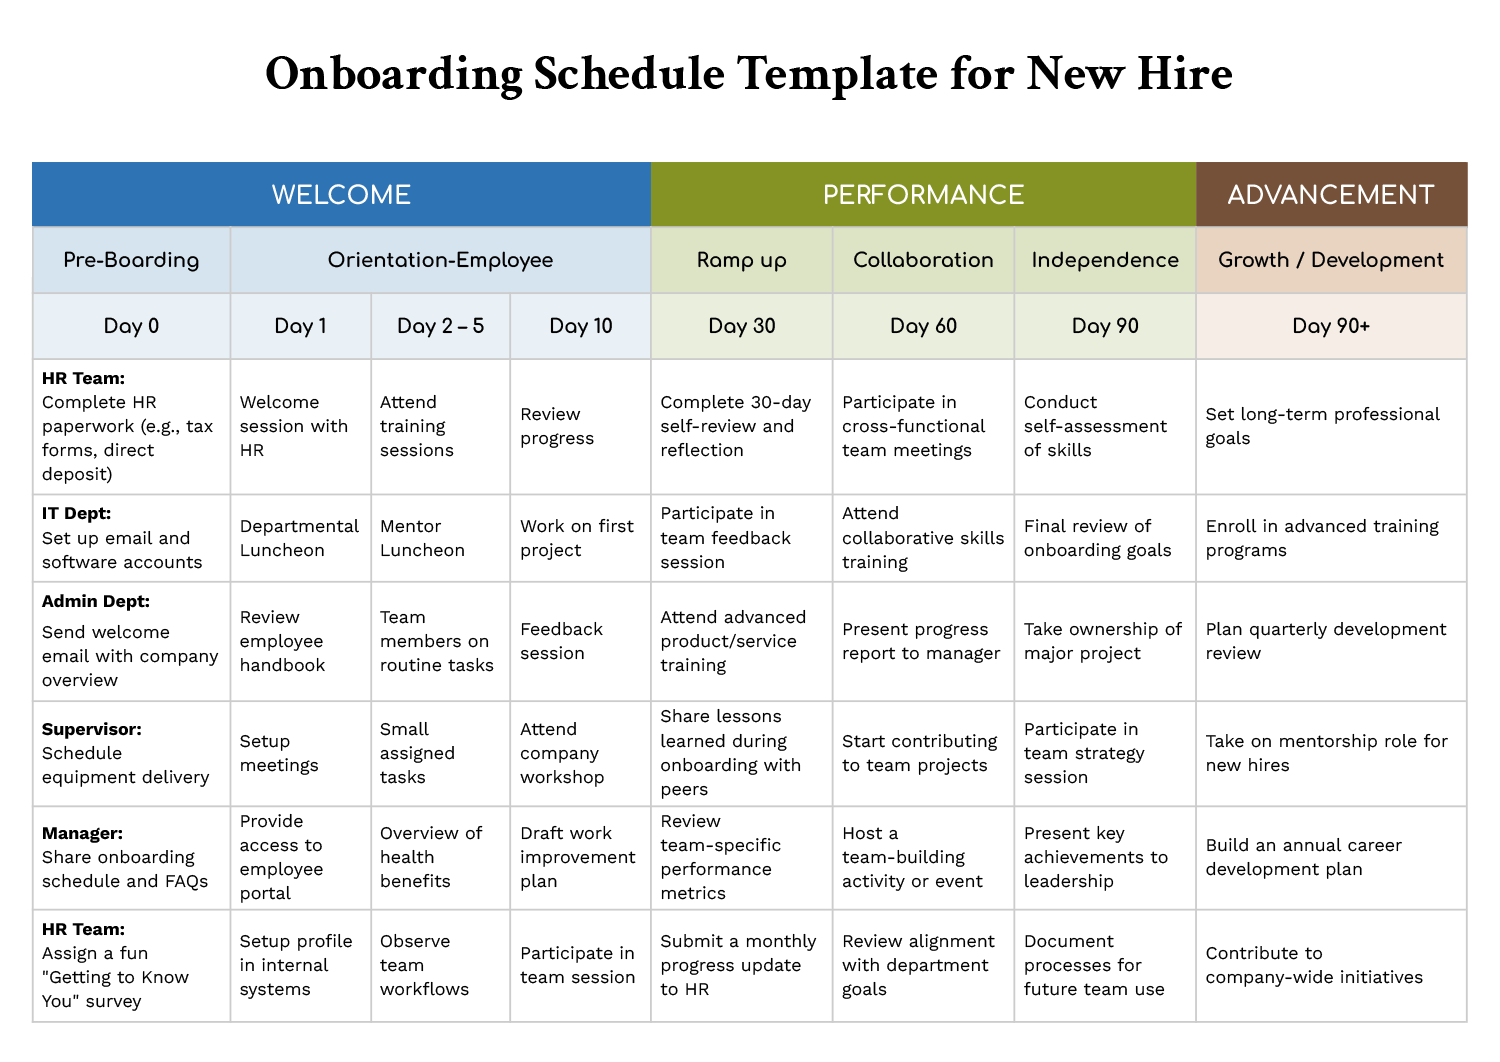
The new hire onboarding schedule template uses a milestone timeline that starts at Day 0 and continues through Day 90+. It is organized around three onboarding stages. Welcome covers pre-boarding and early orientation. Performance focuses on ramp-up, collaboration, and growing independence. Advancement shifts the plan toward development goals after the initial onboarding period. Within each milestone, tasks are grouped by owner groups such as HR, IT, admin, supervisor, and manager, which makes follow-through easier when multiple people are involved.
Milestones and Ownership Breakdown
The top row groups the onboarding journey into Welcome, Performance, and Advancement, then breaks those stages into specific checkpoints like Day 0, Day 1, Day 2 to 5, Day 10, Day 30, Day 60, Day 90, and Day 90+. That layout is useful when you want a plan that works for both early setup and long-term development planning.
The left-side owner rows are what keep the schedule practical. Each row represents the team or role that typically owns that work. For example, early milestones cover items like HR paperwork, email and account setup, handbook review, equipment delivery, and initial meetings. Mid-stage milestones move into first project work, feedback sessions, skill-building, progress reporting, and cross-functional participation. Later milestones cover self-assessments, final onboarding goal reviews, bigger ownership items, and development planning.
How to Customize It Before the New Hire Starts
Start by deciding what this schedule needs to accomplish for the specific role. A sales hire, a designer, and an operations coordinator will all require different ramp-up milestones, even if the early setup steps are similar. Replace any generic tasks with your internal wording so there is no confusion about what “done” means.
Next, review the owner rows and confirm they match how work is assigned in your company. If your IT tasks are handled by an operations lead, rename that row. If your company uses a buddy system, add a row for the buddy and assign touchpoints at Day 1, Day 10, and Day 30.
Then adjust any milestone labels that do not match your onboarding rhythm. Some teams prefer week-based checkpoints, and others use 14-day or 45-day reviews. You can rename milestones while keeping the overall flow so the plan still guides preparation, ramp-up, and independence.
Keep sensitive personal data out of the schedule. Use task wording such as “complete tax forms” or “confirm payroll setup,” and store documents in your HR system or a restricted folder.
Using the Schedule During Onboarding
Once onboarding begins, use the schedule as a shared reference during check-ins. The timeline is already spaced in a way that fits common onboarding conversations, so it works well for weekly follow-ups early on, then 30, 60, and 90-day reviews later.
Day 0 and Day 1 Setup and access
These milestones cover readiness tasks that can block everything else. Use Day 0 to confirm paperwork steps, system access, and equipment delivery. Use Day 1 to anchor the welcome session, introduce the new hire to team routines, and confirm the employee can access the portal and internal systems.
Add a short dependency note inside any task that requires another team’s action. For example, if a training session requires access approval, note that approval owner in the same cell so follow-ups go to the right person.
Days 2 to 10 Training and early contribution
This range is where the new hire moves from orientation into real work. The template includes training sessions, mentor touchpoints, observing workflows, small assigned tasks, and a first progress review. For role-specific clarity, add a small deliverable by Day 10, such as completing a guided assignment, finishing a practice workflow, or submitting an early draft of work for review.
Day 30 to Day 90 Ownership and performance checkpoints
The 30, 60, and 90-day milestones are designed for measurable progress. They include reflection and self-review, team feedback, skill-building, cross-functional participation, progress reporting, and final onboarding goal review. This is a good place to align onboarding with performance expectations without turning the schedule into a formal performance document.
If you want more detail, you can add a short status marker for each milestone. Many teams track whether a task is planned, in progress, completed, or blocked, then review only the blocked items in the next check-in.
Day 90+ Development planning
The final milestone section shifts toward growth. It includes long-term goals, advanced training, development reviews, mentorship, and company-wide contributions. If your organization uses career ladders or competency frameworks, link those materials to the Day 90+ items so the new hire has a clear next step after onboarding.
FAQs
Keep the early access and orientation tasks mostly intact, then customize the ramp-up and independence milestones. A practical approach is to replace Day 10, Day 30, Day 60, and Day 90 items with role-specific deliverables. That keeps the timeline familiar for your internal teams while making the progress expectations meaningful for the role.
Decide upfront who owns updates and when updates are finalized. Many teams assign one person to update status after each check-in, then ask each department owner to confirm completion before the meeting. If you add a status field, keep the choices limited so updates stay quick and readable.
Replace location-based tasks with remote equivalents while keeping the milestone timing. For example, swap in video introductions for in-person sessions, add steps for VPN and MFA enrollment, and include an early “workstation readiness” checkpoint so access and setup issues are handled before training begins.
Keep the task text short and focus on outcomes. Use the schedule as a meeting guide, not a document you only fill out later. If a milestone needs more detail, link a reference document or add a short note in the same cell so the main timeline stays easy to scan.
Yes, as long as you adjust the milestones to fit the working pattern. Contractors may not need benefits enrollment or some HR items, while part-time hires may need longer training windows. The key is to keep owner rows intact and scale the deliverables and checkpoints to match access level and responsibility.


