


Managing 12-hour coverage often means balancing predictable time off with reliable day and night staffing. This every other weekend off schedule template is designed for teams that follow a repeating four-week rotation, where employees alternate between working weekends and having weekends off. It gives supervisors a practical way to plan coverage, communicate assignments, and reduce confusion around which crews are on days, nights, or off duty across the cycle.
It works well for operations, healthcare, security, and any workplace where shift handoffs and weekend staffing need advance planning. Teams can follow the rotation as-is or adjust assignments to match local shift times and staffing rules.
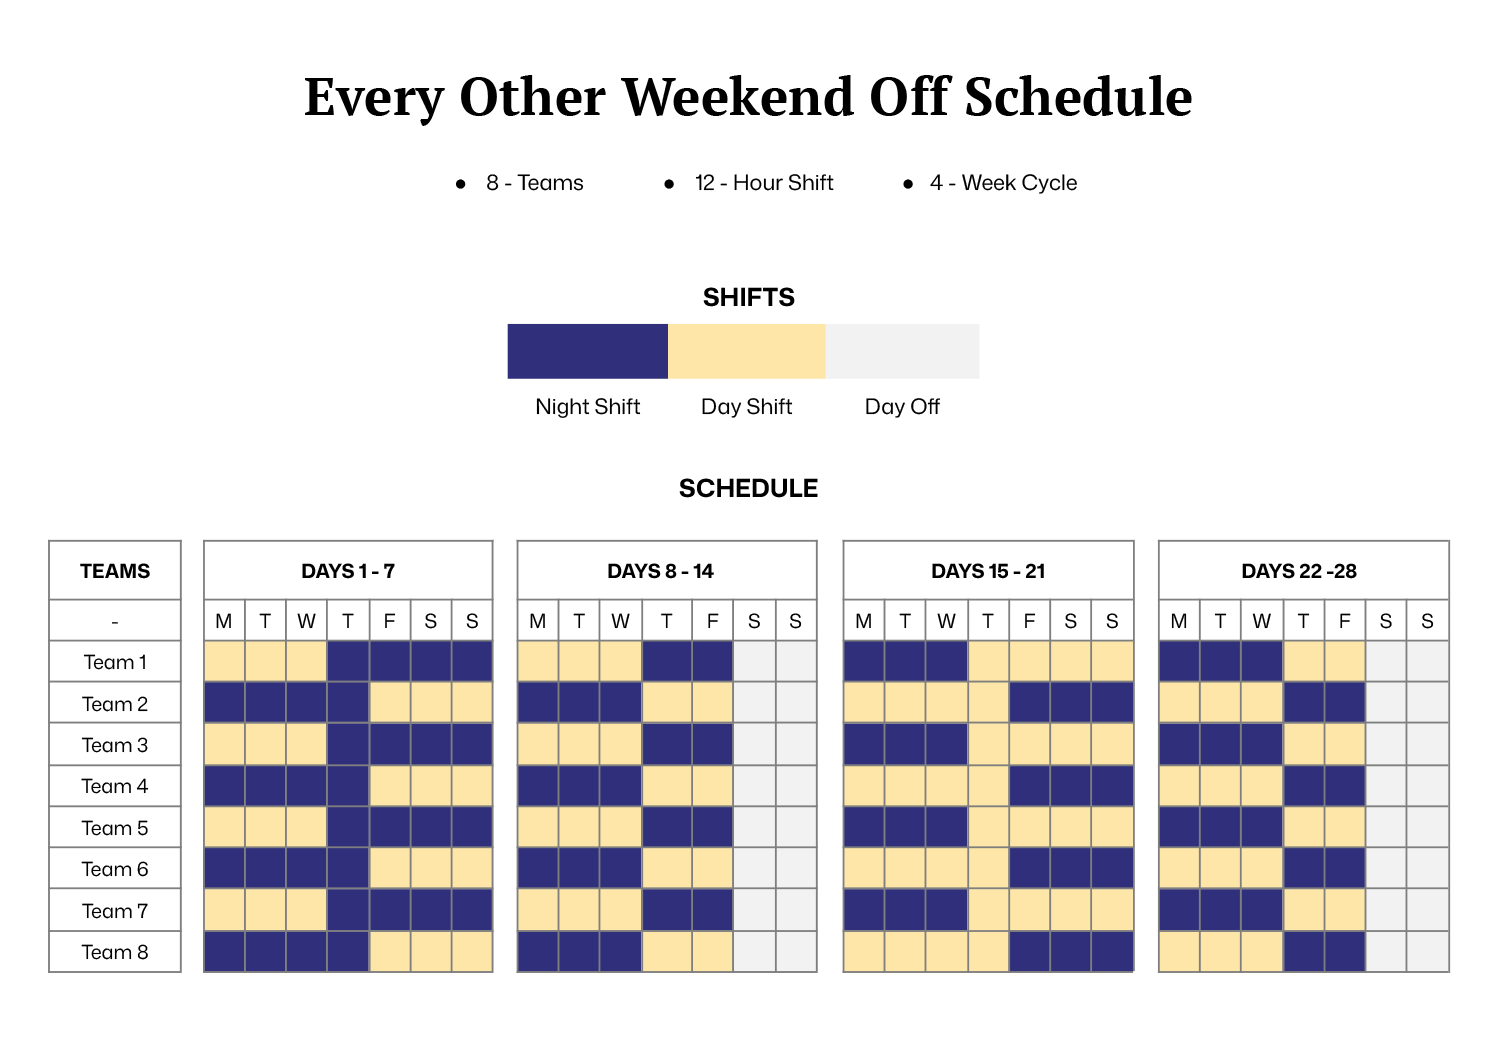
Rotation Layout and Weekend Pattern
The schedule is organized by teams on the left and the cycle days across the top. The rotation spans four weeks, with each week grouped visually so you can scan Monday through Sunday without losing your place. The shift legend uses three categories so the schedule stays readable even when you are reviewing multiple teams at once.
In the spreadsheet versions, shift codes drive the color blocks. You will see letter markers used for the shift types, and conditional formatting applies the matching fill color. In the document versions, the schedule is presented as color-filled cells, which you can recolor or adjust directly inside the table.
Using the Excel and Google Sheets Versions
The spreadsheet version is set up so the day, night, and off pattern is not typed day-by-day for every team. Instead, the schedule area pulls from hidden pattern fields, then displays the correct shift letters in the grid. Conditional formatting reads those letters and applies the matching fill colors, so the schedule stays easy to scan while you adjust rotations.
To get the most value from the spreadsheet, it is worth knowing where the pattern controls live and which cells are meant for edits versus which cells are formula-driven.
Start With Team Names and Shift Times
Update the team labels on the left to match your crews, units, or groups. If your workplace uses specific start and end times, add those times near the shift key so anyone reading the schedule knows what “Day” and “Night” mean in your setting.
Unhide the Pattern Fields When You Need to Change the Rotation
The rotation is controlled by hidden columns on the far right of the sheet. Each team has four pattern cells, one for each week block in the four-week cycle. When you unhide those columns and change the pattern text, the main schedule updates automatically.
- How To Unhide Them In Excel: Select the columns at the far right, right-click, then choose Unhide.
- What You Will See: Short text patterns made of shift letters for each team, split across four weekly blocks.
Only edit the pattern text in the hidden pattern columns when you want to change the rotation logic. Avoid typing over formula cells inside the main schedule grid, since that can break the automatic pattern fill.
How the Pattern Text Controls the Grid
Each character in the pattern corresponds to a day in that week block, in Monday-to-Sunday order. The schedule grid reads that character and displays the matching shift letter. The conditional formatting then shades the cell based on the letter shown.
- Use D for day shift
- Use N for night shift
- Use O for day off
- Use _ as an alternate off marker in the pattern fields if you prefer, since the schedule logic treats non D and non N as off
If your crews follow the same pattern but start on different days, shift the start by rotating the pattern text. Move the first character to the end to push the schedule forward by one day, or move the last character to the front to pull it back by one day.
Weekend-off Cells That Are Manually Set
In this template, some weekend off cells are typed directly as O in the schedule grid, rather than being formula-filled. If you want different weekends off, adjust those O cells for the affected teams, then review the hidden weekly pattern text so the rest of the week stays aligned with your intended rotation.
How the Color Coding Is Applied
The sheet uses conditional formatting rules that look for the shift letters in the schedule cells.
- D Cells receive the day-shift shading
- N Cells receive the night-shift shading
- O Cells receive the day-off shading
If you want different colors, edit the conditional formatting rules rather than recoloring cells manually. That keeps the shading tied to the shift letters so future pattern edits keep the correct colors.
Handling Pto, Training, and Last-minute Changes
For schedule changes, keep the original D, N, or O in place for the rotation pattern, then use cell comments or a small note area to record the change, such as PTO, Training, or Swap details. That approach keeps the rotation logic intact and reduces the chance of breaking the formatting rules.
If you want, paste the current “Spreadsheet Version” paragraph you wrote in the description, and I’ll rewrite it into a polished, fully aligned section using the guidance above.
How to Use the Word and Google Docs Versions
The Word and Google Docs versions are intended for posting, printing, and sharing a rotation that stays readable without spreadsheet formulas. Use them when you need a schedule you can send as a PDF, place in a breakroom, or include in a supervisor packet for approvals and coverage review.
Start by updating the title and cycle dates at the top so the schedule clearly matches the rotation period being posted. Then rename the teams on the left to match your crews, units, or shift groups. If your workplace defines “day” and “night” by specific start times, add those times near the shift key so the schedule is understandable without extra context.
After that, review the table shading and shift letters. Each cell already shows the intended rotation pattern, so your edits should focus on assignment changes and local labeling. If you need to change the weekend-off placement for a team, update the relevant Saturday and Sunday cells first, then adjust the surrounding days so the rest pattern still matches your staffing plan.
For real-world edits that come up after posting, keep changes easy to audit. Update the affected cells and add a short note directly in the cell or as a comment, depending on how your team reviews changes. Initials and a short label, such as PTO or TR, are usually enough to show what changed and who approved it.
If you reuse the schedule for future cycles, duplicate the page, update the dates, and review the team labels before sharing. That keeps your rotation history organized and reduces mix-ups when staff refer back to older postings.
Adjusting Coverage and Team Size
This template is arranged for eight teams over a four-week cycle. If your workplace uses fewer teams, remove or hide the unused rows and then review each day to confirm that required coverage is still met. If you need to add teams, copy an existing team row and update the shift pattern in the hidden pattern columns so the new team follows the intended rotation.
After changing the number of teams, review the schedule day by day. Look down each column and count how many teams are assigned to day shift and how many are assigned to night shift. Compare those totals with your staffing requirement for that date. This column-based review is more accurate than scanning each team row individually because it shows whether coverage is balanced across the operation.
When adjusting team count, pay close attention to weekend placement. Confirm that weekend-off blocks remain staggered between teams so alternating weekends off are preserved across the cycle.
Keeping the Rotation Balanced
An every other weekend off rotation works best when day and night assignments are distributed evenly over the full four-week cycle. After making edits, review each team’s total number of day shifts, night shifts, and off days within the 28-day span.
If one team has a heavier night load, adjust the weekly pattern cell rather than editing isolated grid cells. That keeps the cycle predictable when you reuse it for future periods.
Reviewing the Schedule Before Posting
Before sharing the schedule, take a few minutes to review the full four-week cycle carefully. Start by scanning the Saturday and Sunday columns to confirm that alternating weekend-off blocks are placed correctly for each team. Then review the schedule column by column to make sure the number of day and night assignments meets your staffing requirements for every date. After that, check that no formula-driven cells in the grid were accidentally overwritten during edits, since those cells should still respond to changes made in the hidden pattern fields. Finally, confirm that conditional formatting is still applying the correct colors to D, N, and O markers. A brief review like this helps prevent posting errors and keeps the rotation ready for reuse in future cycles.
FAQs
Scan Saturday and Sunday columns across all four weeks. Each team should have weekend-off blocks separated by one working weekend. If a team shows two consecutive off weekends or two consecutive working weekends, review that team’s weekly pattern cell.
Edit that team’s pattern cell in the hidden columns rather than changing individual grid days. This updates the full week block and keeps the cycle reusable. After editing, review the balance of day and night coverage across other teams.
Review the schedule column by column. Count the number of D and N assignments per day and compare that to your required staffing level. This vertical review ensures daily coverage is accurate.
That cell will stop responding to changes made in the hidden pattern fields. If that happens, copy the formula from the same position in another team row and paste it back into the affected cell.
Yes. The D and N labels represent shift type, not hours. Add your local start and end times near the legend so the schedule reflects your actual shift duration.
Duplicate the sheet or copy the 28-day grid forward, then update the date references in your header area. Keeping each cycle separate avoids confusion when reviewing previous postings.