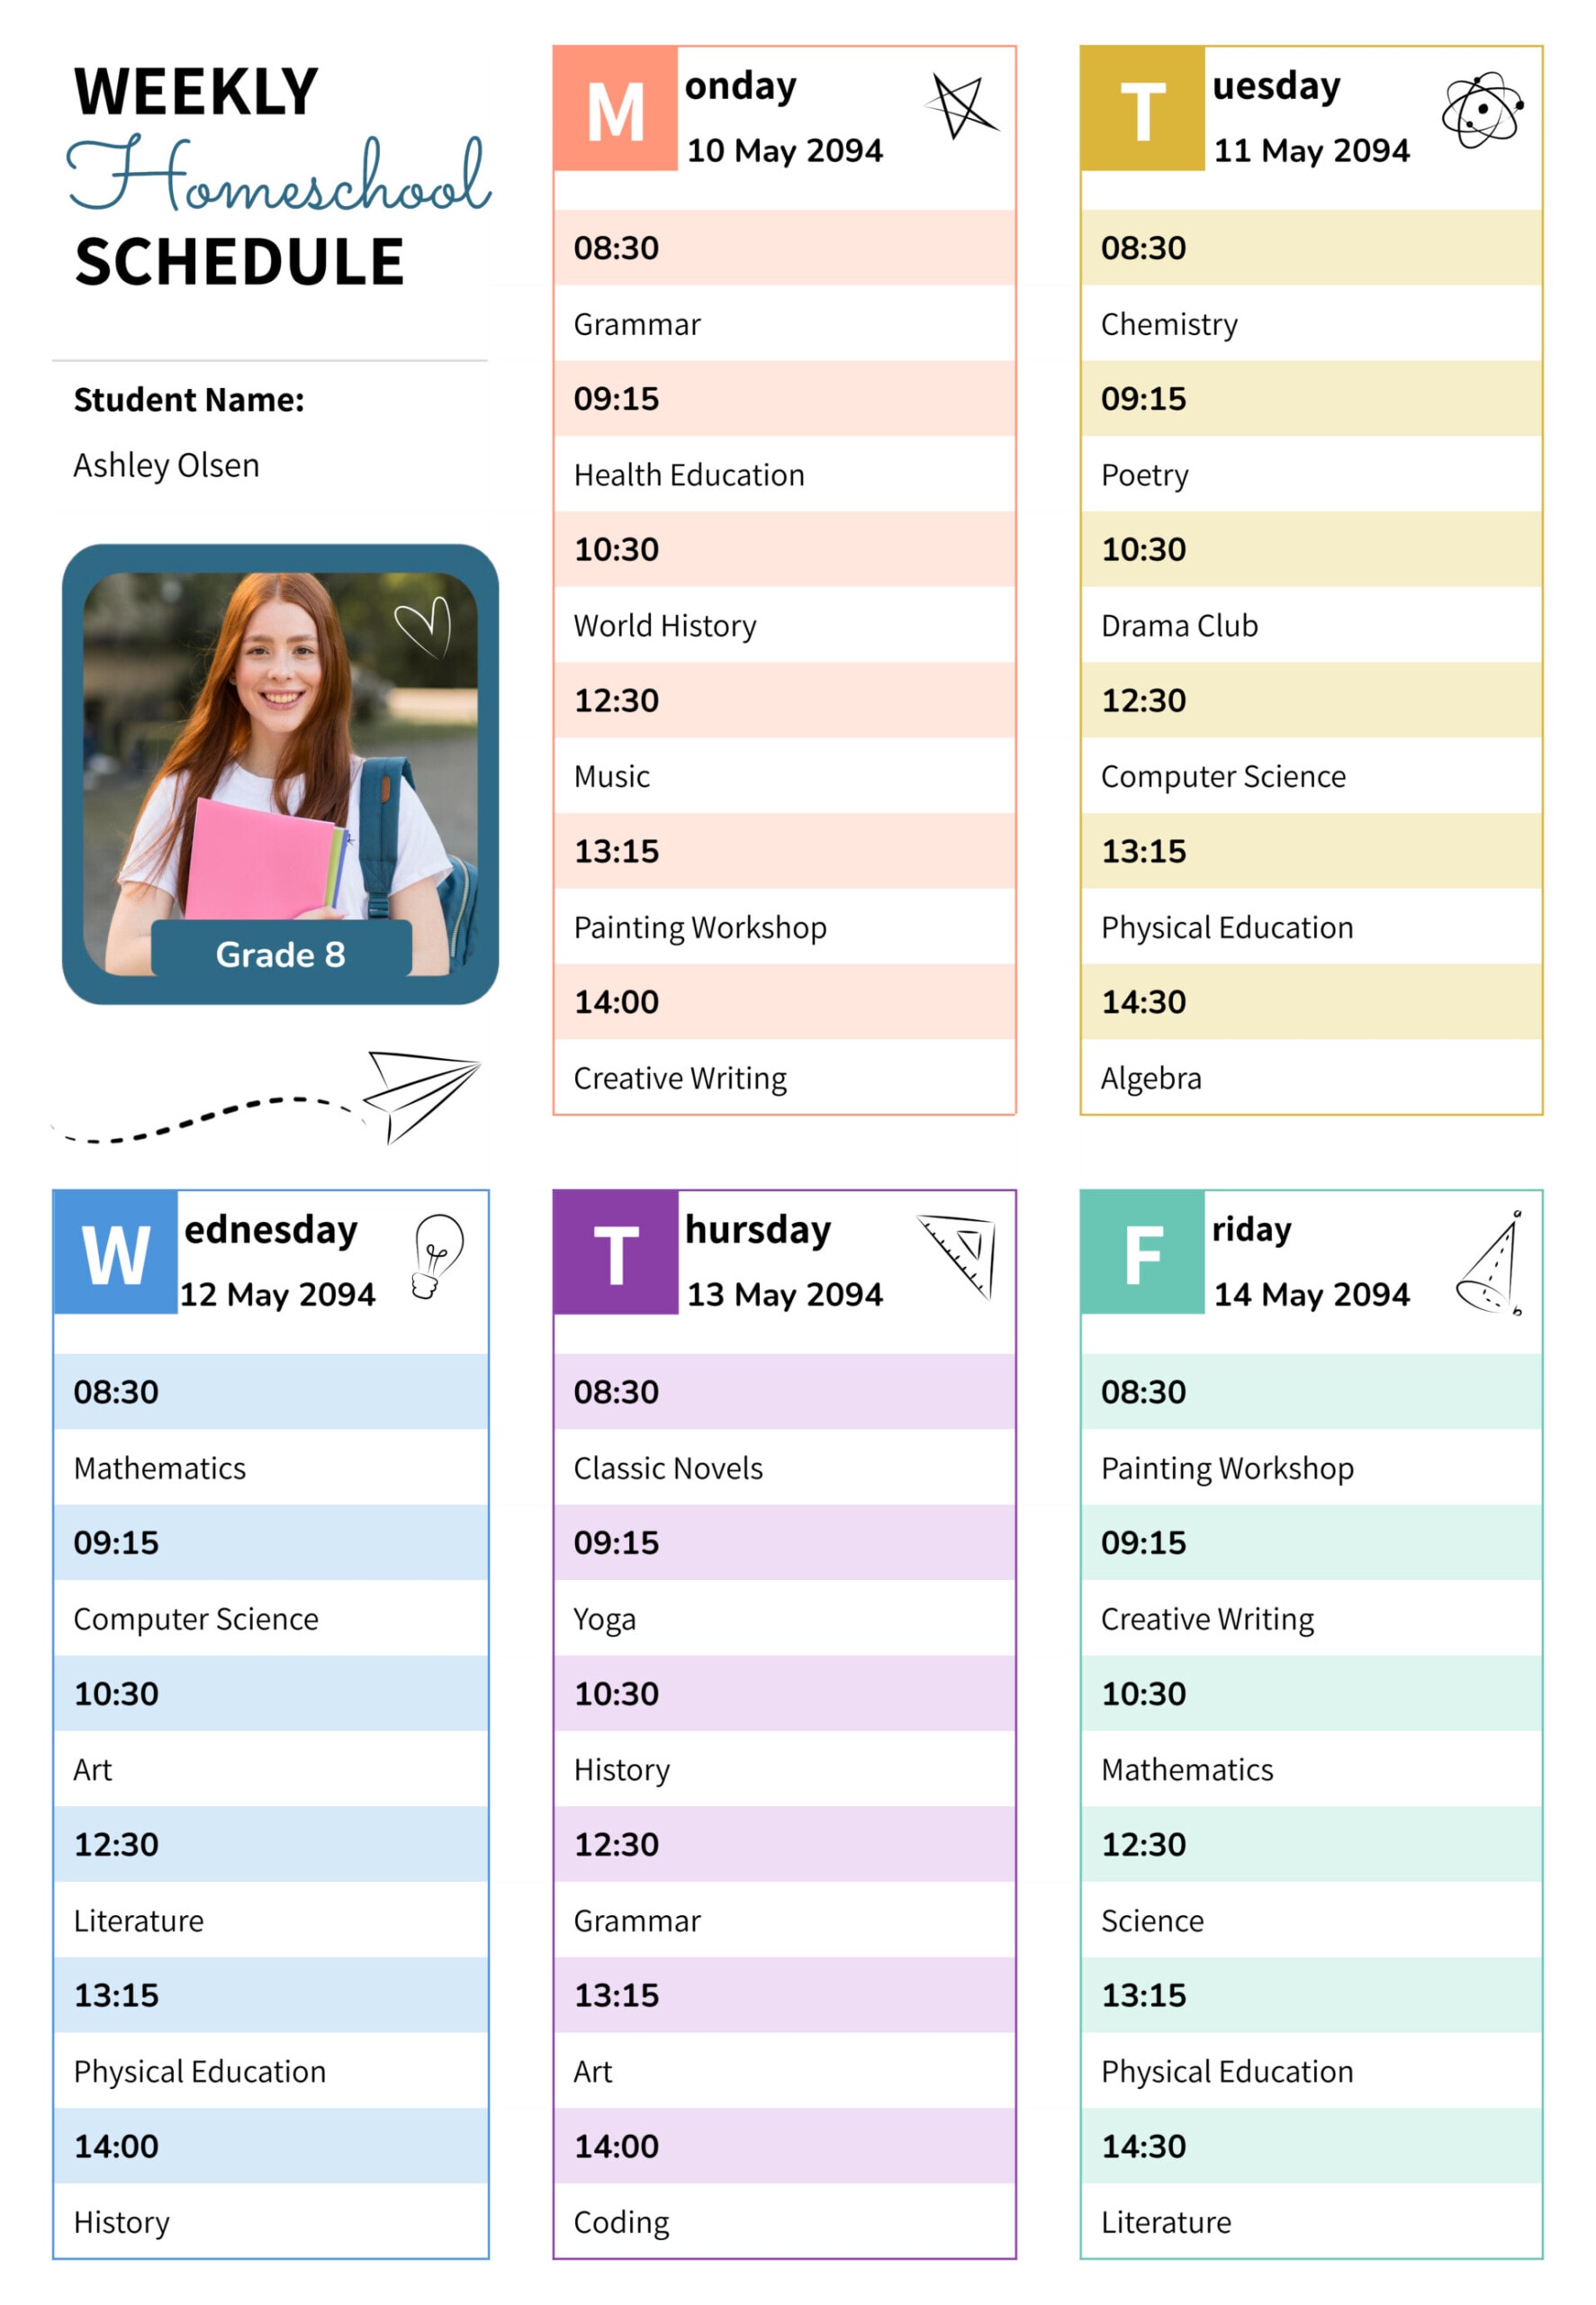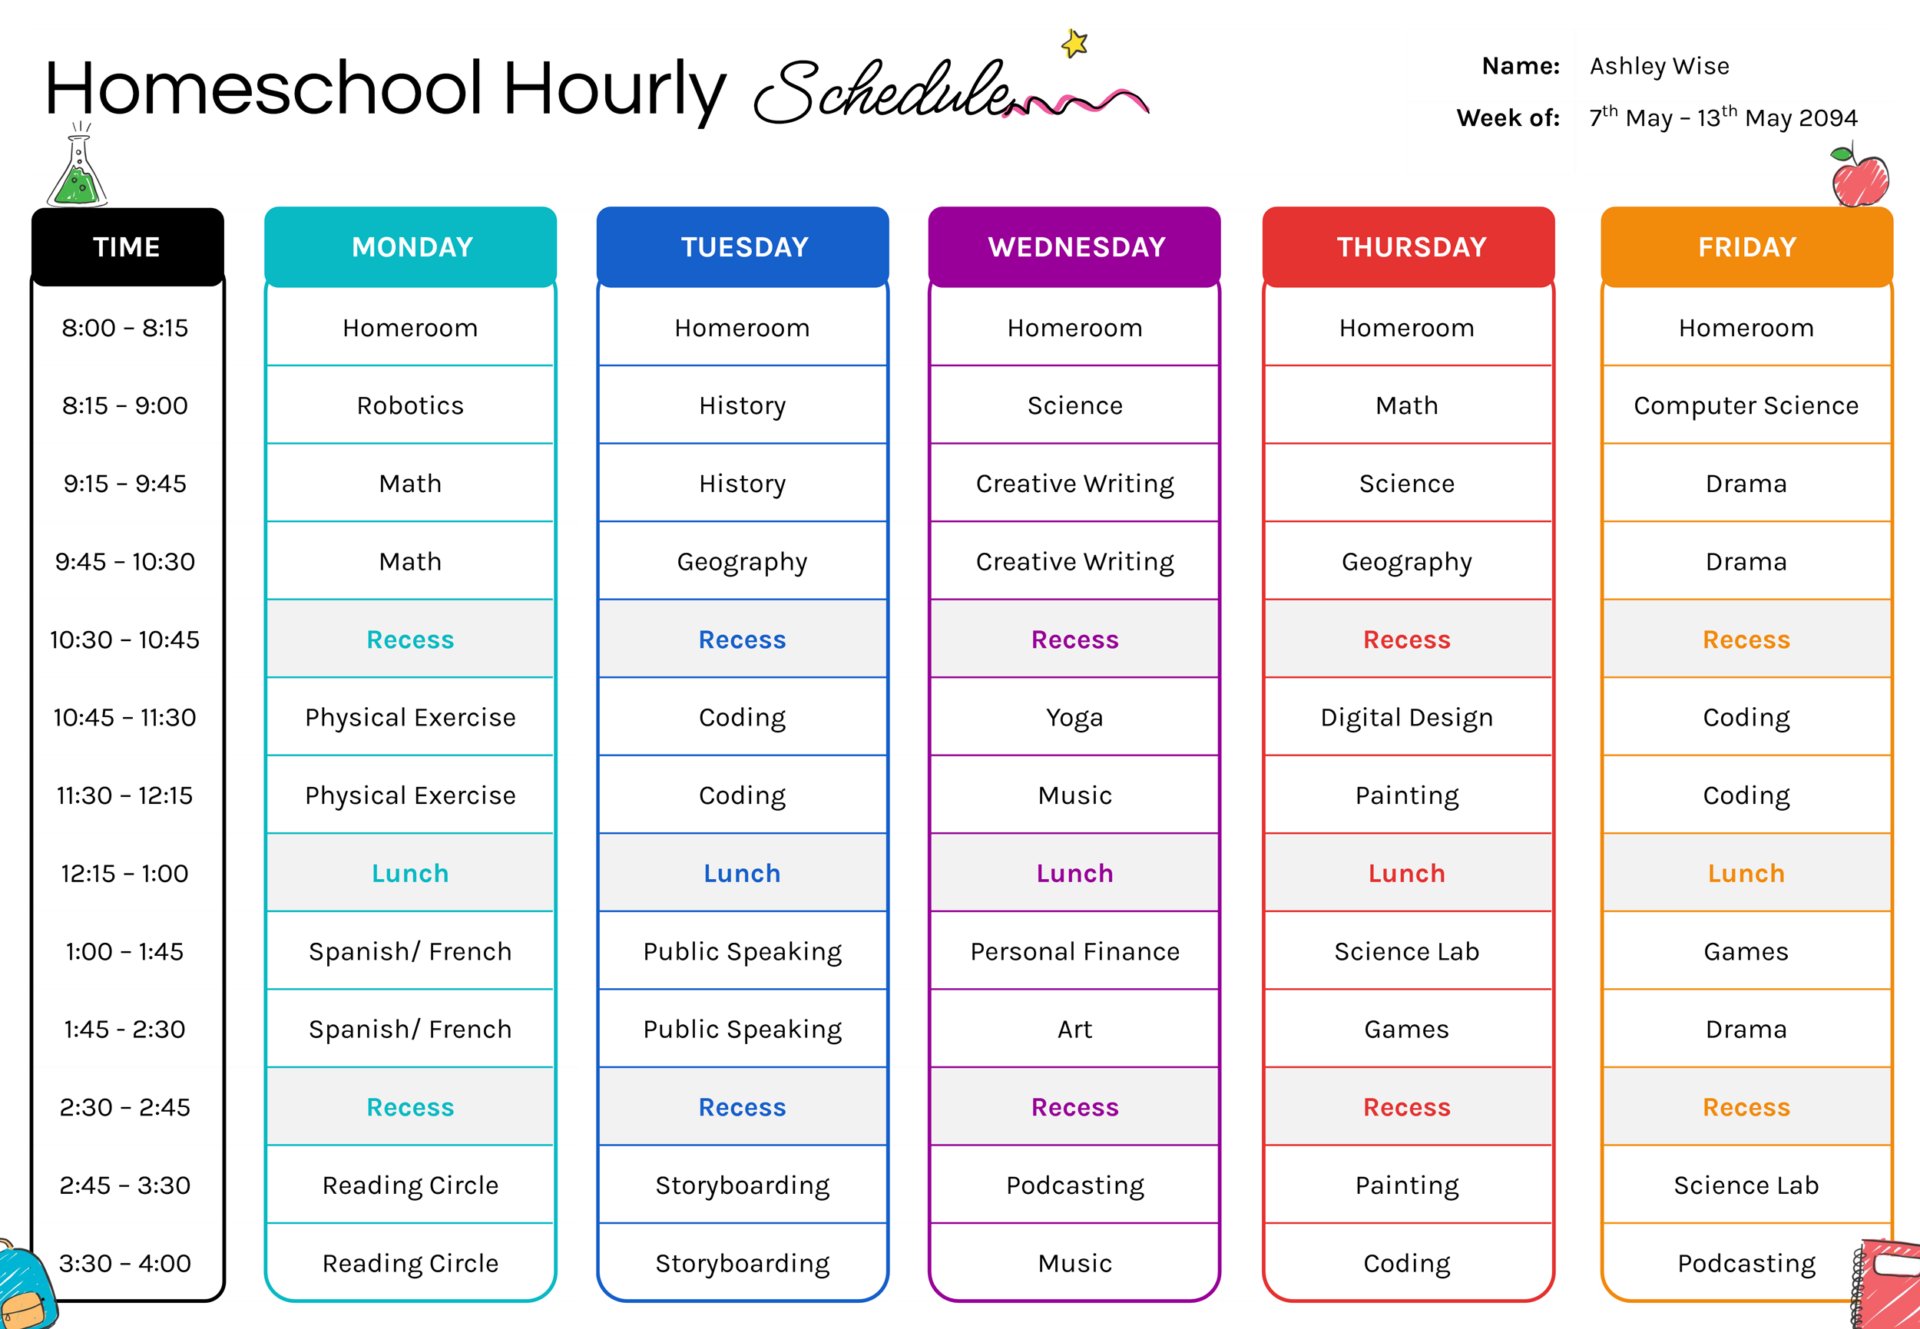


When you plan homeschool by the hour, you stop guessing how much fits in a day. You can see where lessons cluster, where breaks land, and where the day may feel too packed before you start teaching. This homeschool hourly schedule template is designed for weekly planning when timing matters, such as when you follow short lesson blocks, have live classes, or need to protect time for recess, lunch, and transitions.
The template uses a time column on the left and weekday columns across the page, so you can write what happens in each time block from morning to afternoon. A name and week-of area at the top keeps each weekly copy easy to file. Each day column is divided into stacked blocks, so you can type subjects, activities, breaks, and independent work in a way that stays readable when printed or viewed on-screen.
How to Use the Hourly Homeschool Schedule
Start by entering the student name and the week range. If you plan week by week, saving a copy each week can also build a record you can revisit when you want to review pacing or adjust your routine.
Next, update the time column to match your real day. If your start time is earlier or later, change the first time slot and adjust the rest in the same pattern. If you teach in longer blocks, reduce the number of time rows by merging blocks and using broader time ranges. If you teach in short bursts, keep smaller blocks and leave a little space for transitions.
After the time column is set, fill in the fixed points first. Place breaks, lunch, co-op sessions, tutoring, or anything that happens at a specific time. Once those anchors are in place, add your subjects and activities around them. Keeping the subject name short keeps the weekly view easy to scan, especially when the day is moving quickly.
If you want the schedule to stay realistic, avoid filling every block from start to finish. Leaving a few open blocks creates room for a lesson that takes longer, a needed reset, or a carryover task.
When you want more detail than a subject name, use a short topic phrase rather than a full instruction line. Keep detailed steps, page ranges, and materials in your lesson notes, then use the schedule as your timing plan.
Planning Lessons Around Breaks and Transitions
Hourly planning works best when you treat it as a pacing guide, not a strict checklist. If a subject runs long, move the next subject down to the next open block rather than compressing the rest of the day. If the day ends early, use open time for review, reading, or unfinished work instead of adding new topics.
You can also plan by energy level. Place heavier work in the part of the day when focus is usually strongest, then place lighter work after lunch or late afternoon. Recess blocks can separate demanding sessions so the day does not become a long stretch of seatwork.
When you repeat a subject in back-to-back blocks, write the subject name once, then use the next block for the follow-up piece, such as practice, review, or an assignment check. This keeps the schedule readable while still showing what the second block is for.
Customizing the Weekly View
The Saturday column can serve different roles depending on how you use weekends. You can treat it as a lighter teaching day for catch-up work, enrichment, or electives, or repurpose it as a planning space for projects, assessments, and a weekly review list. That keeps the weekly view useful even when your main teaching days stay Monday through Friday.
When you plan for multiple children, keep a separate copy per child so each weekly page stays easy to scan. Shared subjects can stay aligned by placing them at the same time on each copy, then keeping level-specific tasks in your lesson notes instead of packing long text into the blocks.
Printing usually stays easier to read when you keep each time block short and avoid long lines of text. When you use it digitally, you can make quick edits as the week changes, then save a final copy at the end of the week so your saved version matches what you actually taught.
FAQs
Start with how your day actually runs, then match the schedule to that reality. Many homeschool days use a mix of short and long blocks. Short blocks fit practice work, reading, or review, while longer blocks fit writing, labs, and projects. Once you choose your block lengths, keep the time column aligned to that pattern so the week stays easy to read.
Build transition time into the schedule rather than hoping it happens quickly. Use a small buffer block for setup, clean-up, bathroom breaks, or a quick reset between heavier subjects. This is especially useful around lunch, recess, and any live classes, since those moments tend to spill over.
Make small edits rather than rewriting whole days. Move a postponed subject into the next open block, replace a lower-priority block, or add a short “carry” note inside the new block. Saving a final version at the end of the week keeps a clean record of what actually happened.