


A one-page project schedule template is a single-slide timeline for tracking key tasks, owners, and dates for one project. This simple project schedule template is designed for project managers, team leads, and small business owners who need a quick snapshot to discuss progress with their team or clients. It keeps the high-level plan, current status, and next steps on one page that can be printed, shared as a PDF, or used during online meetings.
Sections of the Project Schedule Template
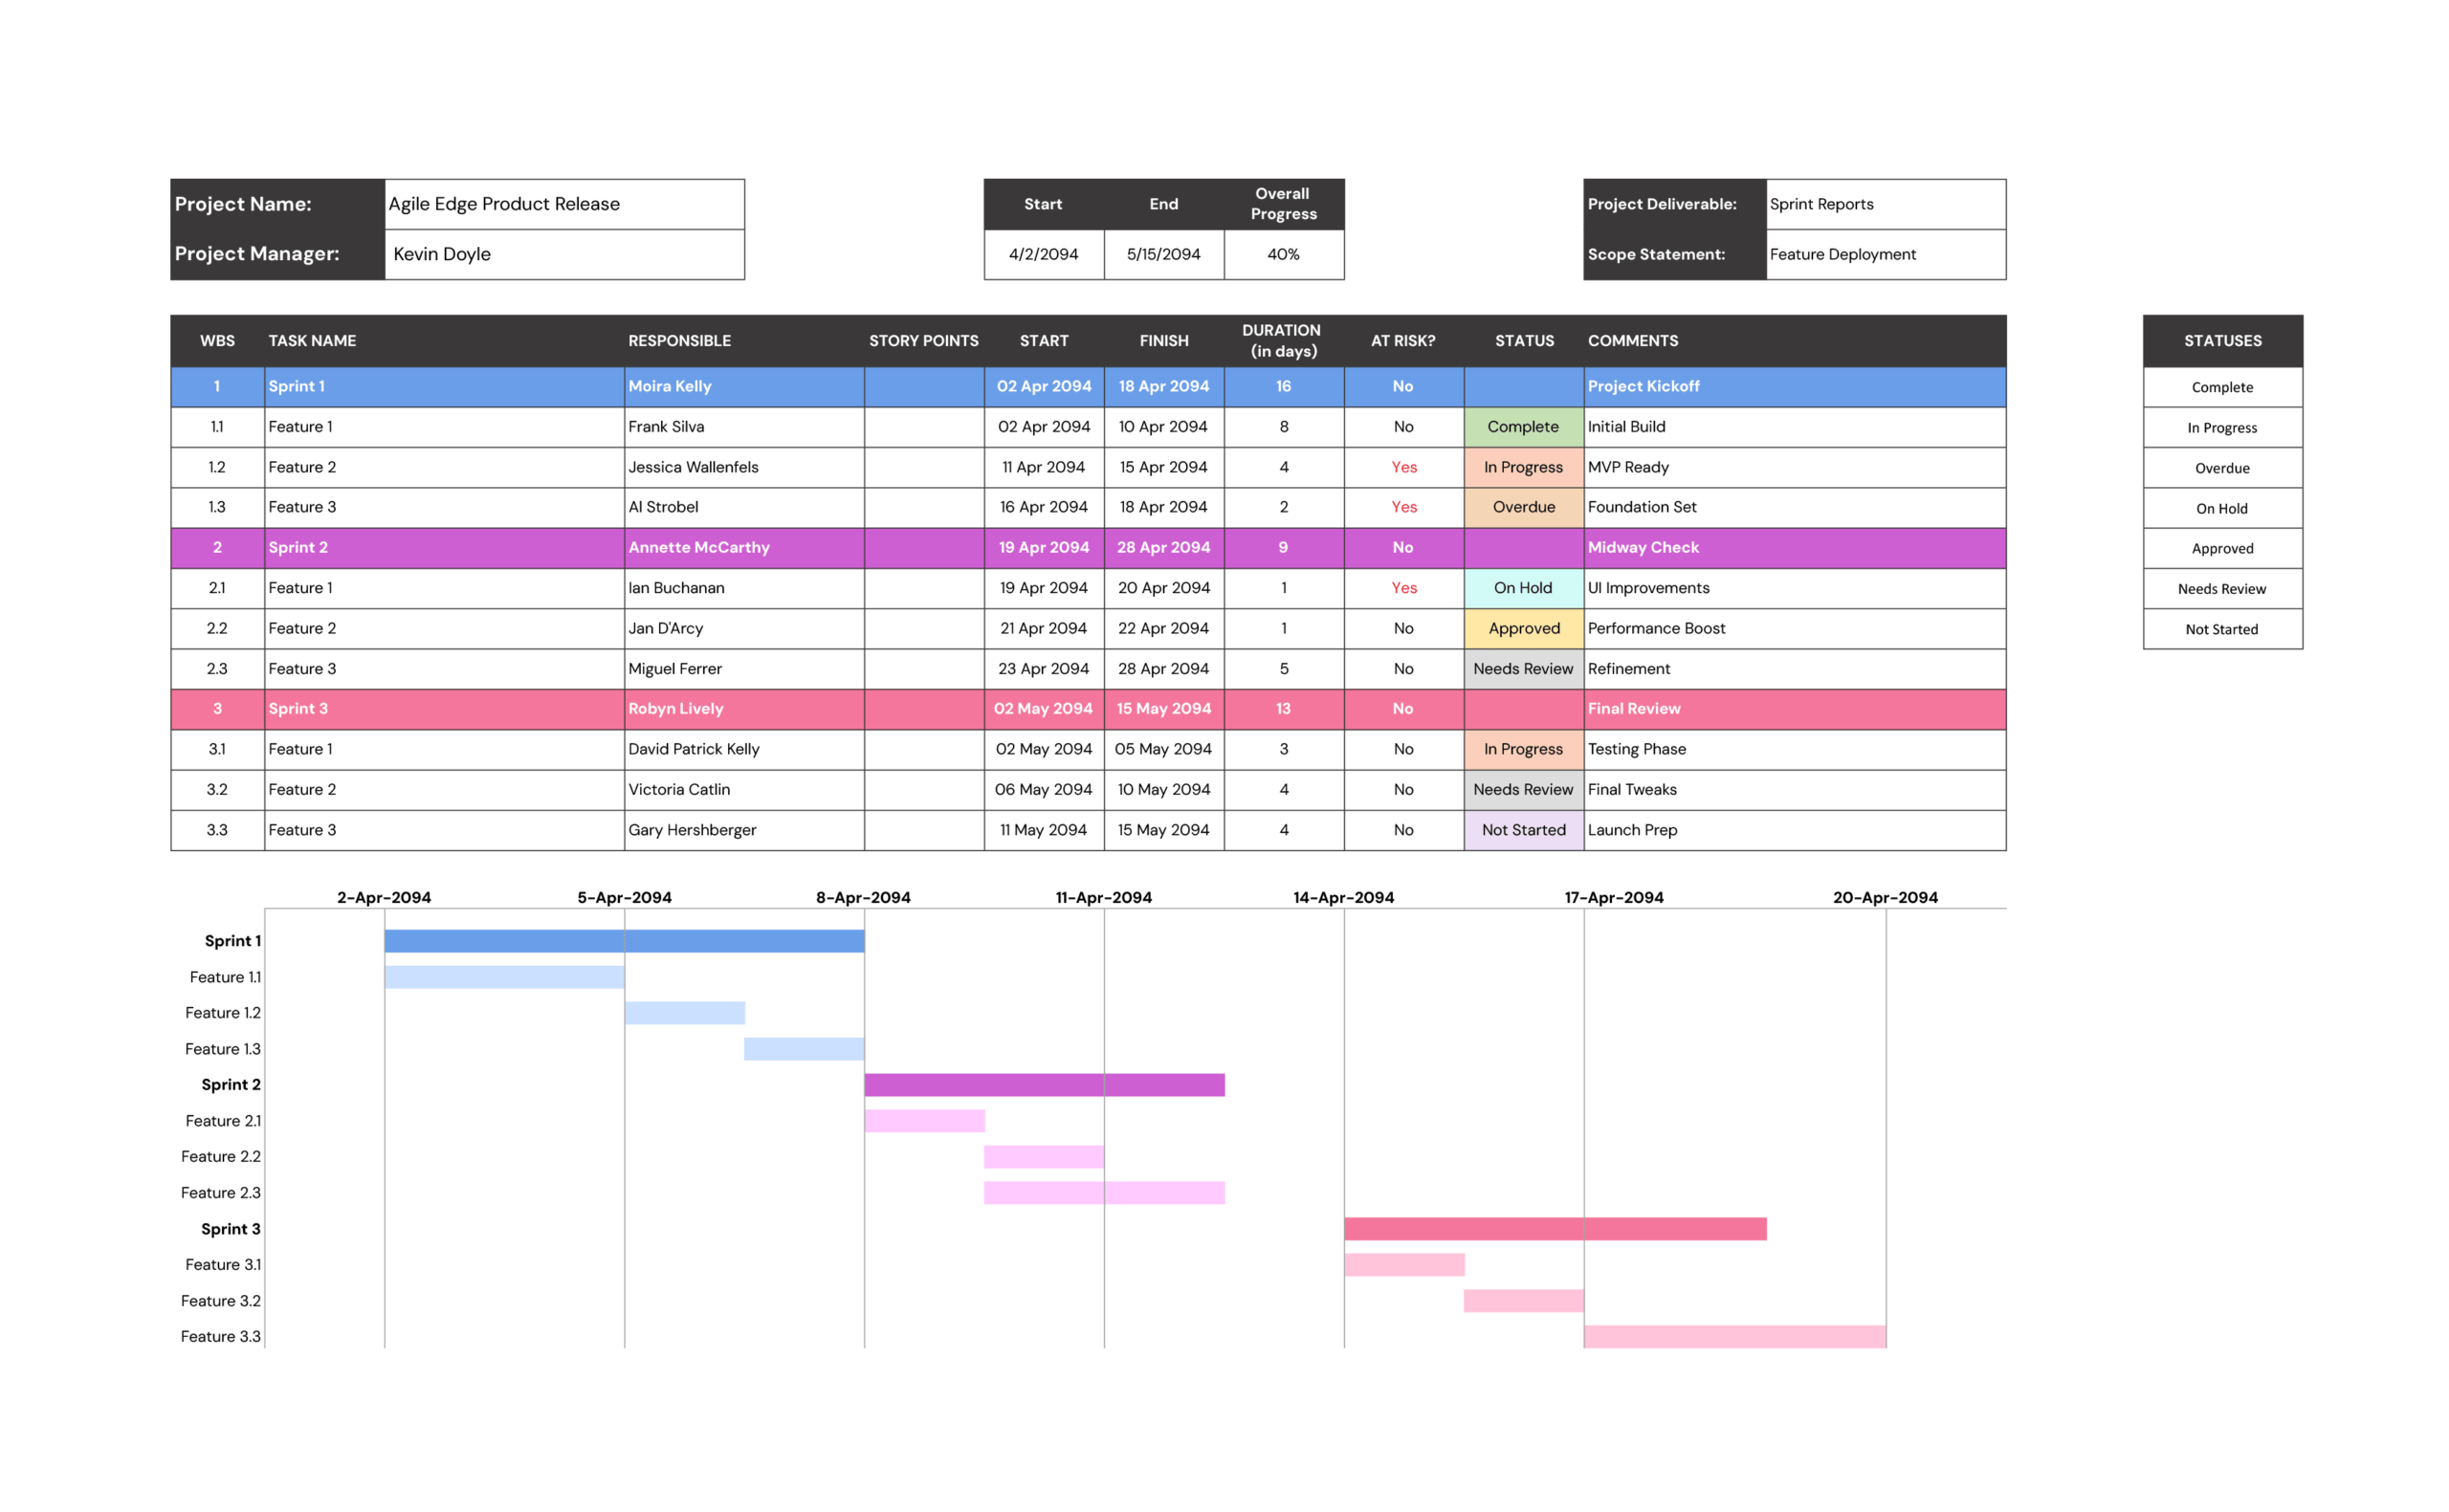
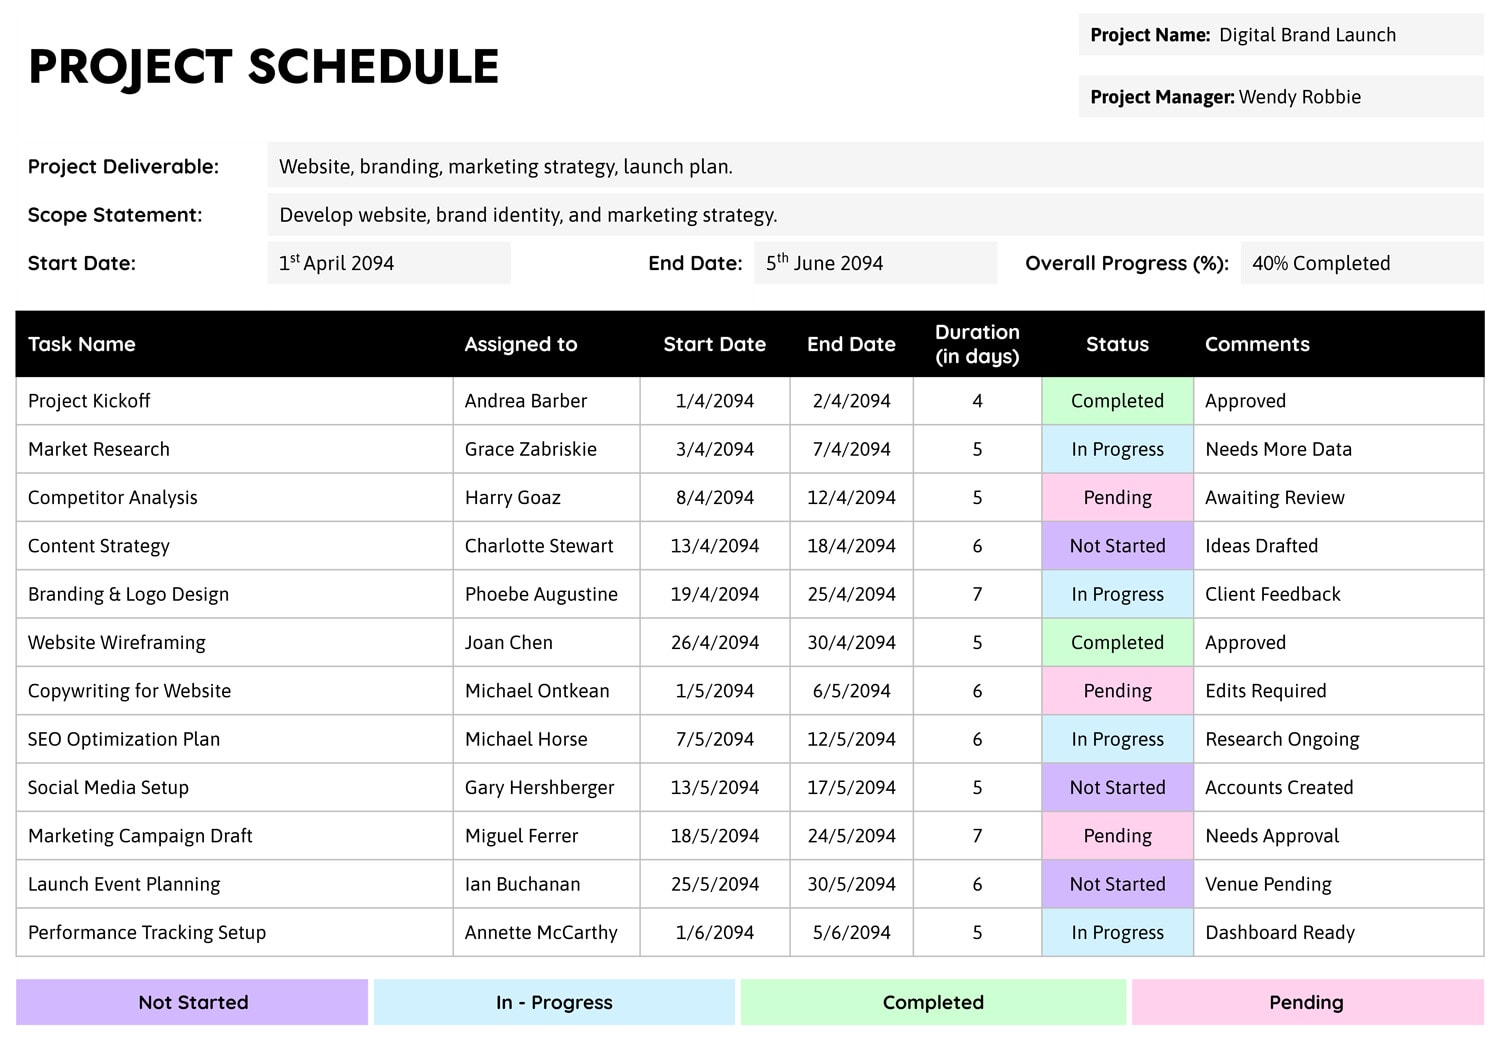
At the top of the slide, there are summary fields for “Project Name,” “Project Deliverable,” “Scope Statement,” “Start Date,” “End Date,” and “Overall Progress (%)”. These boxes give context before anyone reads the task list, so viewers immediately see what the project is about, when it runs, and how far along it is.
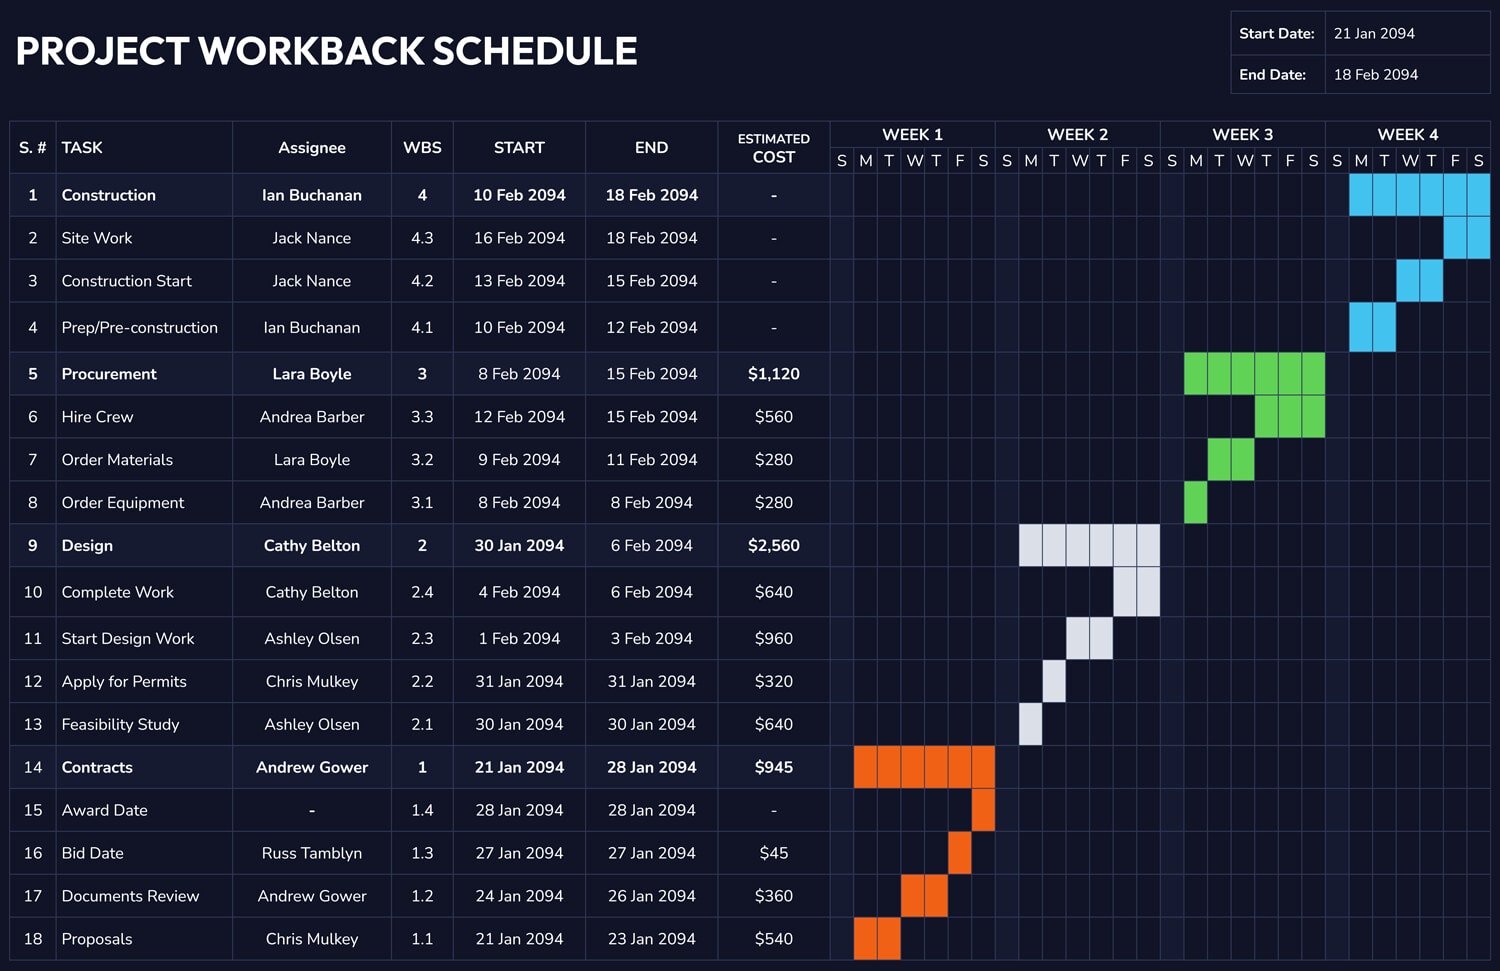
The main section is a table with columns for “Task Name,” “Assigned to,” “Start Date,” “End Date,” “Duration (in days),” “Status,” and “Comments.” Each row represents one task, phase, or work package. The layout works well for 10–15 tasks, which is enough to cover the major stages without crowding the slide.
At the bottom, a color legend explains the status categories such as “Not Started,” “In Progress,” “Completed,” and “Pending.” You can match each status word with a consistent fill color in the “Status” column so the schedule can be read at a glance from across the room.
How to Use This One-Page Project Schedule
Start by filling in the header. Enter the project name, the main deliverable, and a short scope statement that describes what is in scope in one sentence. Add the planned start and end dates, then estimate an overall completion percentage based on how many tasks are done or weighted by effort.
Next, decide what level of detail you want on this slide. In most cases, each row should represent a key task group such as “Requirements Workshop,” “Wireframing,” “Content Drafting,” or “User Testing,” rather than every small step. This keeps the schedule readable while still showing the flow of work.
List each task in the “Task Name” column and assign a single owner in “Assigned to.” Owners can be individuals or teams, but each row should have one primary name so accountability is clear. Then enter the planned “Start Date” and “End Date.” Duration can be calculated and typed in manually, for example the number of calendar days between the start and end dates.
Use the “Status” column to record where each task stands. Pick a small set of status labels and reuse them consistently, for example “Not Started,” “In Progress,” “Completed,” and “Pending.” Apply the matching status color from the legend so that people can scan the slide and see which tasks need attention.
The “Comments” column is for short notes such as dependencies, risks, or approvals. You might record items like “Awaiting client feedback,” “Blocked by vendor,” or “Approved in steering meeting.” These brief remarks turn the schedule into a running log of what changed between check-ins.
Use this slide as the first page in your project deck and update it before every status meeting. You can keep older versions in the same file as an archive of what the plan looked like each week.
Working With the Status Legend and Colors
The legend at the bottom shows the status categories and their colors. When the status of a task changes, edit both the text in the “Status” cell and the cell color so they stay in sync. This keeps the slide readable for anyone who quickly glances at the colors without reading each word.
If your team already uses its own language, you can rename the labels in the legend, for example “On Track,” “At Risk,” or “On Hold,” and then update the statuses in the table to match. Keep the number of categories small so the color coding stays easy to understand.
Customizing and Sharing the Template
You can edit fonts, colors, and layouts to match your brand or presentation style while keeping the same overall layout. The slide can be printed as a one-page handout, exported as a PDF for email updates, or shared directly in PowerPoint or Google Slides during online calls.
The template can be modified for personal or commercial projects, but it is not intended for resale or redistribution as part of a download library.
When presenting to clients, duplicate the slide and keep an “internal” version that includes more candid comments about risks or resourcing. Use the cleaner version for external updates while the team works from the detailed one.
FAQs
It works best for a single project per slide. For a portfolio view, duplicate the slide for each project and add a cover slide that lists all active projects and their overall progress.
Store the file in a shared drive, agree on one person who updates the slide before each call, and screen-share the schedule during your weekly stand-up so everyone sees the same view.
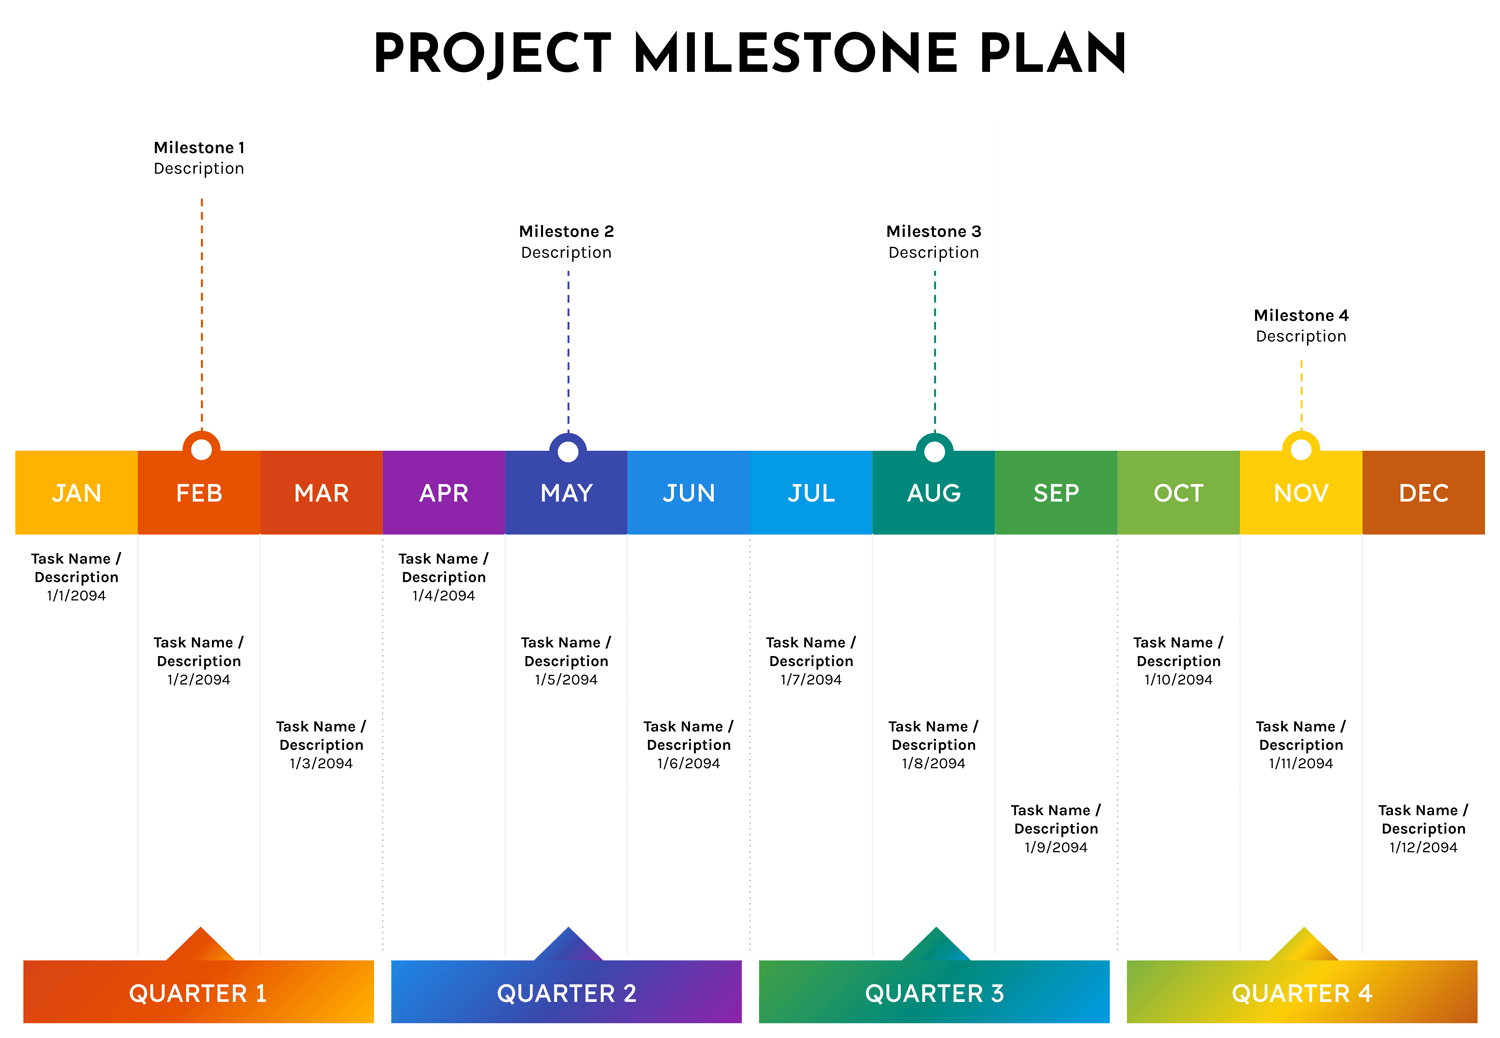
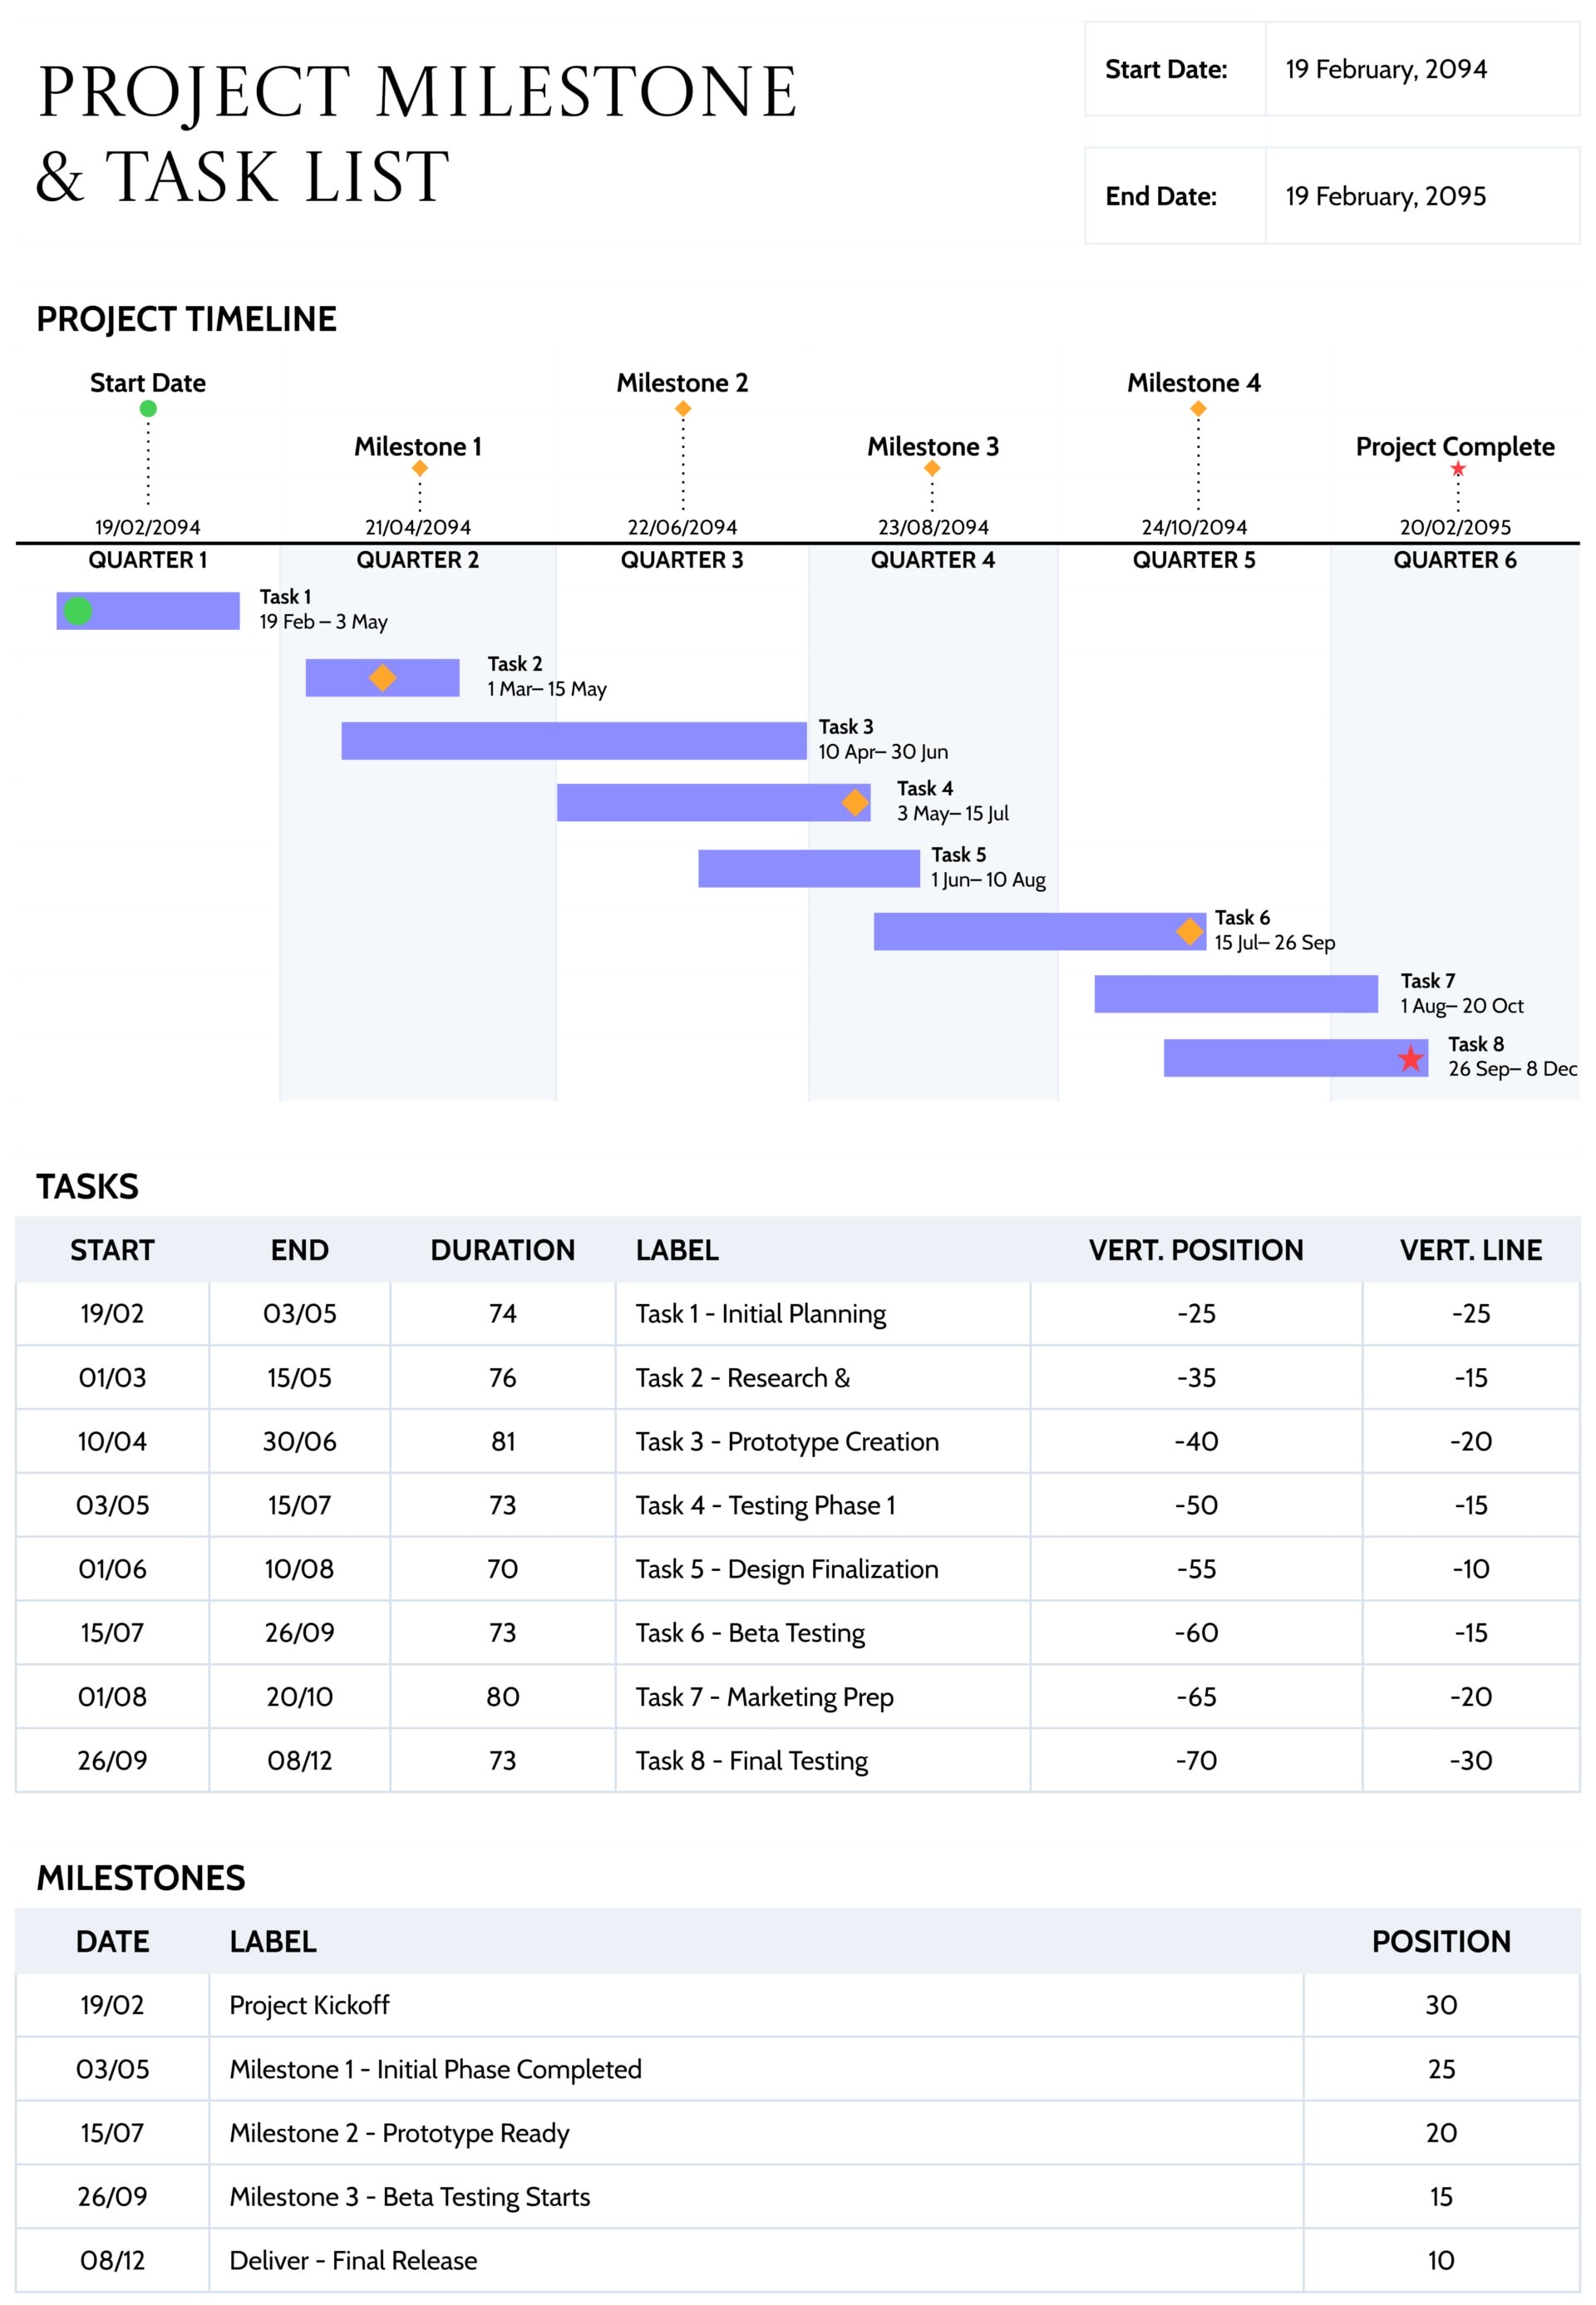
Yes. Enter key milestones as separate rows in the “Task Name” column and give them clear due dates. Use the “Comments” column to note any dependencies or risks tied to that milestone.