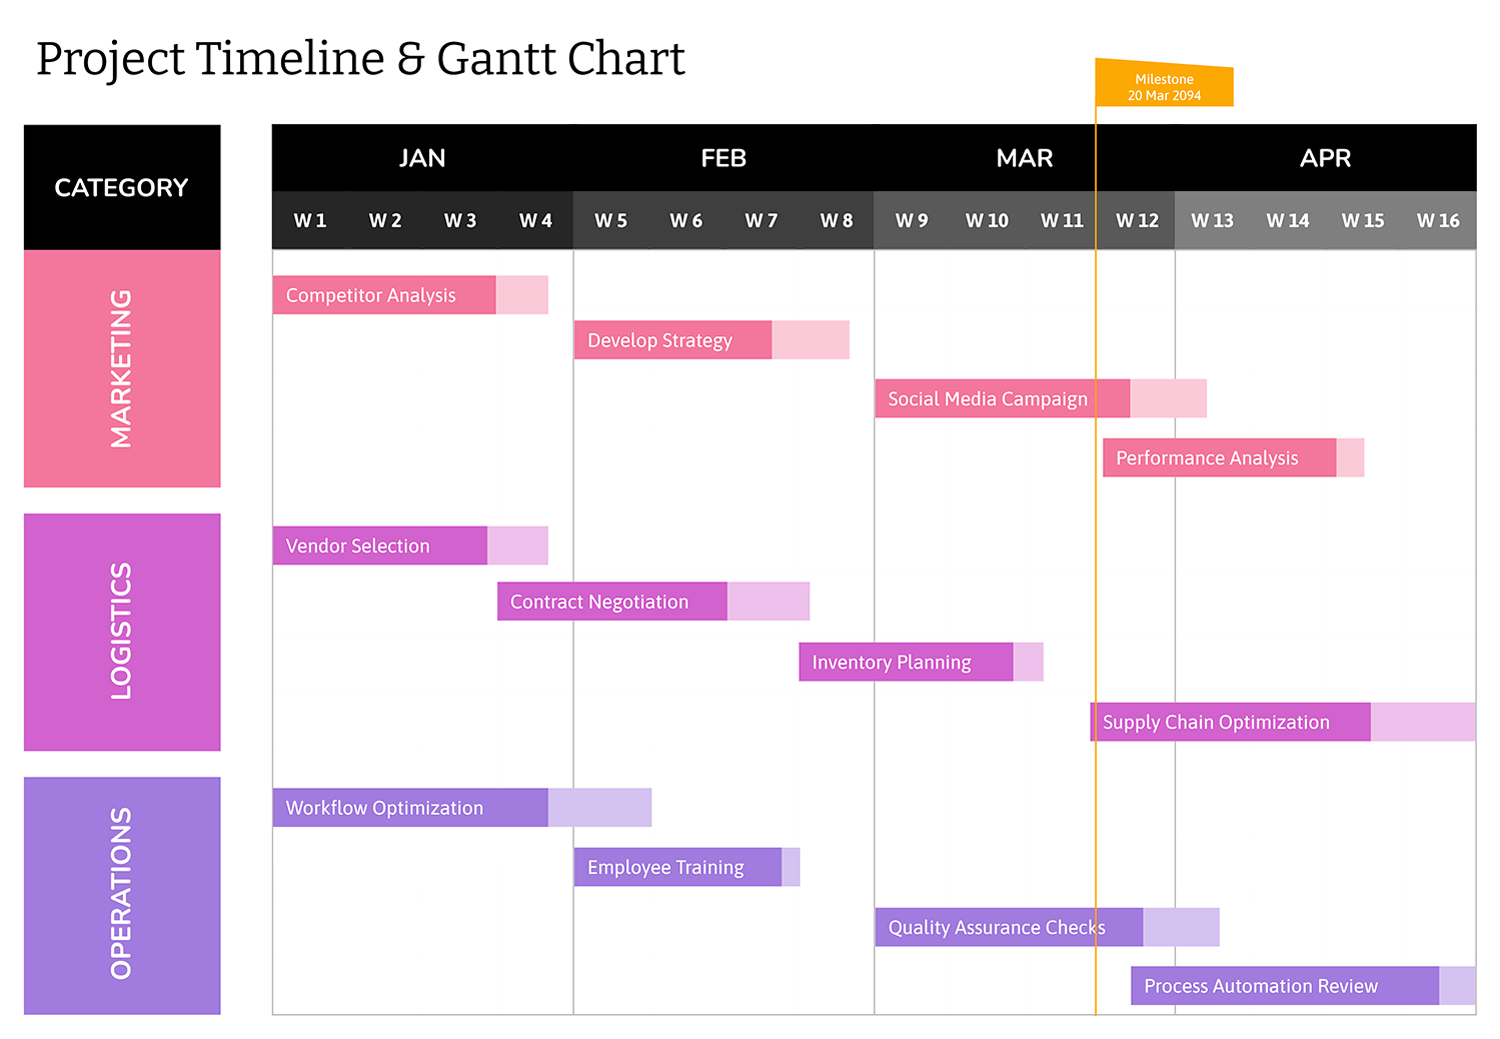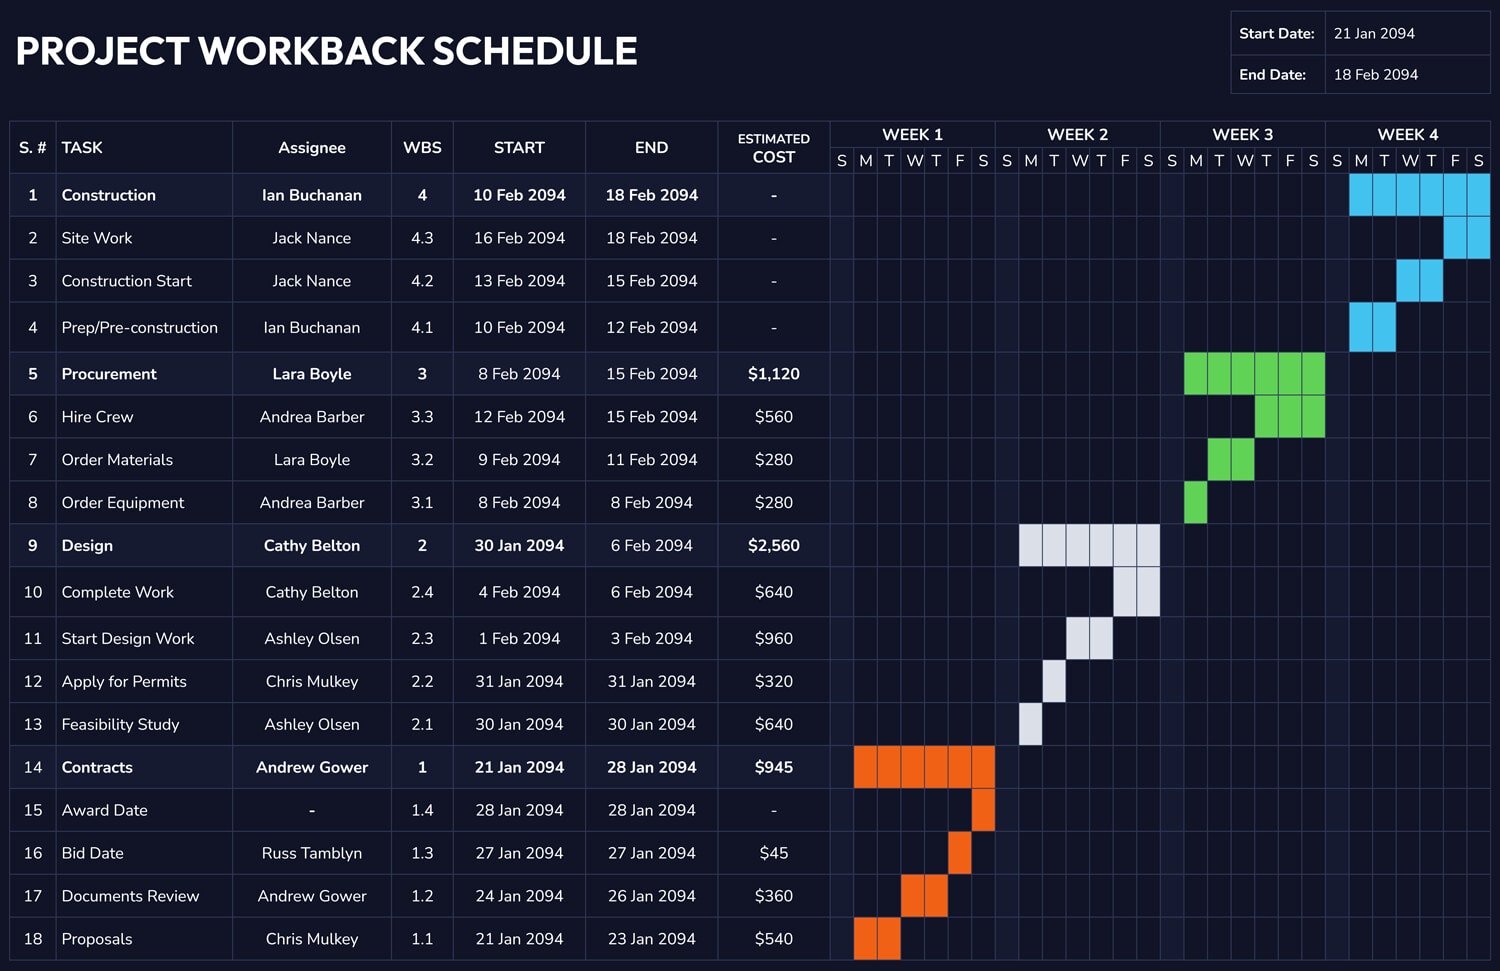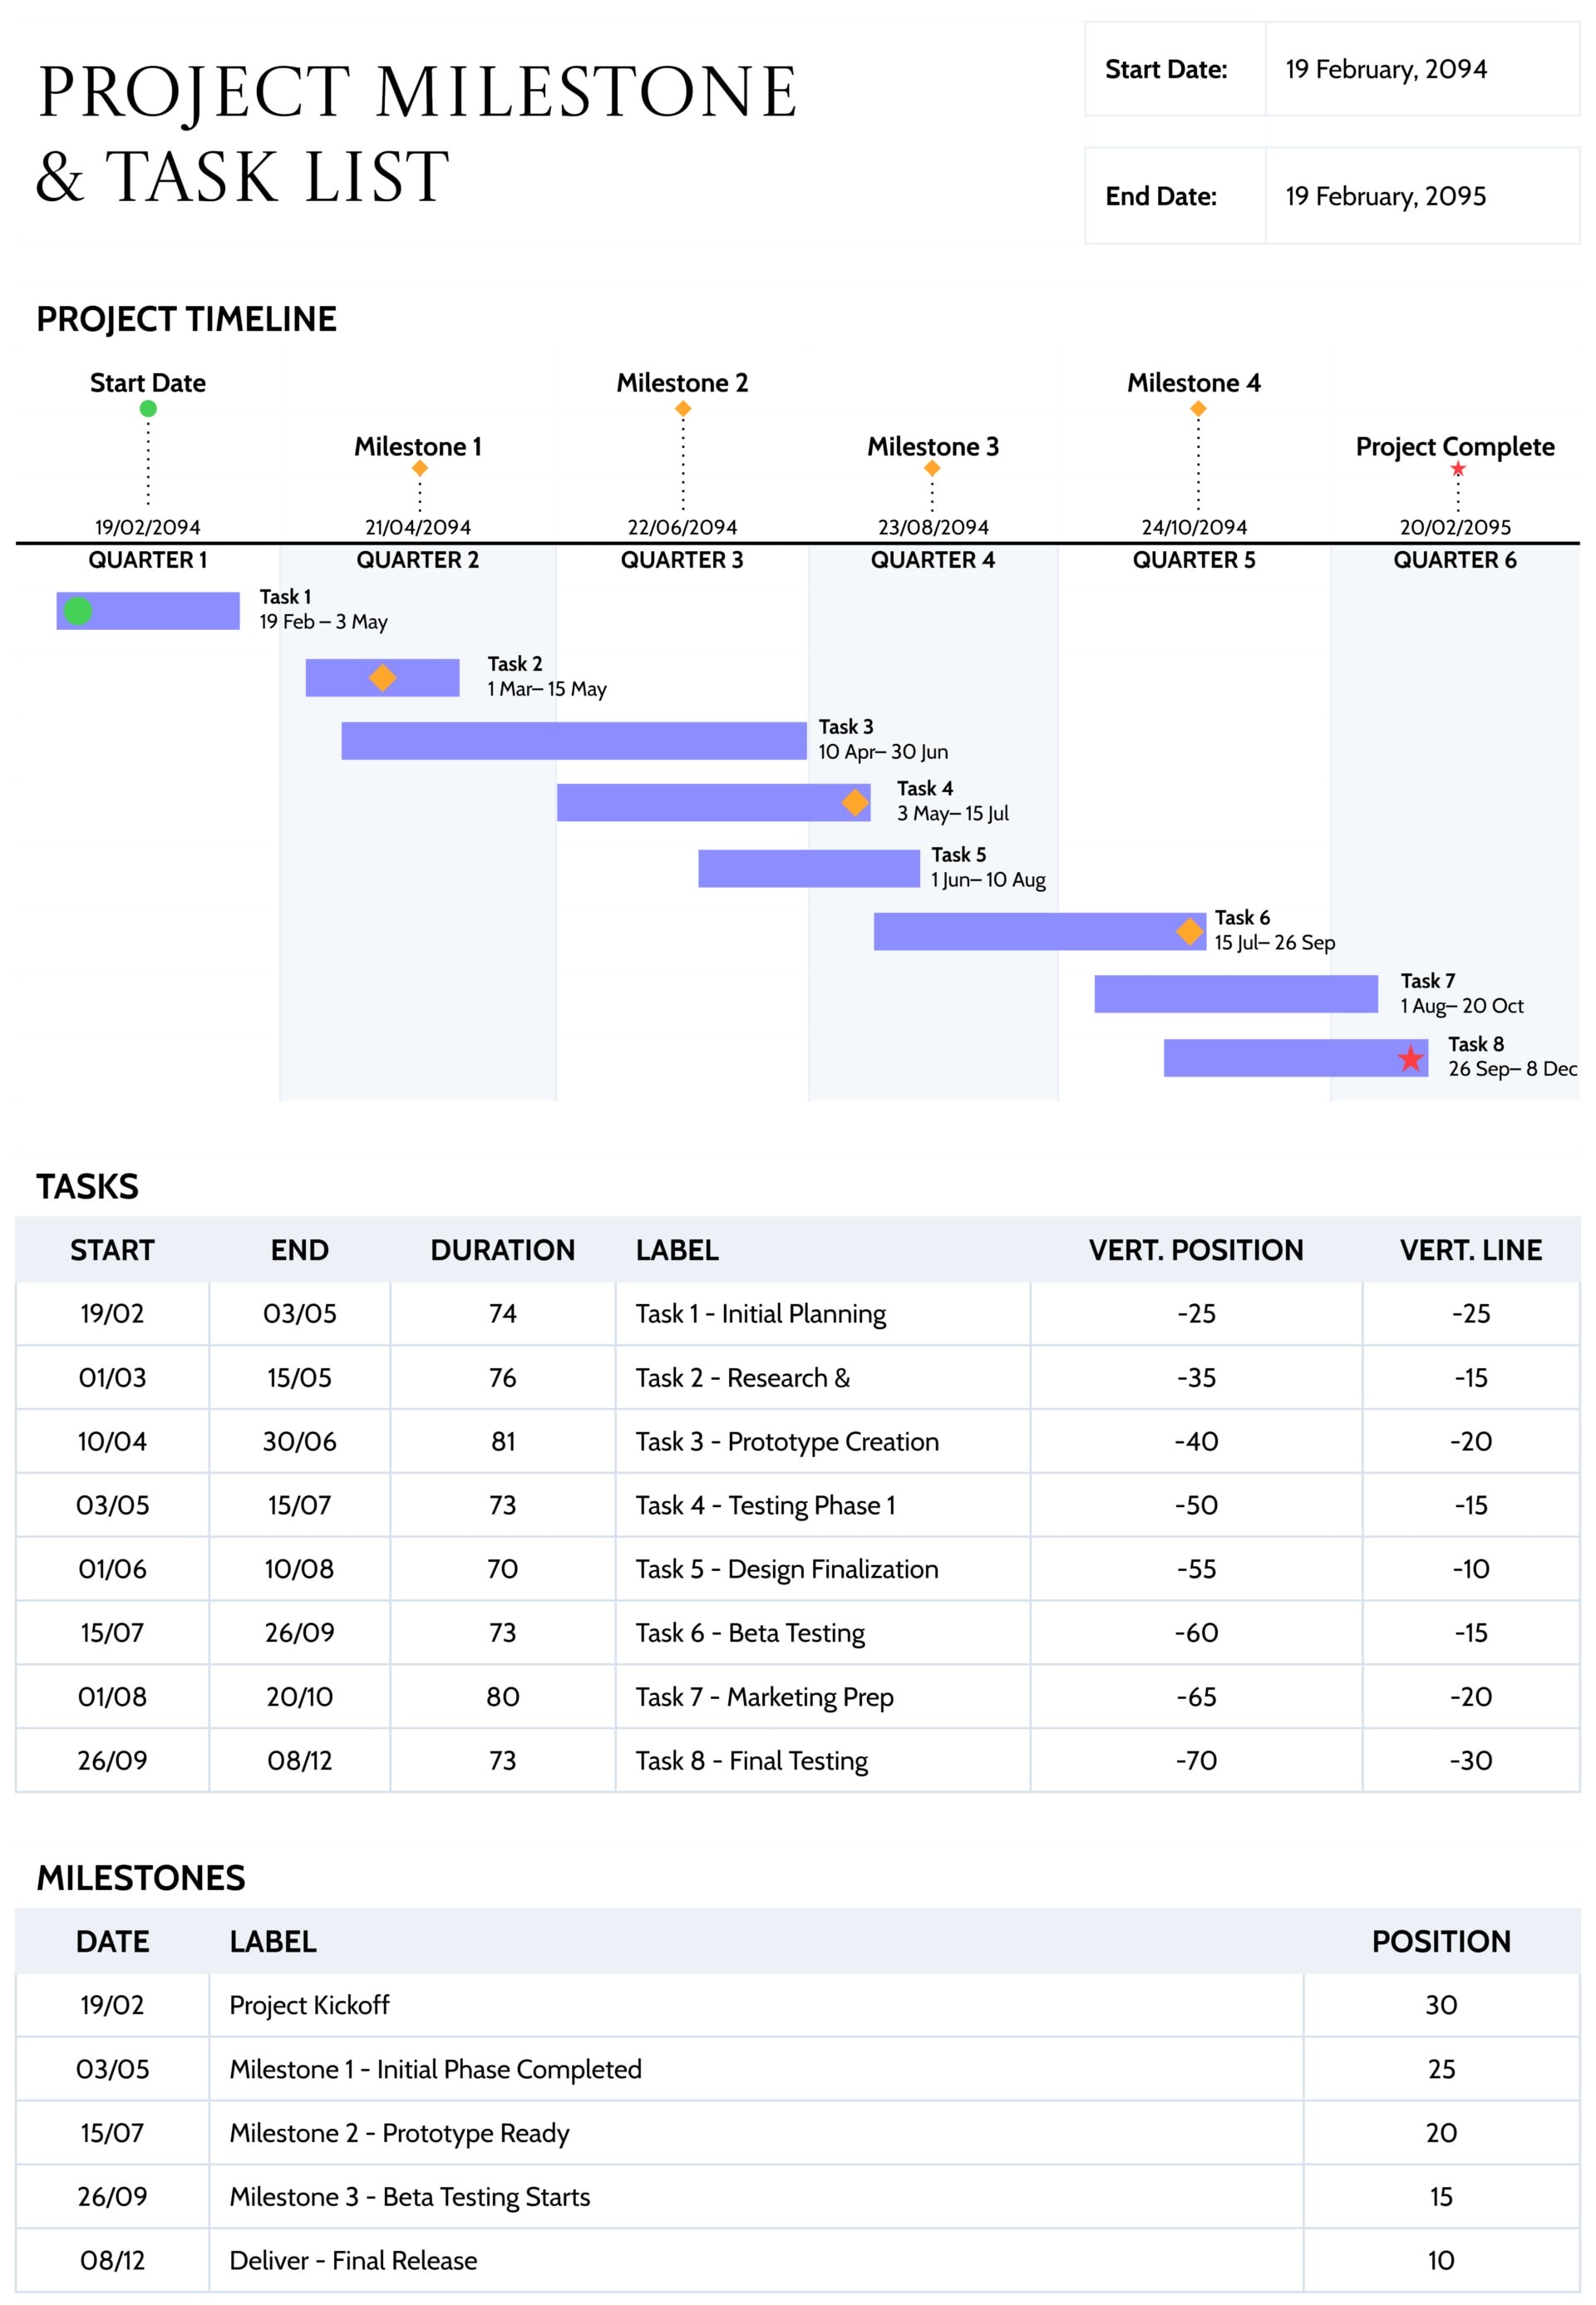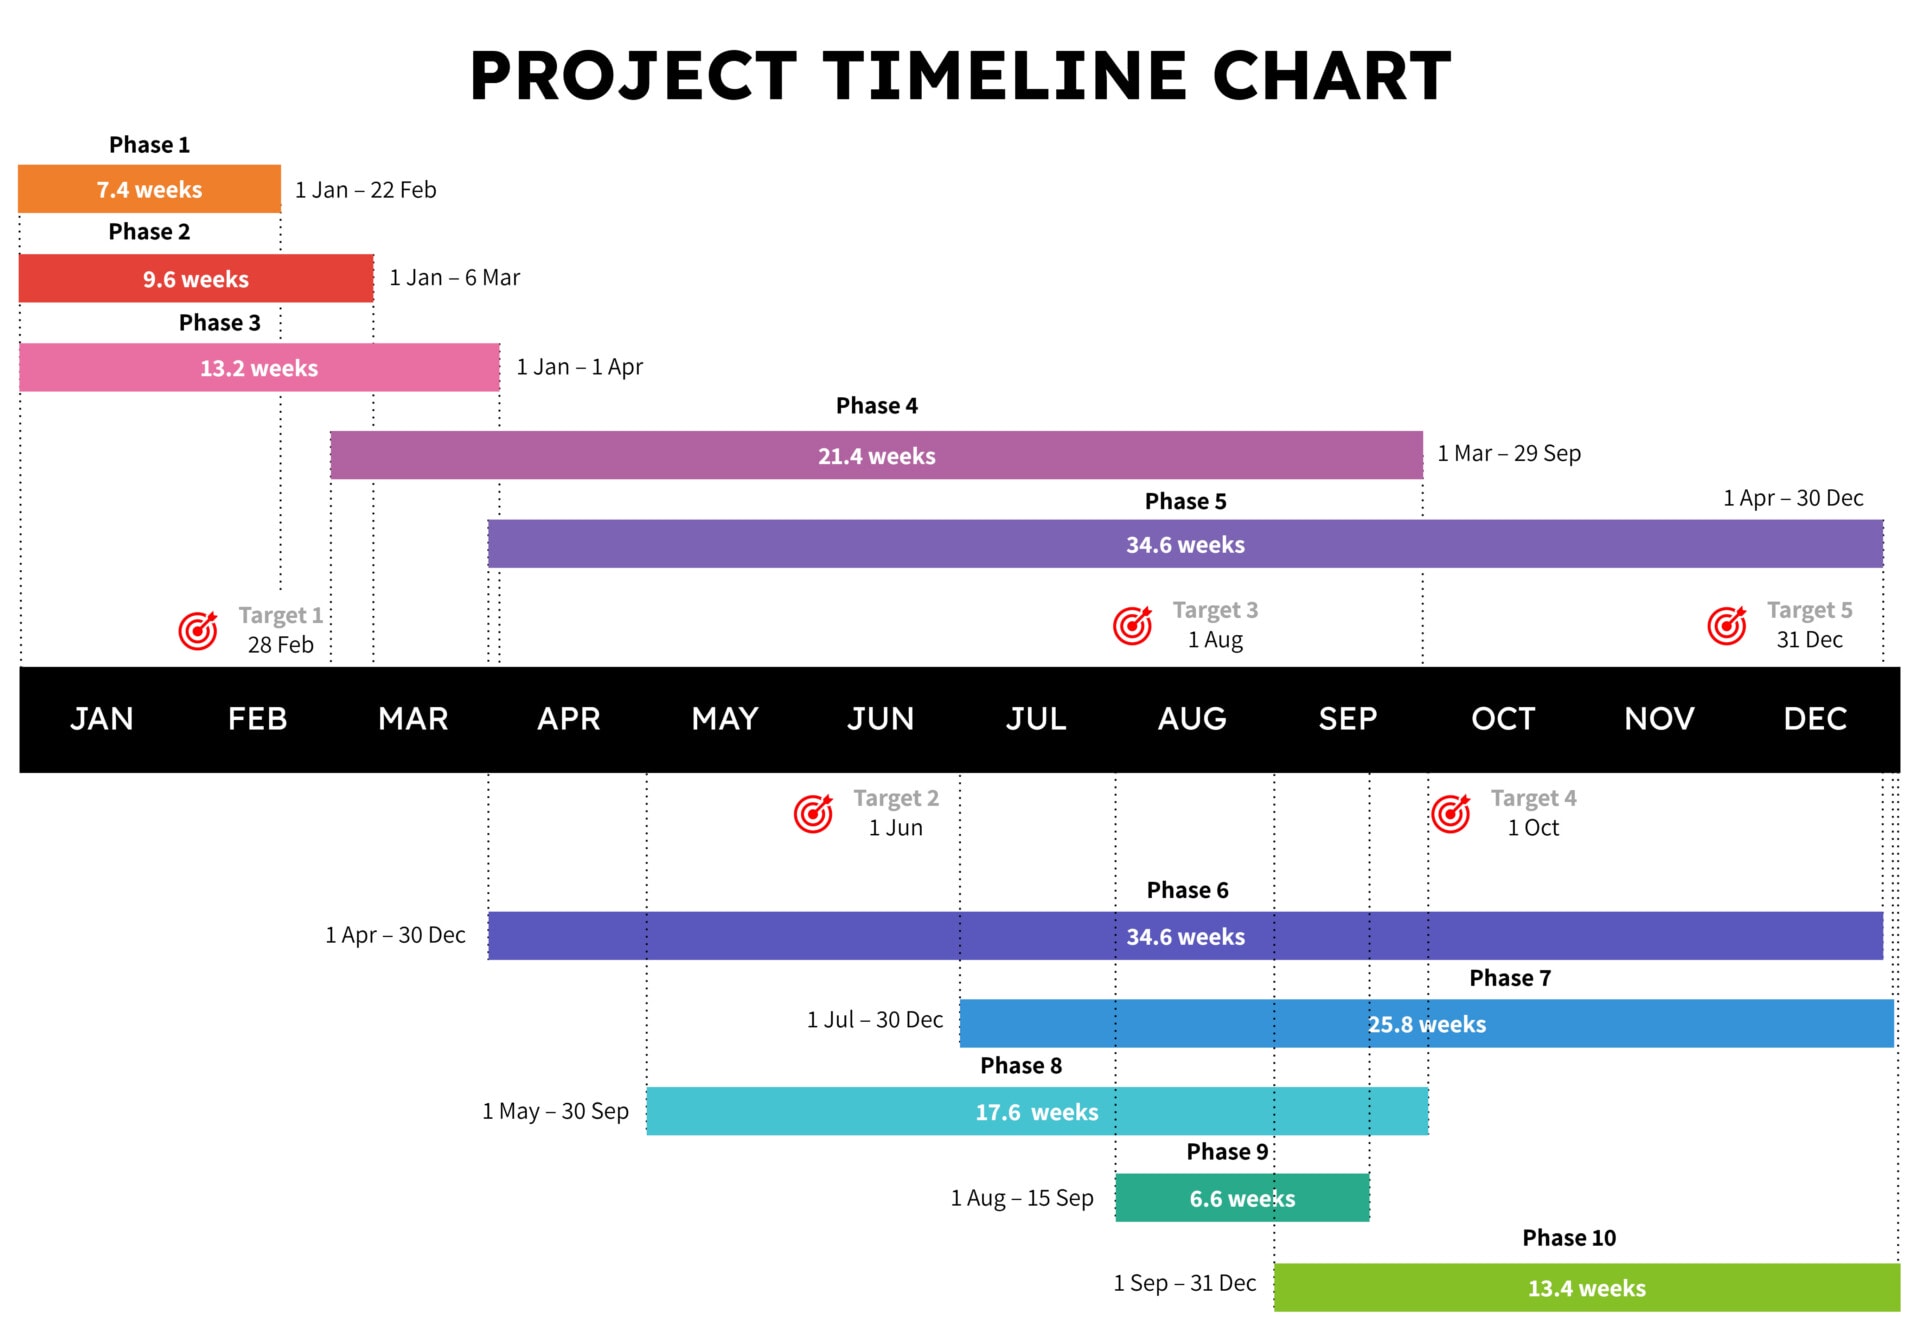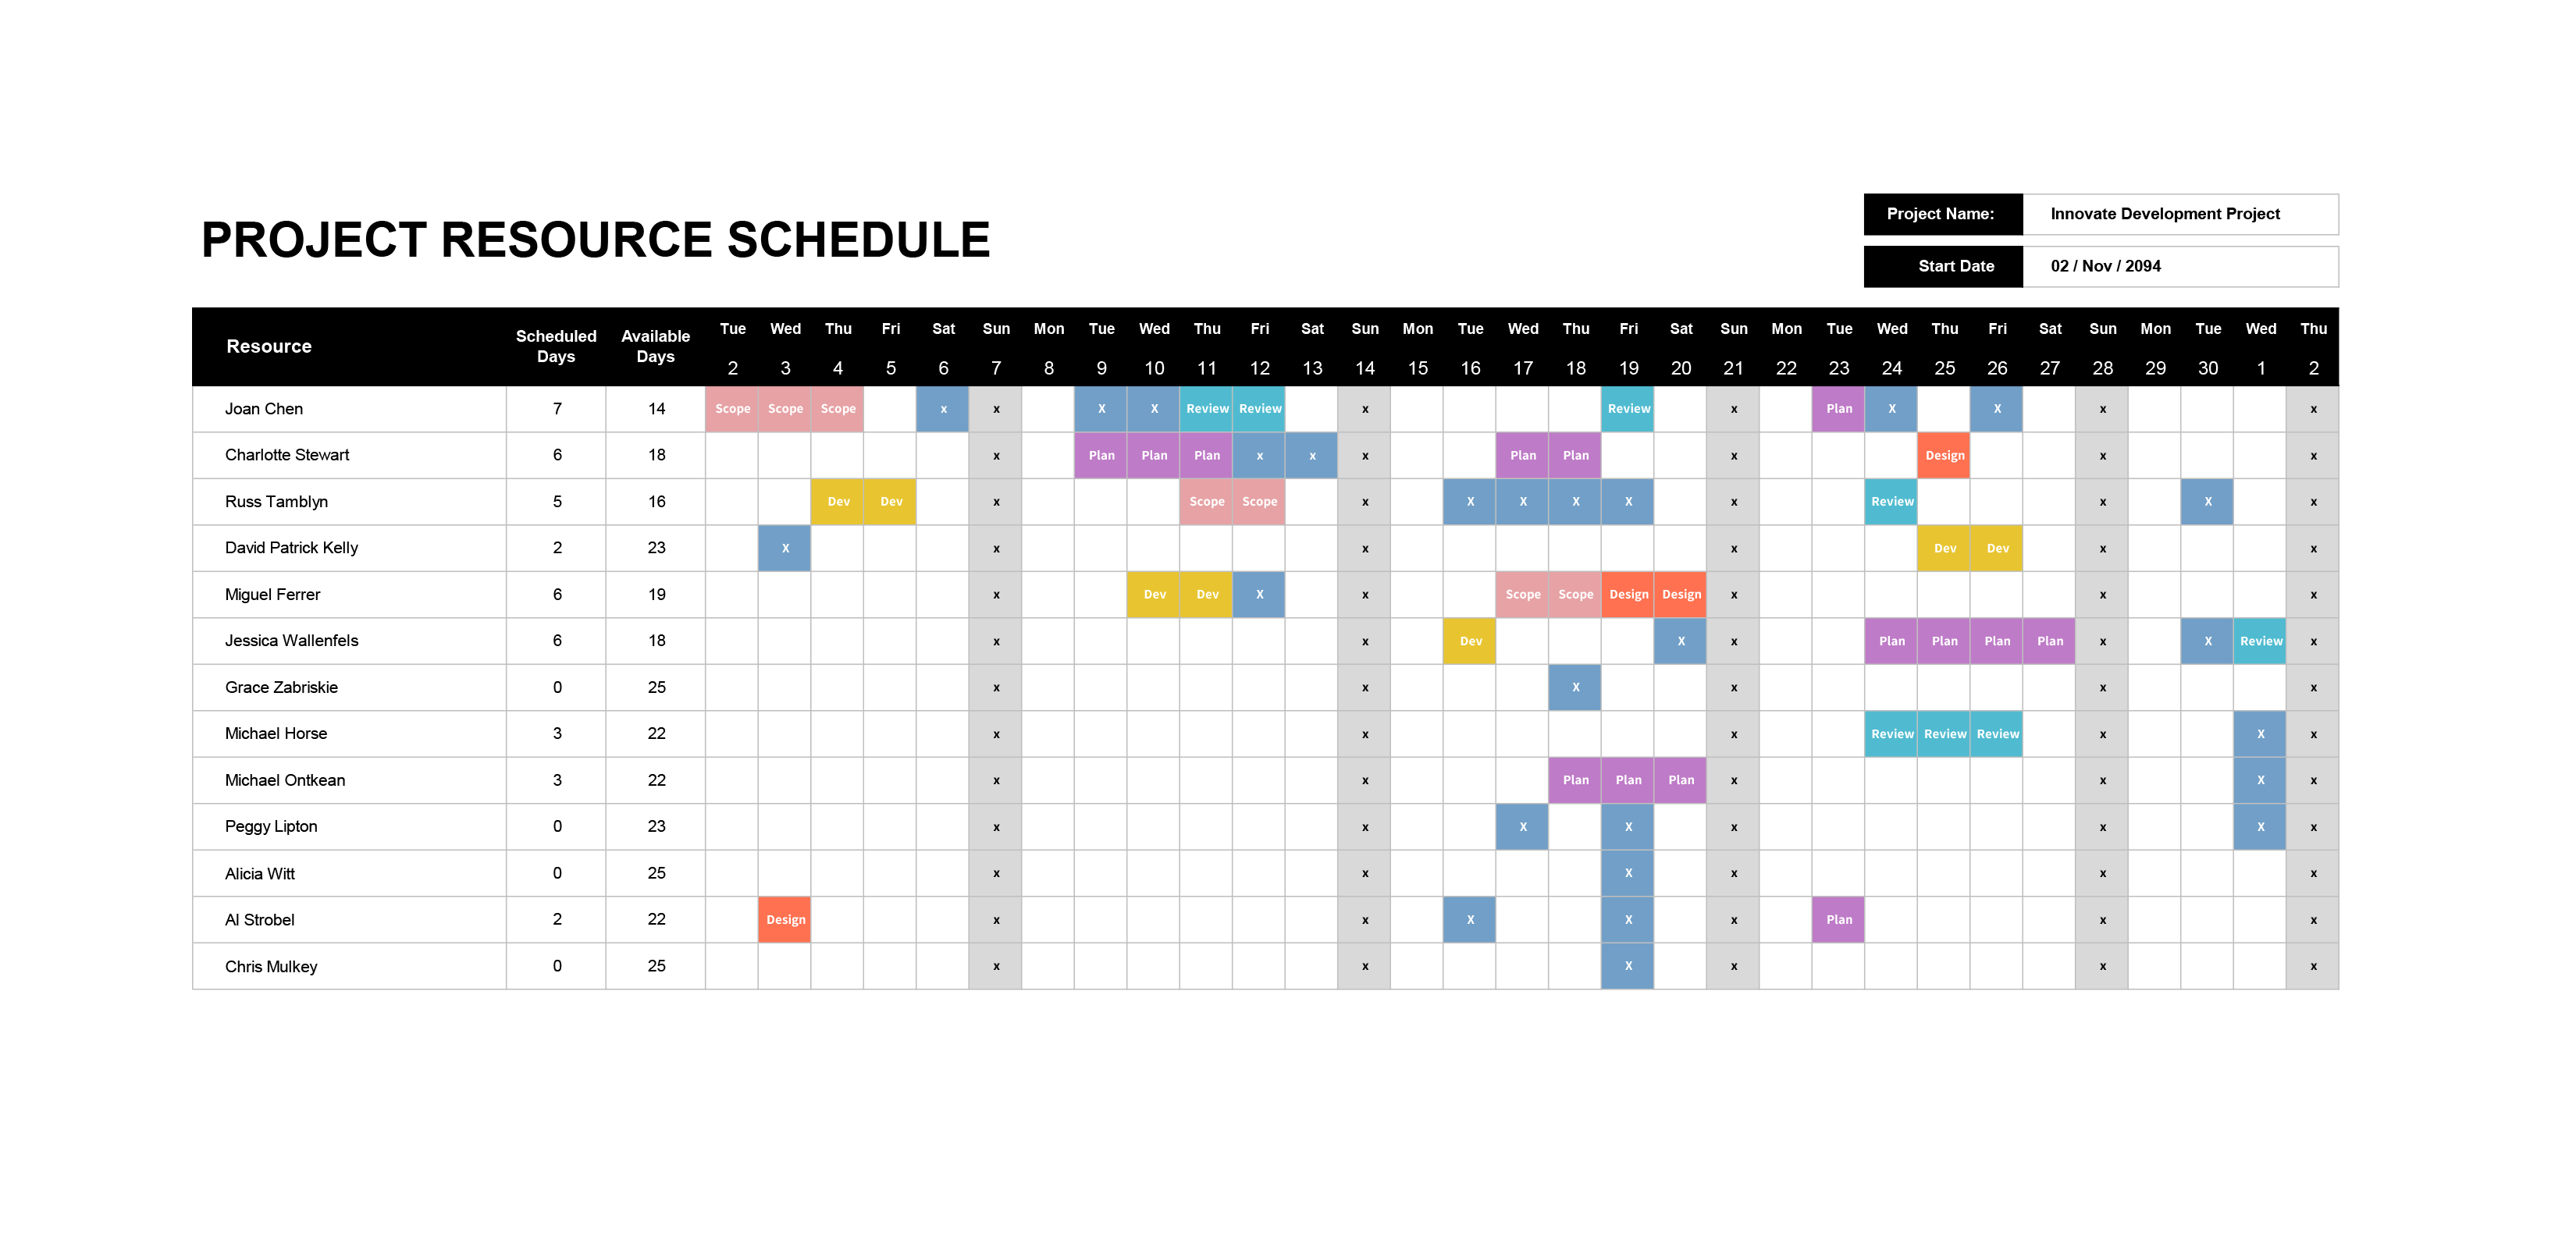


This project resource schedule template is designed for situations where you need a practical view of who is working on what, day by day. Each row represents one team member or role and the columns move across a short planning window, so you can see bookings, days off, and remaining capacity in one place.
The project resource schedule template is designed in Excel and can also be used in Google Sheets. At the left you have a list of resources with two summary columns for Scheduled Days and Available Days. Across the top runs a line of dates that forms a simple calendar. The main grid in the middle is where you mark work, leave, and other commitments using short codes such as “Dev,” “Plan,” “Design,” “Review,” or “X” for unavailable. A small box on the right records the project name and start date, which keeps the schedule tied to a specific piece of work.
How To Use This Project Resource Schedule Template
The worksheet is organised into three parts. The header stores basic project information, the resource list keeps names and summary counts, and the calendar grid records daily assignments. As you fill in the grid, the numbers in Scheduled Days and Available Days update automatically, so you can see at a glance who is close to full capacity and who still has room for additional tasks.
Set Up Project Dates
Begin with the date row at the top of the calendar. Enter the first day you want to track, then extend the dates across the columns until you cover the period you plan to schedule. Most teams find it easier to start with two to four weeks. If your project is longer, extend the date row before you add any bookings so the grid stays continuous.
In the small panel on the right, type the project name and confirm the start date. This information is helpful when you have several resource schedules in circulation and want to keep each one tied to a specific project.
Add Team Members
In the Resource column, list the people or roles you want to schedule. You might use individual names for a small team or role titles such as “Designer,” “Analyst,” or “Installer” for a larger group.
Once the names are in place, you will see Scheduled Days and Available Days listed beside each person. At this stage they simply show the number of working days in the visible period. As you add bookings, these numbers shift so you can quickly compare workloads across the team.
Plan Work and Time Off
Use the main grid to enter short codes on the dates when someone is booked. For example, you might type “Dev” on development days, “Plan” during planning sessions, or “Review” when a person is scheduled to review deliverables. When a person is unavailable, use a consistent marker such as “X” instead of leaving the cell blank.
Keeping codes consistent makes the schedule much easier to read. If several team members share the same pattern of work, you can copy and paste their codes across the row to save time, then make small adjustments where needed. If you extend the date range later, remember to continue the same pattern of codes so the visual rhythm of the calendar stays familiar.
Review Capacity and Adjust
After the first pass of bookings, look down the Scheduled Days and Available Days columns. A row with many Scheduled Days and very few Available Days signals a heavy workload, while a row with few Scheduled Days suggests capacity that has not yet been used. This quick comparison is often enough to start a conversation about moving tasks, shifting deadlines, or pairing team members on key activities.
You can also scan each column as a single day view. If you notice that several people are marked as unavailable on the same date, or that critical roles are booked on overlapping work, adjust the entries in the grid so the team has realistic coverage.
Save a new copy of the schedule whenever you make significant changes. Over time you get a simple history of how assignments shifted and which weeks were most compressed.
FAQs
A project resource schedule is a calendar that shows who is working on which tasks on specific days. It gives a day by day view of bookings, days off, and remaining capacity for each person.
This template suits project managers, team leads, and coordinators who need to keep track of daily assignments for a small or medium team, whether they are on one project or several parallel initiatives.
Yes. You can adapt this project resource schedule template to work on a weekly basis instead of tracking individual days. To do this, change the date row at the top so that each column represents the start of a week, for example the Monday of each week, rather than every single calendar day. Once that change is made, treat each cell as a weekly booking indicator instead of a single day. When a person is booked at any point during that week, enter the same short codes you are already using, such as “Dev,” “Plan,” or “Review,” or use “X” when they are unavailable for the entire week. If someone is working on more than one type of activity in a week, you can combine codes in one cell, such as “Dev/Review,” since the goal becomes showing overall focus in that period instead of exact dates.
When you switch to a weekly view, the summary columns naturally shift in meaning as well. Scheduled Days can now be read as the number of weeks where a resource has at least one booking, while Available Days becomes the count of weeks with no booking codes in the visible range. The overall layout of the template remains the same, but you are thinking in terms of weeks booked and weeks free rather than individual days. This version works better when you need a longer planning horizon and want to keep an eye on workload patterns without tracking the precise day a task takes place.