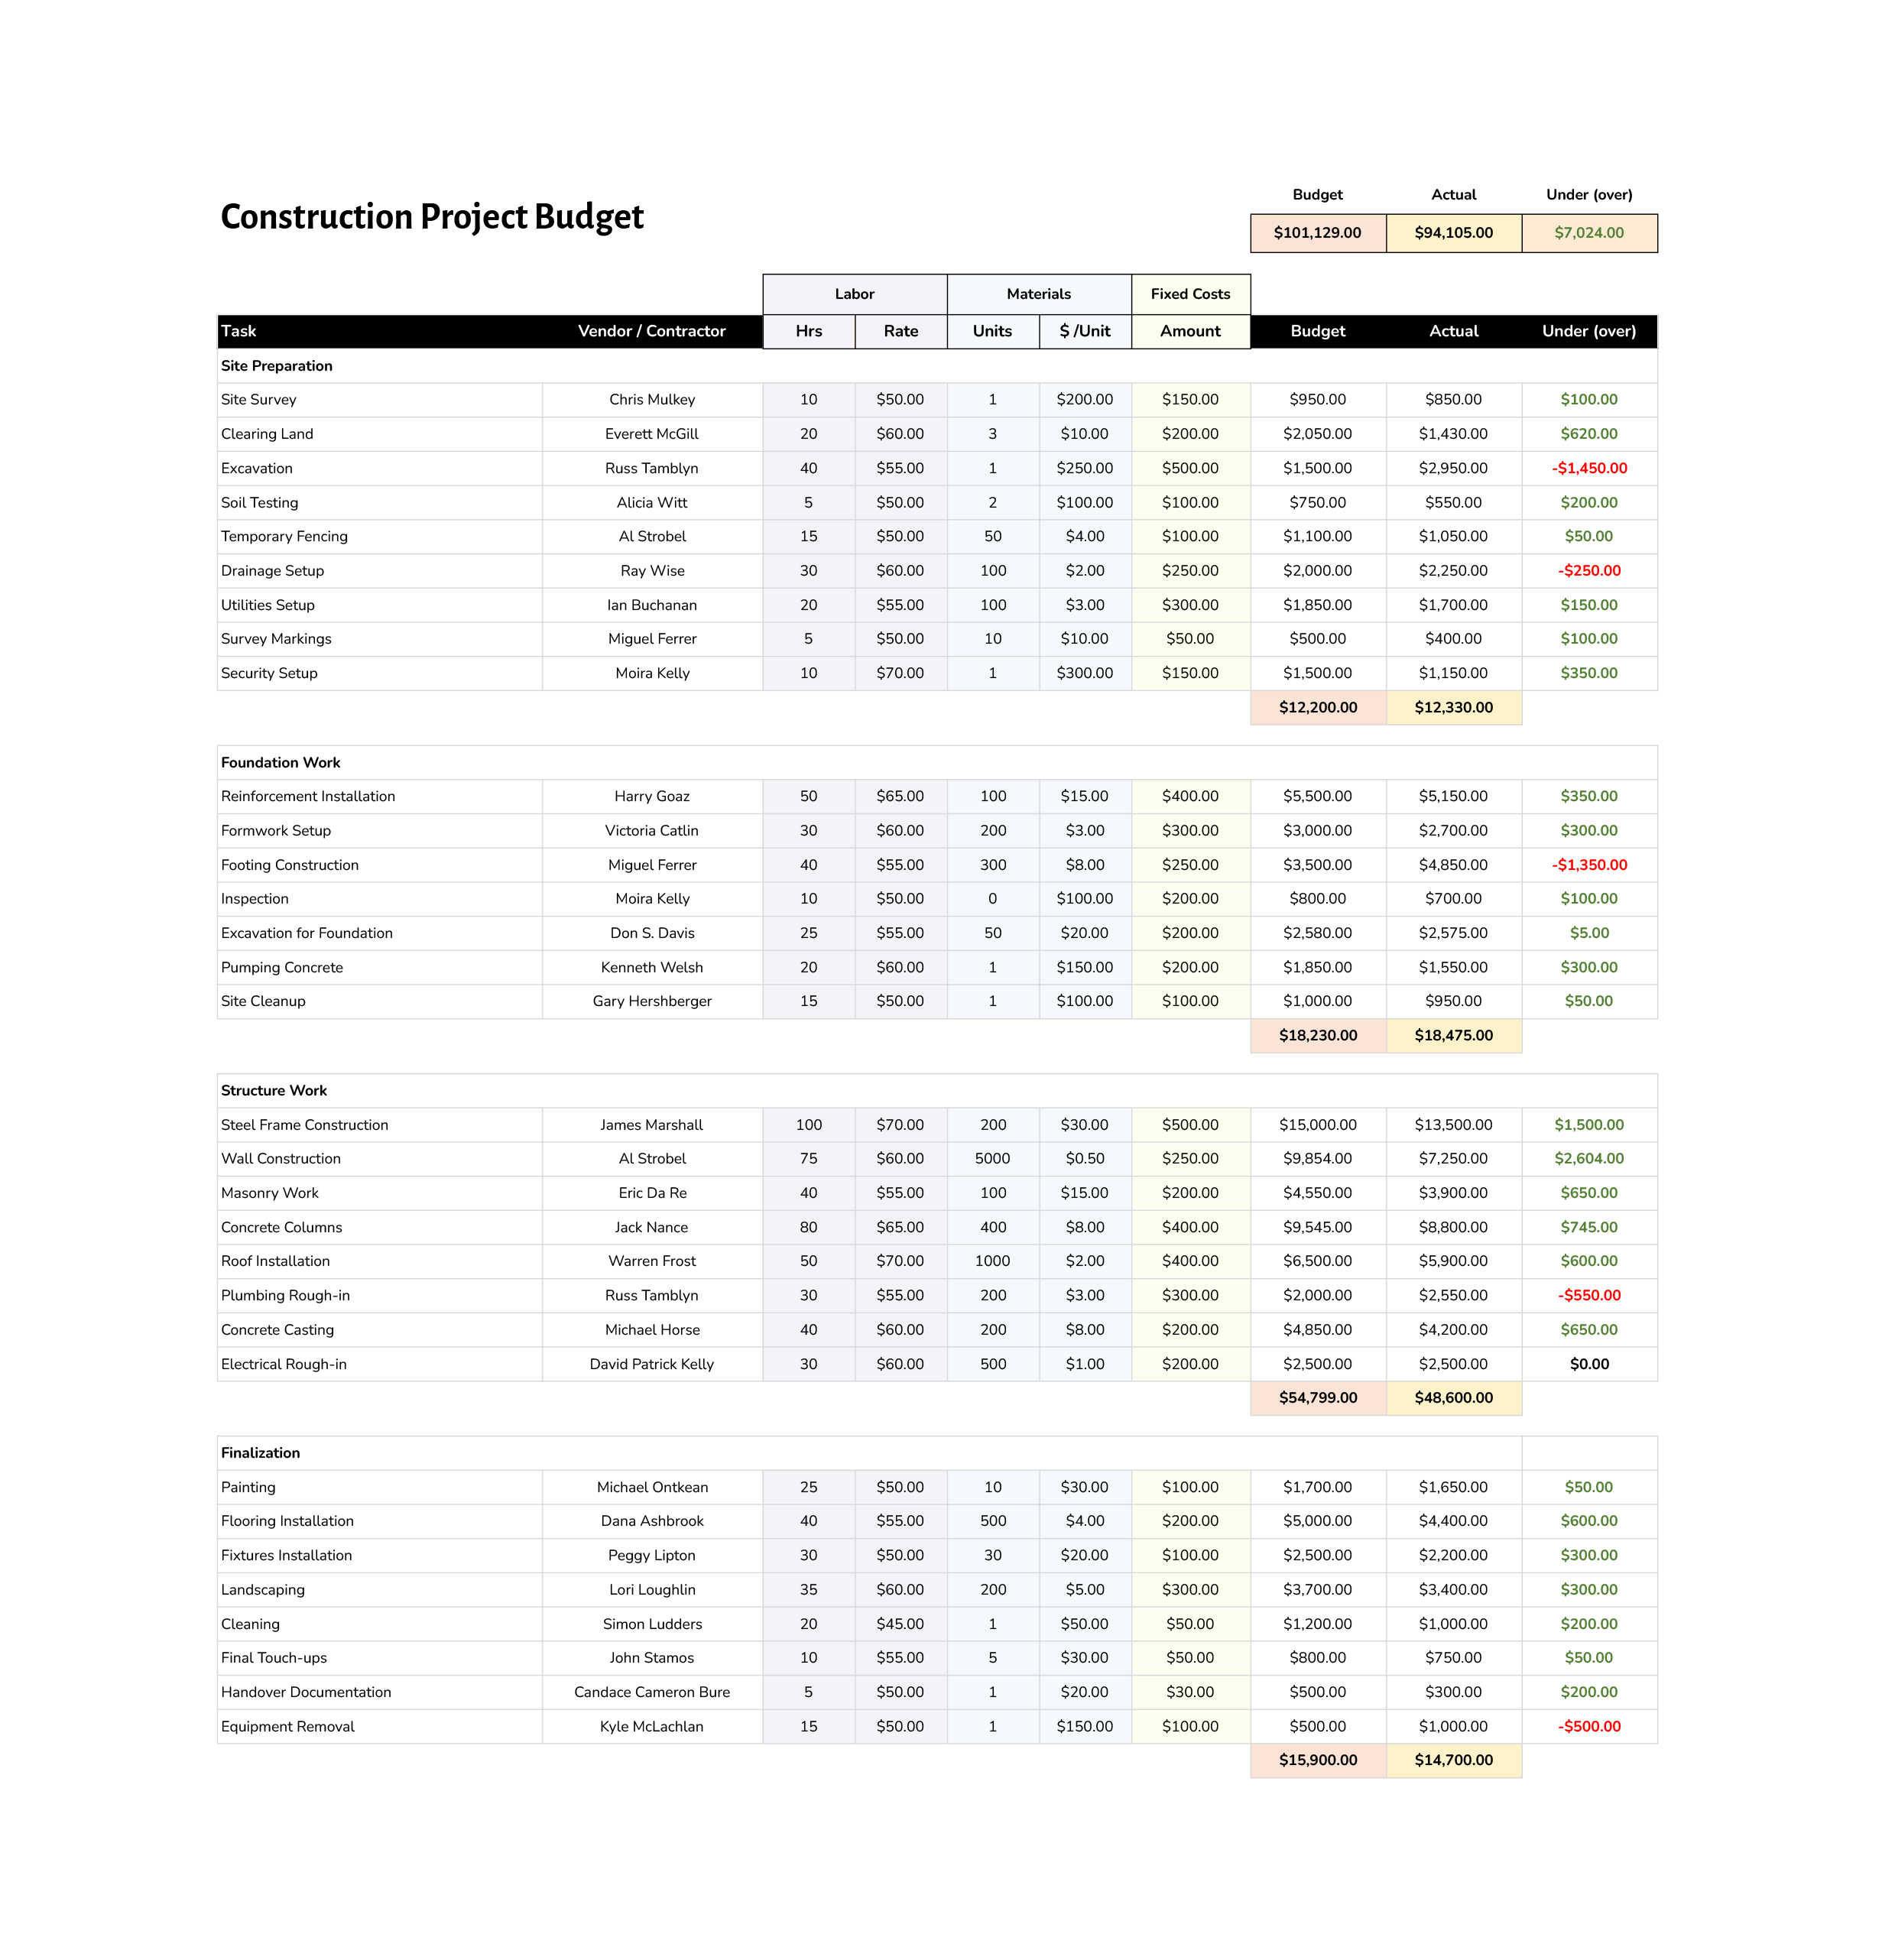



The construction project budget template is designed for projects where you need a detailed breakdown of costs by phase and a clear comparison between what you planned to spend and what the work actually costs. It is laid out in sections such as Site Preparation, Foundation Work, Structure Work, and Finalization, with each section listing the individual activities that fall under that stage of the build.
For every task, the template records the vendor or contractor, labor effort, material quantities, fixed costs, and three key money columns titled Budget, Actual, and Under (over). Subtotals at the end of each section roll up the figures for that part of the project, while a summary table in the top corner displays the overall budget, the total actual spend, and the amount you are currently under or over budget. The sample tasks and numbers are placeholders that you can overwrite with your own project information.
How to Use This Construction Project Budget Template
The sheet is arranged as a single master table. The left side focuses on what work is being done and who is responsible for it, while the middle columns capture cost assumptions and the right side tracks budget versus actual spend. As you update quantities and costs, the subtotals for each section and the grand totals at the top change automatically, so you always have an up to date view of the financial picture for your construction project.
Step 1: Set Up Main Phases and Tasks
Start by reviewing the phase headings such as Site Preparation, Foundation Work, Structure Work, and Finalization. If your project uses different stages, rename these section titles to match your scope, for example Demolition, Shell, Interiors, or Exterior Works. You can insert extra rows under a heading if you need more tasks or delete unused lines, as long as you keep the subtotal row at the end of each section.
Within each phase, update the Task column to reflect the activities for your build. Typical entries might include clearing land, excavation, formwork, masonry, utilities, roofing, interior finishes, and equipment removal. The aim is to list each significant piece of work that carries its own cost, so later you can see exactly where overruns originate.
Choose a level of detail that matches how you manage the project. Very small tasks make the budget precise but can be harder to maintain, while broader tasks keep the sheet shorter but group several cost items together.
Step 2: Assign Vendors and Contractors
Once your tasks are listed, move to the Vendor or Contractor column. Enter the name of the company or individual responsible for each line of work. This can include subcontractors, specialist trades, and the main contractor if they are billing a particular activity directly.
Having the vendor name next to each task creates a simple link between invoices and budget lines. When a bill comes in, you can find the matching task by vendor and description and record the actual amount against the correct row. If you expect to request several quotes before choosing a supplier, you can initially leave the vendor name blank or add “TBD” and fill it in once the contract is awarded.
Use consistent naming for vendors across the sheet, for example “ABC Concrete Ltd” instead of switching between abbreviations and full names. This makes it much easier to filter and review spending by contractor later.
Step 3: Enter Labor, Material, and Fixed Cost Estimates
The middle of the table is split into three cost types. Labor columns record the hours and hourly rate for the people working on the task. Material columns record the quantity of material required and the cost per unit. Fixed Costs capture any lump sum amounts that do not depend on time or volume, such as permit fees, equipment rental, or a one off mobilization charge.
Work through the list task by task and enter your best estimate for each category. For labor, multiply the number of hours you expect the crew to work by the agreed rate per hour. For materials, note how many units you expect to buy and the unit price. In many cases only one or two of these cost types will apply to a given task, so it is normal to leave some cells blank where no labor or material is needed. The Budget column reflects the total expected cost per line based on the values you enter.
Step 4: Record Actual Costs During Construction
As the project moves forward, begin filling in the Actual column for each task. When an invoice arrives for excavation, concrete, steel, or any other line item, locate the matching task and type the billed amount into the Actual cell. You can update these figures weekly or at each draw request, depending on how often you reconcile costs.
The Under (over) column shows the difference between the Budget and Actual amounts for each line. A positive number indicates that the task is currently under budget, while a negative number (often formatted in red) indicates overspend. This simple comparison highlights where the project is drifting away from the original plan and where savings are balancing out other overruns.
Step 5: Review Section Totals and Overall Budget Position
At the end of each phase block, you will see a subtotal row. These lines add up the Budget, Actual, and Under (over) values within that section, so you can see at a glance how much site preparation, foundation work, structural work, or finalization is expected to cost and how that compares to current spending. Reviewing these subtotals regularly supports discussions about where to focus cost control efforts.
In the upper corner of the sheet, the summary box shows the grand total Budget, grand total Actual, and the overall Under (over) figure across the entire project. This area works well in progress meetings and client updates because it provides a single set of headline numbers while the detailed table explains exactly what sits behind them.
Save a dated copy of the budget at key milestones such as contract award, ground break, topping out, and substantial completion. Later, you can compare versions line by line to see exactly which phases added cost, which trades came in under expectations, and how change orders affected the final total. These snapshots also support conversations with clients and stakeholders because you can show how the numbers evolved instead of relying on memory.
FAQs
This template suits general contractors, project managers, quantity surveyors, and owners who want a clear breakdown of their construction budget without adopting a full costing system. It works for residential builds, commercial projects, and renovation jobs where you need visibility by phase and task.
Yes. You can keep all four sections and simply reduce the number of tasks, or rename phases to match your work such as Demolition, Interior Work, Fixtures, and Clean up. The same layout works whether the budget is modest or large, because the summary rows always show the totals for whatever tasks you include.
For change orders, add new lines under the relevant phase with clear descriptions such as “Change order 3 – extra lighting” and record both the additional budget and the actual cost as the work is completed. Keeping change orders on their own lines rather than folding them into existing tasks makes it easier to see how much of the final cost came from the original scope versus later changes.